| Brian's Guitar from Conception to Birth or How to Build a Guitar in 62 Easy Steps! |
| Appendix C - Design Diagrams |
|
You simply can’t go out, buy some wood, and start glueing it all
together. You have to have a detailed plan. This includes accurate
drawings of the front of the guitar as well as a section through the
center of it. I enjoy doodling my ideas on scraps of paper as
thoughts come to me. As I refine those ideas, I’ll input them into
my AutoCAD program to work out the details and exact measurements.
It’s a good exercise in using both halves of your brain; sketch and
refine. On the following pages are numerous design exercises which I went through on this build. Many times I went through many versions of a particular component only to come back to my first idea. That’s ok; it just reaffirmed my initial choice and let me know that I’ve explored all of my options. These diagrams have been reduced in size to fit in this book. Also, AutoCAD does not talk to my word processor very well. Thus, some diagrams will be a little difficult to read. This is mostly to show you that you need to do a lot of sketching and ciphering to get your design to work. There’s a lot that goes on behind the scenes which no one will ever really see. All of your drawings should be done in minute detail and to full scale. |
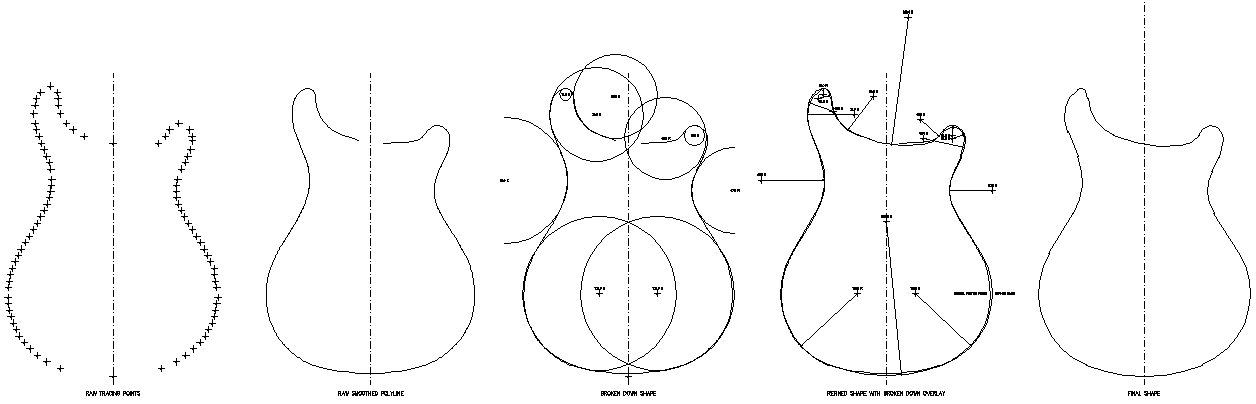 |
Even though we traced a Paul Reed Smith body, we still needed to
plot out the points so it could be input into AutoCAD accurately
(sketch 1 above). After connecting all the dots (sketch 2), I found
that the pen I traced the guitar with probably wandered around a
bit. I refined the layout by breaking down the design into it’s
individual arcs and lines (sketch 3). I then polished up the
geometry, got the body perfectly symmetrical, and tweaked a few arcs
(sketch 4). Ultimately, this led to the ultimate body shape which we
could work with (sketch 5).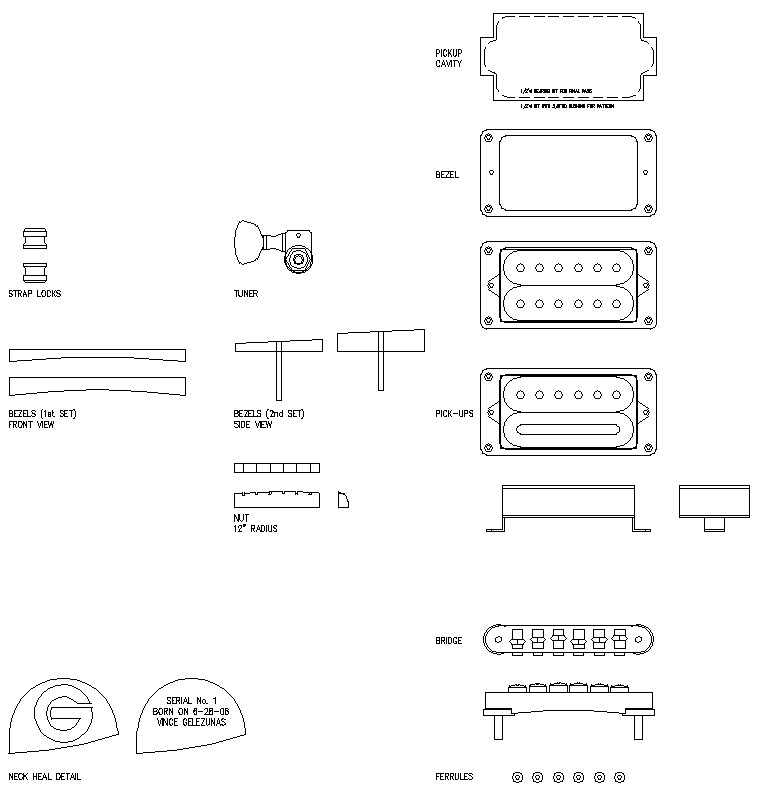 You
need to have all of your hardware in hand before you can complete
your design. Obviously, you want to make sure everything will fit.
After receiving the hardware, I got out my calipers and transfered
all of the dimensions into AutoCAD. With all of these individual
parts in the computer, I began to arrange them on the guitar body I
drew up previously. Preparation and accuracy are paramount when
dealing with the fine level of detail involved in guitar building.
Take your time and get it right the first time. Fixing a screw up
later on down the line is at best difficult, and it can be
impossible. These sketches depict both top and side views of many of
the pieces of hardware. You
need to have all of your hardware in hand before you can complete
your design. Obviously, you want to make sure everything will fit.
After receiving the hardware, I got out my calipers and transfered
all of the dimensions into AutoCAD. With all of these individual
parts in the computer, I began to arrange them on the guitar body I
drew up previously. Preparation and accuracy are paramount when
dealing with the fine level of detail involved in guitar building.
Take your time and get it right the first time. Fixing a screw up
later on down the line is at best difficult, and it can be
impossible. These sketches depict both top and side views of many of
the pieces of hardware. |
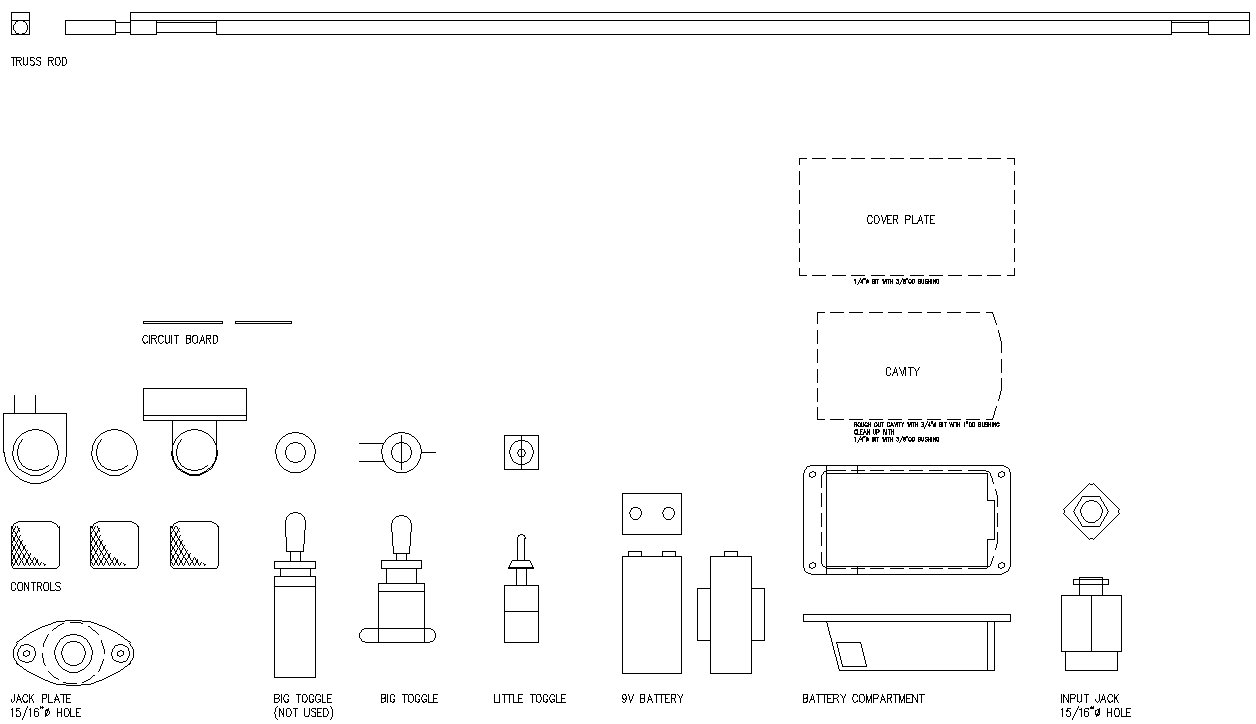 You
might think that the knobs and switches are trivial, that is until
they won’t fit into your control cavity. This exercise informed me
that the 3-way switch was too tall and would end up poking Brian in
the pecker while he was playing. That may have lent some added
inspiration to Brian’s improvisations; however, it wouldn’t have
looked very good (neither his pecker nor the guitar). I also had a large battery compartment which
needed to be accommodated within the body of the guitar. These
diagrams helped layout the routing templates used to cut the cavity
and wiring channels. It’s important to document and verify
everything before you start cutting any wood. You
might think that the knobs and switches are trivial, that is until
they won’t fit into your control cavity. This exercise informed me
that the 3-way switch was too tall and would end up poking Brian in
the pecker while he was playing. That may have lent some added
inspiration to Brian’s improvisations; however, it wouldn’t have
looked very good (neither his pecker nor the guitar). I also had a large battery compartment which
needed to be accommodated within the body of the guitar. These
diagrams helped layout the routing templates used to cut the cavity
and wiring channels. It’s important to document and verify
everything before you start cutting any wood. |
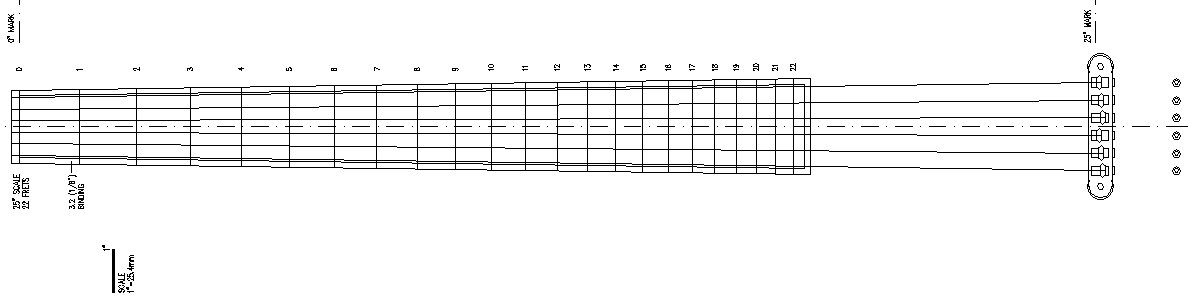 |
The dimensions of the nut and bridge are required to properly layout
the neck. They define the width at each end of the scale. The
desired scale length defines the distance between the nut and the
bridge. Combining all of this data will dictate the taper of the
fretboard. Use a fret spacing chart (which can be found on the
internet) to help layout your fret locations.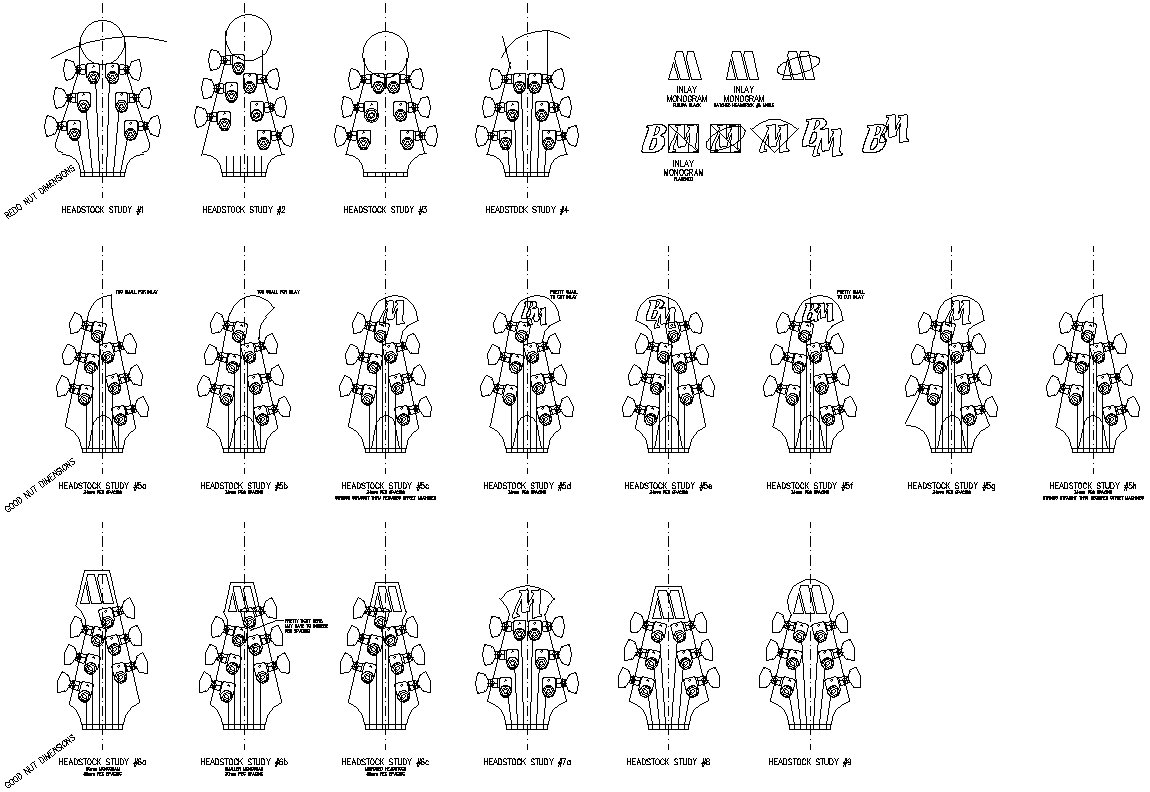 The
headstock is the signature area on many guitars. You can tell
whether a guitar is a Stratocaster or a Les Paul simply by looking
at the headstock. It also lends a convenient spot to sign your own
artistry via an inlay. We went through many different design schemes
on the headstock and ended up with one of a very simple design. The
headstock is the signature area on many guitars. You can tell
whether a guitar is a Stratocaster or a Les Paul simply by looking
at the headstock. It also lends a convenient spot to sign your own
artistry via an inlay. We went through many different design schemes
on the headstock and ended up with one of a very simple design. |
 |
|
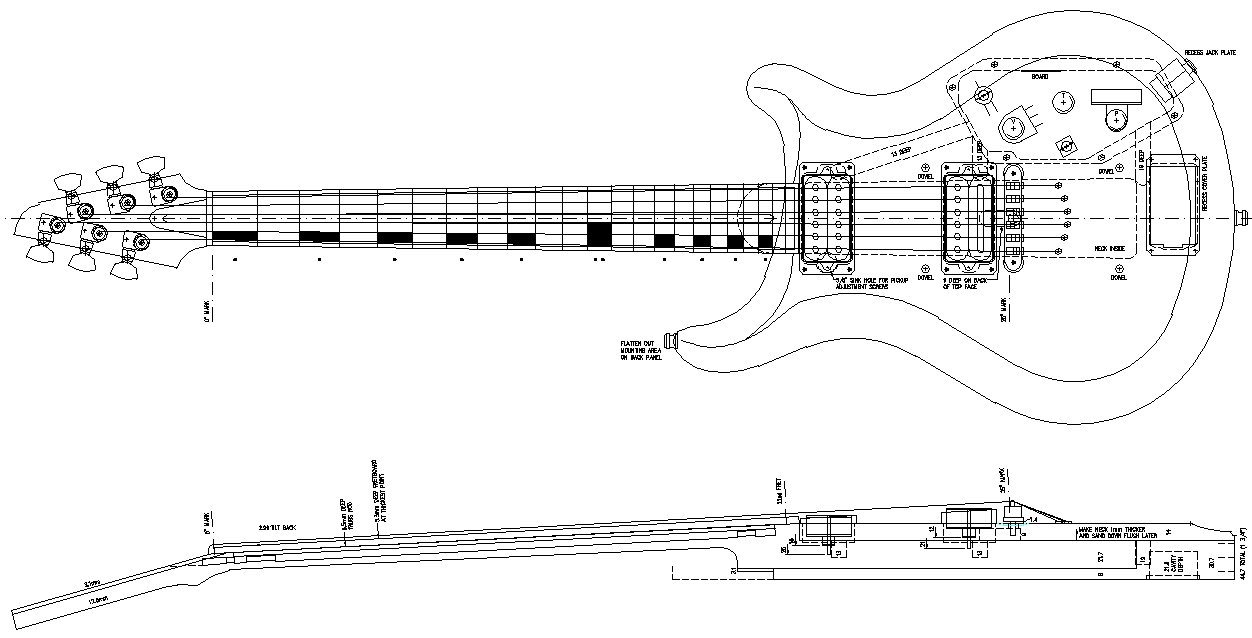
Once you have all the bits a pieces documented and input into the
computer, I started laying out everything on the guitar and putting
the big picture together. A plan and section of the guitar was drawn
accurately to scale. These drawings were printed out and directly
used to make all of the templates. Wiring channels were laid out
making sure they didn’t interfere with the bridge mounting posts or
dowel locations. Knobs and switches were located and the control
cavity was designed to accommodate them while avoiding cutting into
the neck pocket. The height of the bridge will define the amount the neck will tilt back from the body of the guitar. This is evident in the section through the guitar. Make as many notes to yourself on these drawings as needed; these are your blueprints and patterns. This is the time you really get your guitar figured out in minute detail. Don’t leave anything left to figure out later as by then it might be too late. |
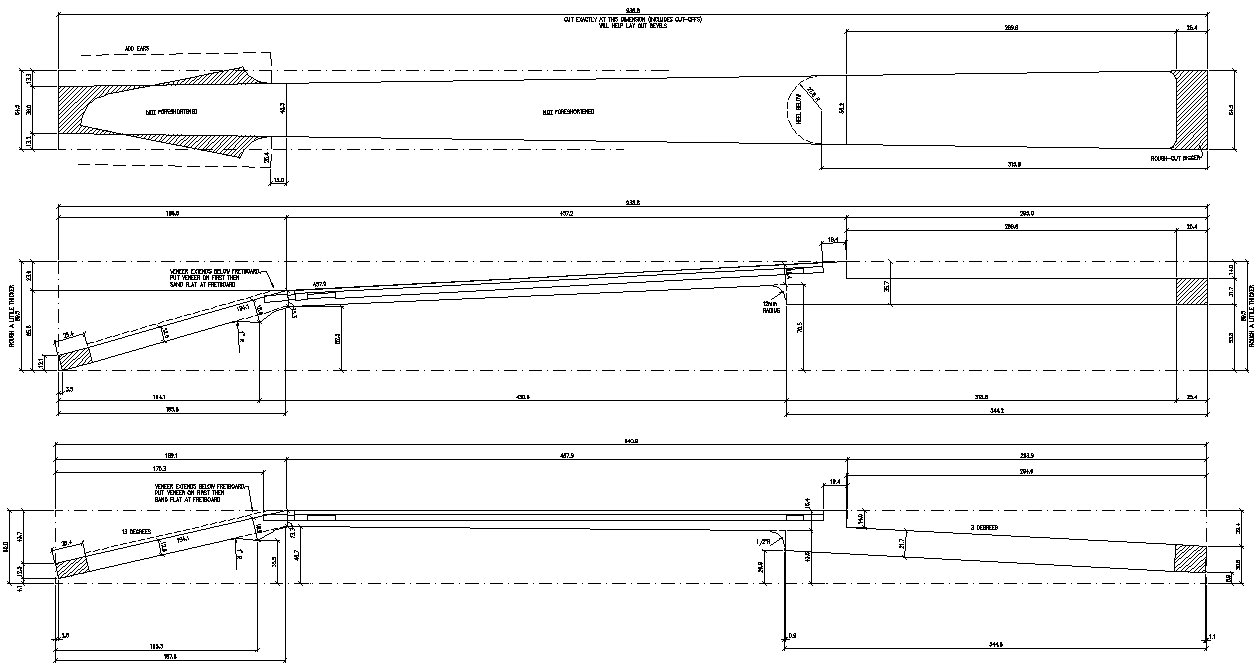 |
| The single most important layout you’ll need to devise is for the neck. If you get the neck wrong, it might render your new guitar useless. Since our neck was set into the body, we had a few more angles and cuts to make. The top sketch is a top view of the neck. The bottom two sketches are sections of the same neck, but showing how it could be cut from the block of wood in two different fashions. I chose to go with the bottommost layout since I could keep the fretboard surface (the most critical surface) untouched and dead flat. This layout is fully dimensioned since I would not be using a template to cut out the neck. I had to transfer all of the dimensions to the block of wood with a pencil, ruler, and square. This opens up an area for inaccuracies or transcribing errors, so double-check everything ... and then check it again. |
|
AutoCAD Drawing File You can download my AutoCAD drawing file which includes my designs, layouts, and templates HERE. Read the warnings and use the file at your own risk. |


