|
Brian's Guitar from Conception to Birth
or How to Build a Guitar in 62 Easy Steps! |
|
21
Add Some Inlays |
  Inlays
on a guitar add that little extra touch letting everyone know that
you know what you’re doing. But I’ve never done an inlay before in
my life, so I really don’t know what I’m doing. We picked out a
simple and sleek design (plagiarized from a McNaught Guitar) that
let us add some inlay, but wasn’t some crazy “tree of life”
complexity that had a thousand intertwining pieces. Transfer the
design to the fretboard and score the edges. Typically you would cut
the pieces first and score around your pieces. Since everything in
our pattern is square with straight lines, I scored first and fit
the pieces to it later. Inlays
on a guitar add that little extra touch letting everyone know that
you know what you’re doing. But I’ve never done an inlay before in
my life, so I really don’t know what I’m doing. We picked out a
simple and sleek design (plagiarized from a McNaught Guitar) that
let us add some inlay, but wasn’t some crazy “tree of life”
complexity that had a thousand intertwining pieces. Transfer the
design to the fretboard and score the edges. Typically you would cut
the pieces first and score around your pieces. Since everything in
our pattern is square with straight lines, I scored first and fit
the pieces to it later.
|
 |
 |
 |
If you can’t see your scored lines very well, you can fill them in
with some chalk. I picked up the nifty Dremel router base from
StewMac along with a few very small router bits which helped out
tremendously. Set the depth on your router to leave the inlay
exactly flush with the surface. Plunge your router into the field by
wiggling it slightly as you penetrate the wood. Take small passes
until you’re very close to your scored lines. Since my lines were
straight, I registered a chisel into the score and lightly tapped
the last bit out. If you’re design has flowing lines, you’ll have to
complete the cavity with your router or some very small chisels.
Clean up the bottom and corners of the cavity with a small chisel.
Repeat the process until your whole neck is completed.
  Mark
dimensions onto your inlay material, in our case it was Abalam (an
abalone-laminate product). I made up a cutting jig which fully
supported the inlay material. It even had a small fish tank pump and
hose to gently blow the dust away as I cut. Make your cuts very
close to the line, but still with a little room to clean up the
edges. I used a jeweler’s saw with a #2 blade in it. Mark
dimensions onto your inlay material, in our case it was Abalam (an
abalone-laminate product). I made up a cutting jig which fully
supported the inlay material. It even had a small fish tank pump and
hose to gently blow the dust away as I cut. Make your cuts very
close to the line, but still with a little room to clean up the
edges. I used a jeweler’s saw with a #2 blade in it.
|
  You
can grind up to your line more aggressively with a Dremel tool
equipped with an abrasive disk clamped to your workbench. For fine
tuning, clamp a sanding block into your vise with some 150 grit.
Sand a little then test your fit. You want the piece to just squeeze
into the hole. If a piece doesn’t fit right, cut another one; it
doesn’t take that long. You
can grind up to your line more aggressively with a Dremel tool
equipped with an abrasive disk clamped to your workbench. For fine
tuning, clamp a sanding block into your vise with some 150 grit.
Sand a little then test your fit. You want the piece to just squeeze
into the hole. If a piece doesn’t fit right, cut another one; it
doesn’t take that long.
|
  Cut
and fit all of your pieces first, then glue them in. Cyanoacrylate
glue (also called “CA glue” or “super glue”) works great. But, dude,
fork up the $5 for the debonder while you’re at the store looking at
it. Your hands will be close to the work, and you don’t want to
stick you fingers together on a Saturday night and have to wait
until Monday to get back to the store. Put a drop or two of glue
into the bottom of the cavity and spread it around with a toothpick.
Don’t use too much glue; a thin layer will do. You don’t want the
glue oozing out all over the place. Press the piece into the cavity.
If you cut your pieces right, the side tension will hold the piece
in place until the glue dries. If you have a loose piece or two, use
some spring clamps to hold them down. Let the glue dry for at least
an hour, preferably two. Cut
and fit all of your pieces first, then glue them in. Cyanoacrylate
glue (also called “CA glue” or “super glue”) works great. But, dude,
fork up the $5 for the debonder while you’re at the store looking at
it. Your hands will be close to the work, and you don’t want to
stick you fingers together on a Saturday night and have to wait
until Monday to get back to the store. Put a drop or two of glue
into the bottom of the cavity and spread it around with a toothpick.
Don’t use too much glue; a thin layer will do. You don’t want the
glue oozing out all over the place. Press the piece into the cavity.
If you cut your pieces right, the side tension will hold the piece
in place until the glue dries. If you have a loose piece or two, use
some spring clamps to hold them down. Let the glue dry for at least
an hour, preferably two. |

 Inlays
on a guitar add that little extra touch letting everyone know that
you know what you’re doing. But I’ve never done an inlay before in
my life, so I really don’t know what I’m doing. We picked out a
simple and sleek design (plagiarized from a McNaught Guitar) that
let us add some inlay, but wasn’t some crazy “tree of life”
complexity that had a thousand intertwining pieces. Transfer the
design to the fretboard and score the edges. Typically you would cut
the pieces first and score around your pieces. Since everything in
our pattern is square with straight lines, I scored first and fit
the pieces to it later.
Inlays
on a guitar add that little extra touch letting everyone know that
you know what you’re doing. But I’ve never done an inlay before in
my life, so I really don’t know what I’m doing. We picked out a
simple and sleek design (plagiarized from a McNaught Guitar) that
let us add some inlay, but wasn’t some crazy “tree of life”
complexity that had a thousand intertwining pieces. Transfer the
design to the fretboard and score the edges. Typically you would cut
the pieces first and score around your pieces. Since everything in
our pattern is square with straight lines, I scored first and fit
the pieces to it later.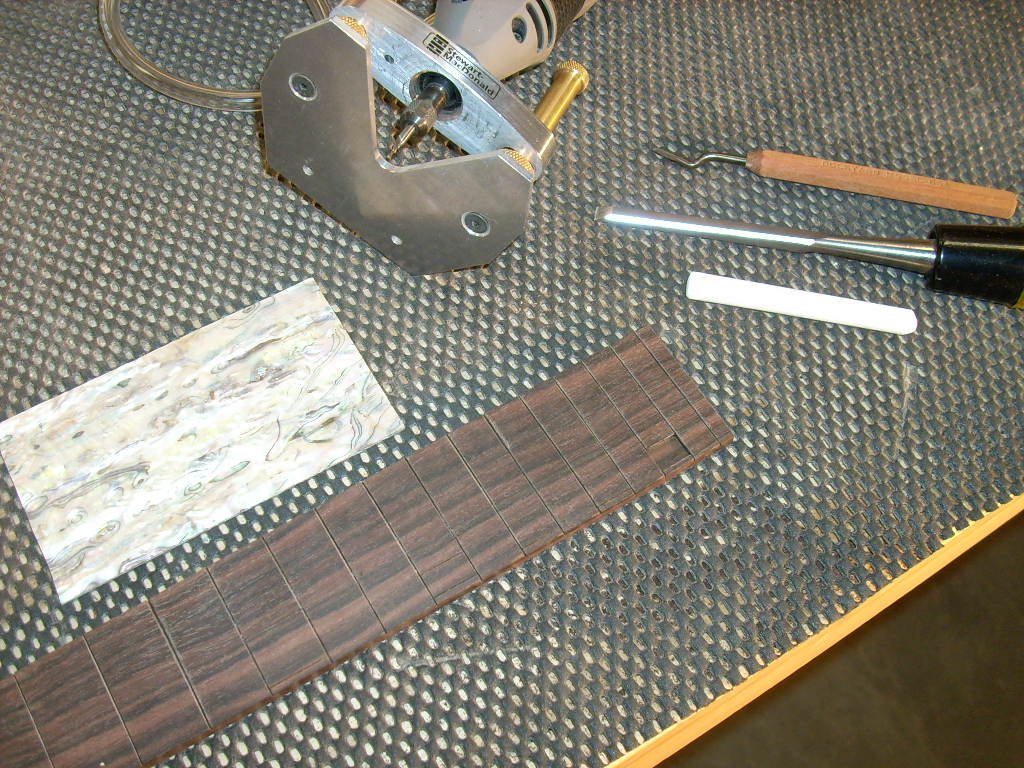


 Mark
dimensions onto your inlay material, in our case it was Abalam (an
abalone-laminate product). I made up a cutting jig which fully
supported the inlay material. It even had a small fish tank pump and
hose to gently blow the dust away as I cut. Make your cuts very
close to the line, but still with a little room to clean up the
edges. I used a jeweler’s saw with a #2 blade in it.
Mark
dimensions onto your inlay material, in our case it was Abalam (an
abalone-laminate product). I made up a cutting jig which fully
supported the inlay material. It even had a small fish tank pump and
hose to gently blow the dust away as I cut. Make your cuts very
close to the line, but still with a little room to clean up the
edges. I used a jeweler’s saw with a #2 blade in it.
 You
can grind up to your line more aggressively with a Dremel tool
equipped with an abrasive disk clamped to your workbench. For fine
tuning, clamp a sanding block into your vise with some 150 grit.
Sand a little then test your fit. You want the piece to just squeeze
into the hole. If a piece doesn’t fit right, cut another one; it
doesn’t take that long.
You
can grind up to your line more aggressively with a Dremel tool
equipped with an abrasive disk clamped to your workbench. For fine
tuning, clamp a sanding block into your vise with some 150 grit.
Sand a little then test your fit. You want the piece to just squeeze
into the hole. If a piece doesn’t fit right, cut another one; it
doesn’t take that long.
 Cut
and fit all of your pieces first, then glue them in. Cyanoacrylate
glue (also called “CA glue” or “super glue”) works great. But, dude,
fork up the $5 for the debonder while you’re at the store looking at
it. Your hands will be close to the work, and you don’t want to
stick you fingers together on a Saturday night and have to wait
until Monday to get back to the store. Put a drop or two of glue
into the bottom of the cavity and spread it around with a toothpick.
Don’t use too much glue; a thin layer will do. You don’t want the
glue oozing out all over the place. Press the piece into the cavity.
If you cut your pieces right, the side tension will hold the piece
in place until the glue dries. If you have a loose piece or two, use
some spring clamps to hold them down. Let the glue dry for at least
an hour, preferably two.
Cut
and fit all of your pieces first, then glue them in. Cyanoacrylate
glue (also called “CA glue” or “super glue”) works great. But, dude,
fork up the $5 for the debonder while you’re at the store looking at
it. Your hands will be close to the work, and you don’t want to
stick you fingers together on a Saturday night and have to wait
until Monday to get back to the store. Put a drop or two of glue
into the bottom of the cavity and spread it around with a toothpick.
Don’t use too much glue; a thin layer will do. You don’t want the
glue oozing out all over the place. Press the piece into the cavity.
If you cut your pieces right, the side tension will hold the piece
in place until the glue dries. If you have a loose piece or two, use
some spring clamps to hold them down. Let the glue dry for at least
an hour, preferably two.


