
| December 16, 2015 |
   Herbie's
Getting a New DOUBLE Guitar Stand! Herbie's
Getting a New DOUBLE Guitar Stand!Herbie was the proud recipient of my very first sculptural, organic guitar stand way back in 2010. I had just bought a new bandsaw which allowed me to cut free-flowing shapes, and I needed a project to hone my skills on the new tool. Since then, Herbie has added a couple new PRS Private Stock guitars to his arsenal. If you don't know, the Private Stocks are the high end, custom, fully loaded guitars made from only the best woods they come across. Each one is personally signed by Paul Reed Smith himself. Here's a photo of Paul congratulating Herbie on his most recent purchase. Now that Herbie has toned down his guitar hoarding addiction a bit (probably with a little prodding from the wife), he's down to his two favorites (guitars, not wives). So that brings us to the present when I received an email asking if I could provide a proper throne for the pair. You bet! |
| December 23, 2015 |
  Amongst
the many design ideas Herbie presented, he had one additional
special request, that this be a collaborative design and
construction effort with Mark Gettemeyer and myself. To bring
you up to date, Mark owns a Sphere Custom Guitar, we're both
Facebook friends with Herbie, and we both live in St. Louis.
Herbie enjoyed living vicariously (and maybe with a touch of
jealousy) as he watched Mark's guitar being built some 4,400 miles
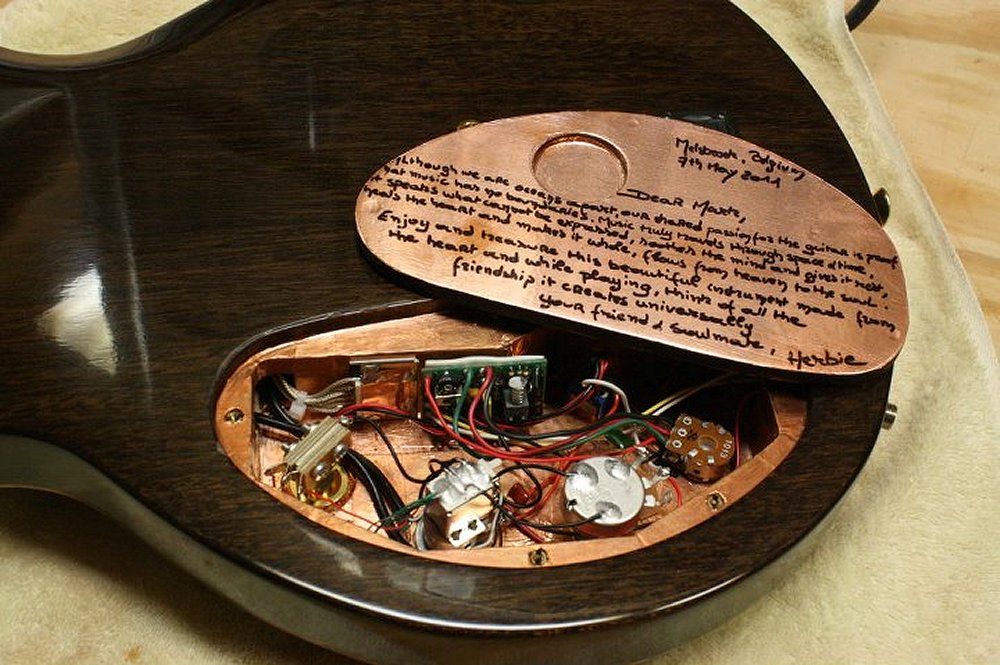
away. Herbie actually signed the guitar, a touching message on
the back of the control cavity cover. Mark seems to like it,
but I found that while playing, it would rest a bit to close to my
crotch, and the transitive properties of that equation made me feel
a little uncomfortable. Amongst
the many design ideas Herbie presented, he had one additional
special request, that this be a collaborative design and
construction effort with Mark Gettemeyer and myself. To bring
you up to date, Mark owns a Sphere Custom Guitar, we're both
Facebook friends with Herbie, and we both live in St. Louis.
Herbie enjoyed living vicariously (and maybe with a touch of
jealousy) as he watched Mark's guitar being built some 4,400 miles
away. Herbie actually signed the guitar, a touching message on
the back of the control cavity cover. Mark seems to like it,
but I found that while playing, it would rest a bit to close to my
crotch, and the transitive properties of that equation made me feel
a little uncomfortable. |
  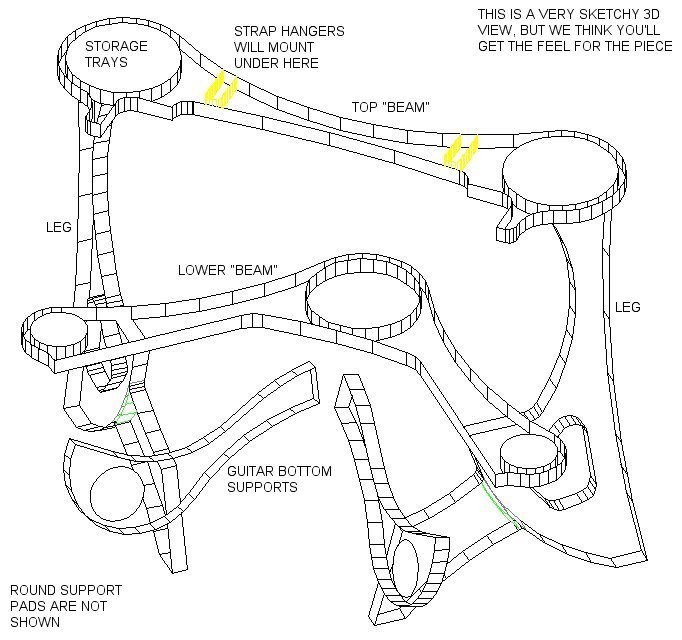 I've
done a lot of guitar stands, but they all held only one guitar.
A double guitar stand was a new concept for me, so I had to hit the
computer again to lay out the geometry. All the angles can get
pretty crazy. If the guitars don't fit, well, that's an
expensive mistake. I've
done a lot of guitar stands, but they all held only one guitar.
A double guitar stand was a new concept for me, so I had to hit the
computer again to lay out the geometry. All the angles can get
pretty crazy. If the guitars don't fit, well, that's an
expensive mistake.These are some of the sketches Mark and I sent over to Herbie. With all these photos, you can click on the thumbnails for the high-res pictures. The 3D is kinda a quick and dirty, but it shows how the whole piece assembled. There will be a top "beam" which will support the necks, a middle "boomerang" which will support the bodies, and two lower guitar supports. Somehow two vertical uprights will tie all this together. There will be plenty of storage trays, pick slots, strap hangers, and maybe a beer tap if I can work that in. |
| January 9, 2016 |
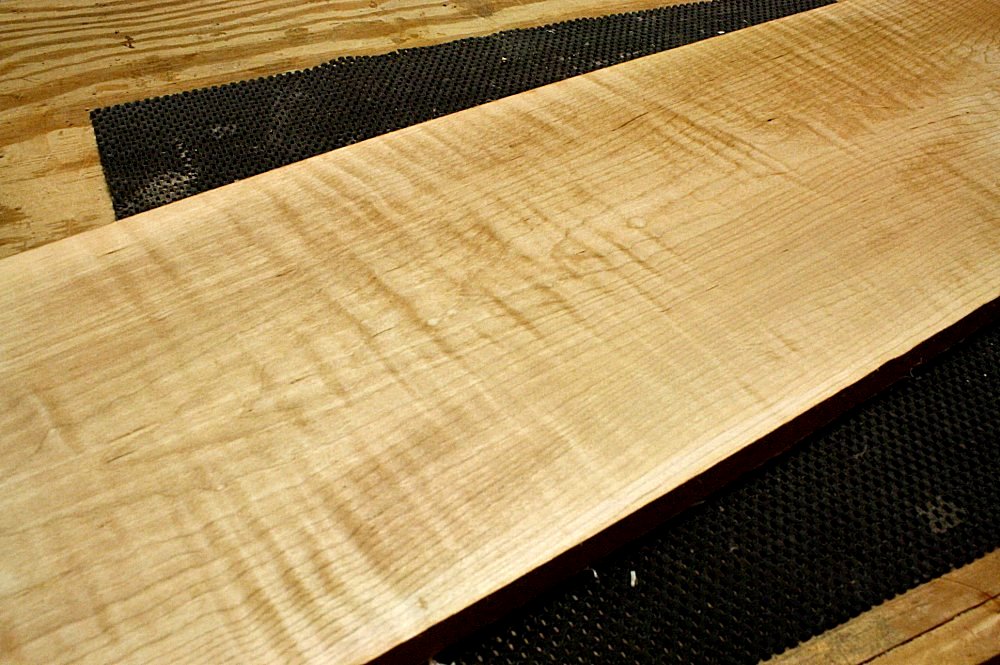
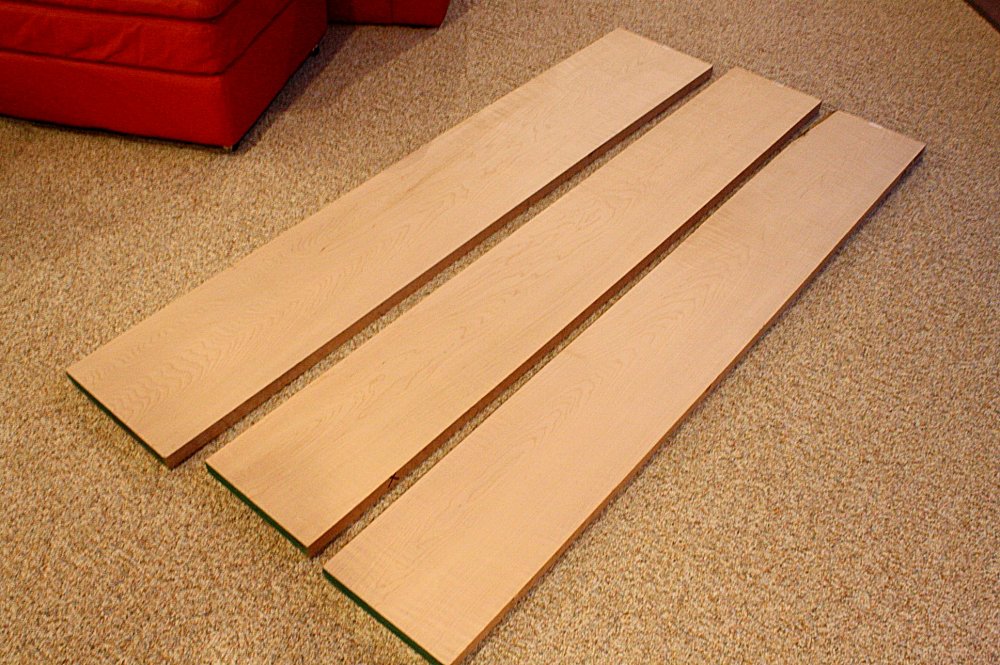 Herbie's
got wood! That joke never gets old. I always like
showing a "before" picture of the slabs of wood before we start
hacking them up. This is some quality curly maple, which is
the same species of wood Herbie's guitars are made from. They
have some pretty awesome grain, almost like tiger stripes, but it
only reveals itself when the wood is wet. I would show you
here, but I don't think my wife would appreciate me hosing down the
carpet. When the stain goes on, that grain will really pop.
Herbie is still contemplating a color scheme, but it will be a while
before he has to make that final decision. Herbie's
got wood! That joke never gets old. I always like
showing a "before" picture of the slabs of wood before we start
hacking them up. This is some quality curly maple, which is
the same species of wood Herbie's guitars are made from. They
have some pretty awesome grain, almost like tiger stripes, but it
only reveals itself when the wood is wet. I would show you
here, but I don't think my wife would appreciate me hosing down the
carpet. When the stain goes on, that grain will really pop.
Herbie is still contemplating a color scheme, but it will be a while
before he has to make that final decision. |
| January 18, 2016 |
 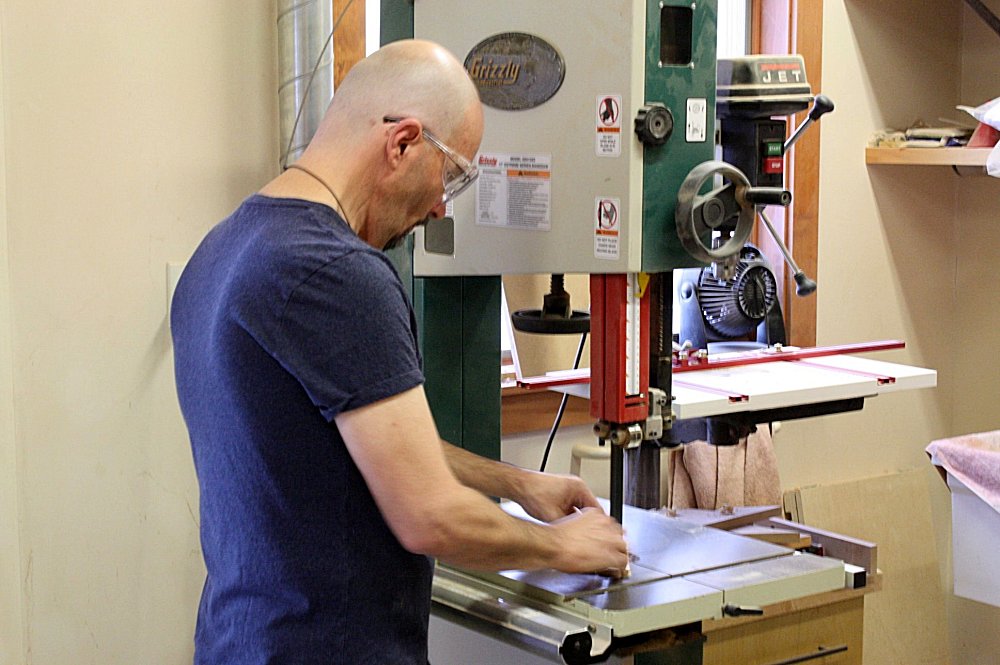 Time
to get to work. It's pretty nice having a strapping young
apprentice in the shop for a change. Mark is clocking some
time in on making the templates, which are made from 1/4" thick MDF.
It's easier to shape the thinner material with cutting and sanding
rather than trying to go straight at it on the 1" thick maple.
Once we're satisfied with the templates, routing the wood to the
same shapes will be much more efficient. I can also reuse the
templates when all the future orders come flooding in. Time
to get to work. It's pretty nice having a strapping young
apprentice in the shop for a change. Mark is clocking some
time in on making the templates, which are made from 1/4" thick MDF.
It's easier to shape the thinner material with cutting and sanding
rather than trying to go straight at it on the 1" thick maple.
Once we're satisfied with the templates, routing the wood to the
same shapes will be much more efficient. I can also reuse the
templates when all the future orders come flooding in. |
| January 21, 2016 |
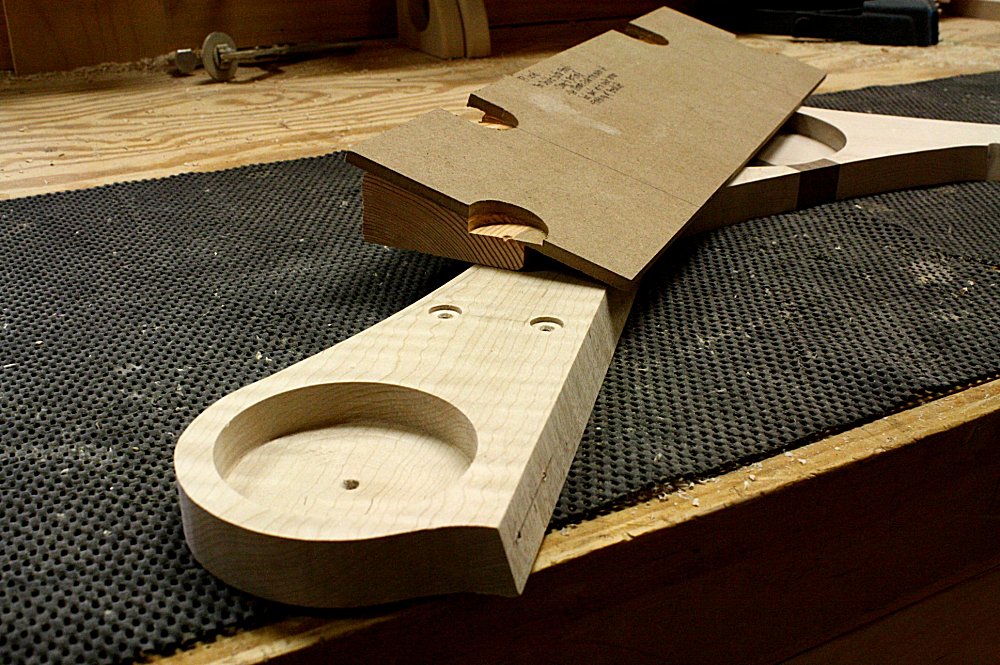
 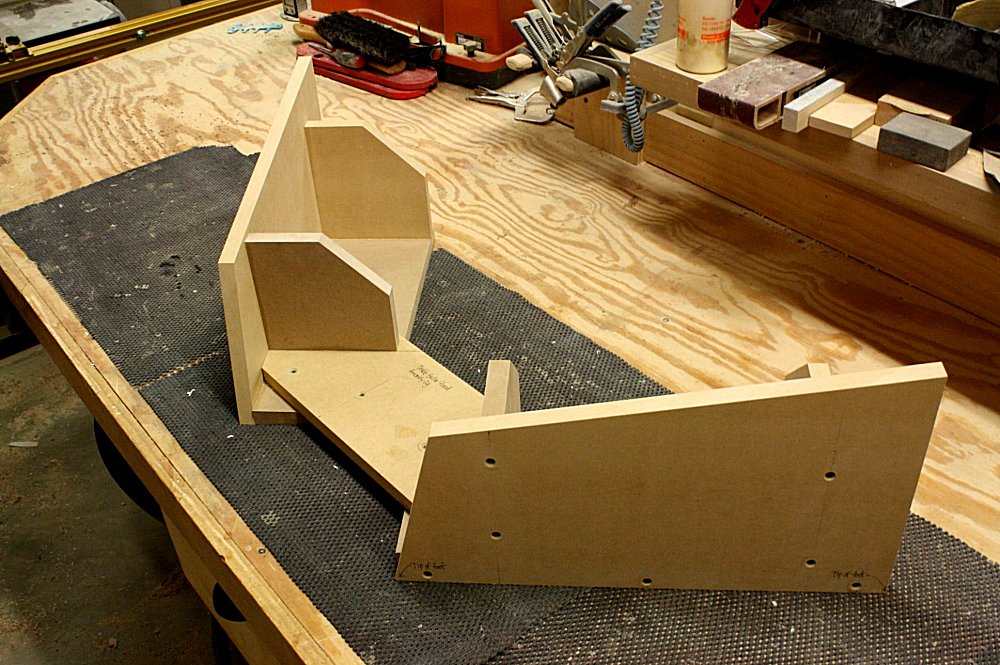 If
you look back (above) at the 3D representation, you can see that
there is a lot of stuff going on here. The legs have to be
aligned at precisely the right angle or everything above it won't
fit correctly. It would kinda suck to get everything assembled
and then the guitars didn't sit on there right. So we put
together an assembly jig to locate the legs exactly where they need
to go and to provide a clamping surface to hold them steady while we
attach the other parts. If
you look back (above) at the 3D representation, you can see that
there is a lot of stuff going on here. The legs have to be
aligned at precisely the right angle or everything above it won't
fit correctly. It would kinda suck to get everything assembled
and then the guitars didn't sit on there right. So we put
together an assembly jig to locate the legs exactly where they need
to go and to provide a clamping surface to hold them steady while we
attach the other parts.Herbie was excited about his wood, but the previously posted picture didn't show the grain well enough. So here ya go, boss! We wet the wood down with a little of Mark's drool to accentuate the grain pattern. All three boards were cut from the same tree, and they all have that continuous rippling effect for the full length of the boards. Every piece we cut from these boards will rock. |
| January 25, 2016 |
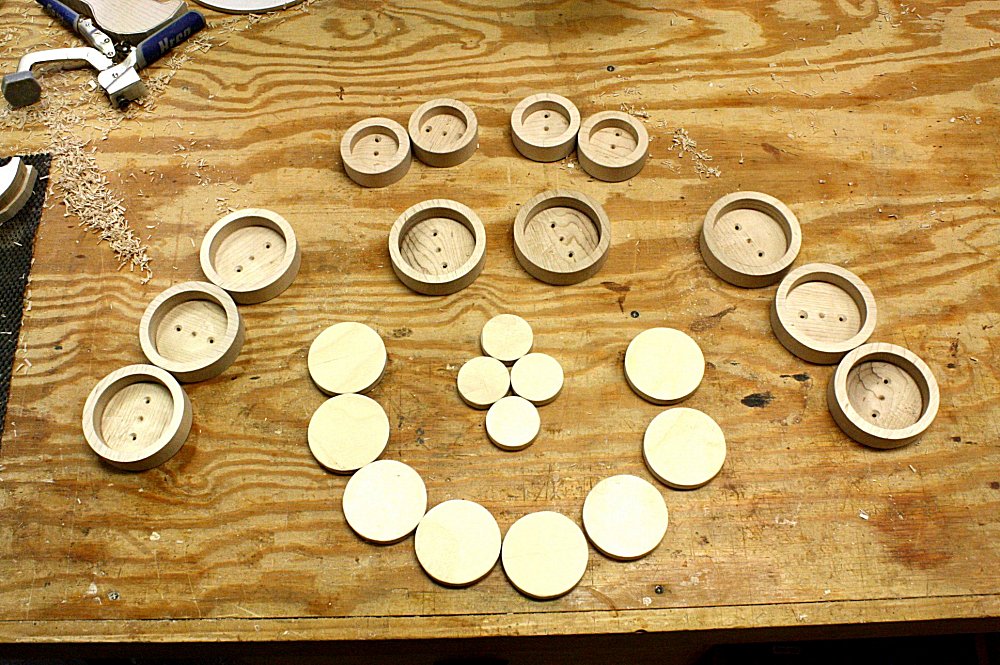  This
guitar stand has a few big pieces where we can't find a single plank
of wood wide enough from which to make them. We have to glue
up a couple boards to get us the required width. Sure, they
look a bit blocky right now, put we'll cut them up and rout on the
sexy next. This
guitar stand has a few big pieces where we can't find a single plank
of wood wide enough from which to make them. We have to glue
up a couple boards to get us the required width. Sure, they
look a bit blocky right now, put we'll cut them up and rout on the
sexy next.It's different having a shop "intern" around, but it's nice that the menial jobs get done efficiently. Cutting out all the "pods" (these will hold the foam cushions) can become tedious with the laying out, drilling, shaping, and sanding. Mark soon discovered that woodworking isn't always the glamour job it's made up to be. An hour wrestling the drill press bestowed upon him some valuable insight. Yes, the pods in the photo are arranged in a little smiley face, primarily due to the fact that this task was completed. |
| January 28, 2016 |
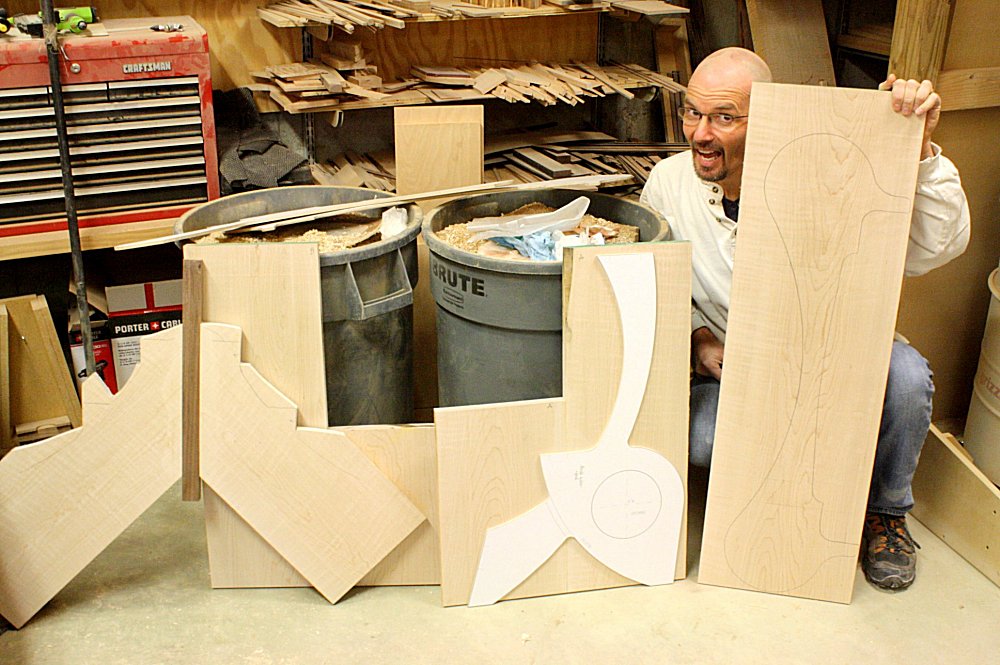
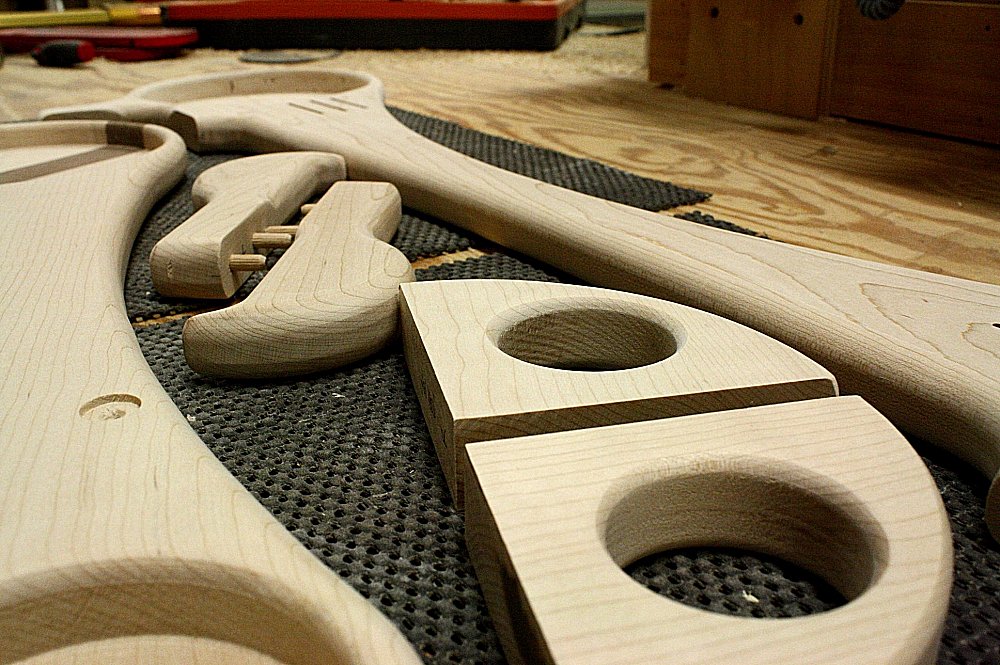
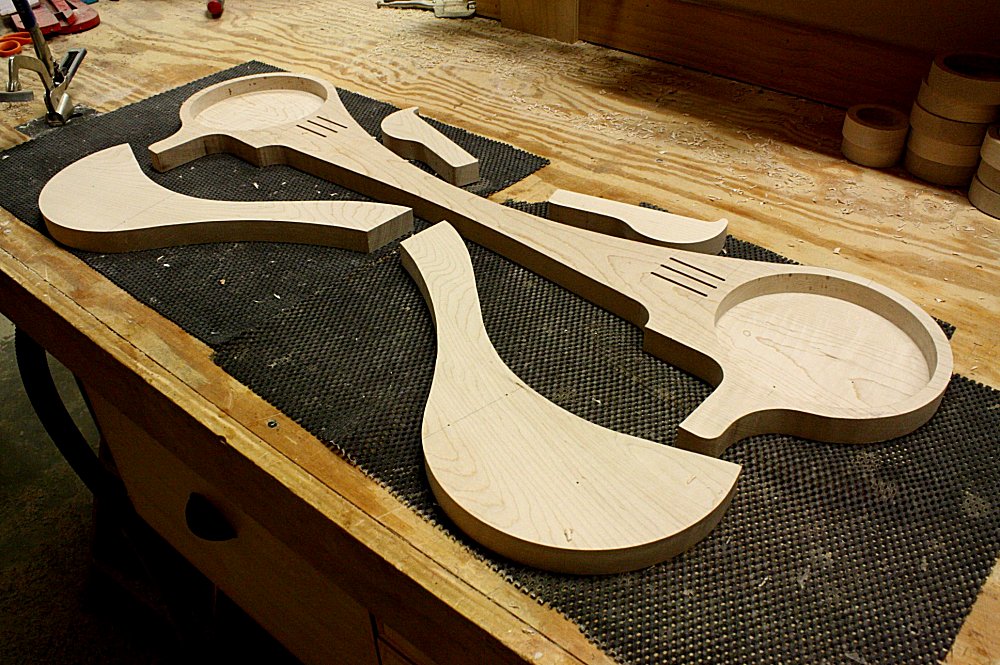 Once
all the templates were created and the wood blanks were ready, we
traced the shapes onto the wood. We rough cut them on the band
saw then used the templates as a pattern to rout them clean and
flush. Once
all the templates were created and the wood blanks were ready, we
traced the shapes onto the wood. We rough cut them on the band
saw then used the templates as a pattern to rout them clean and
flush.At the bottom in the photo are the lower guitar supports (you can refer back up to the previous design post to match the shapes up). Above them is the upper beam, which has has a couple storage trays and pick slots. At the top are the guitar strap hangers which will be secured to the upper beam. It's a good start, but there are plenty more pieces to yet run through this process. The pieces look a little chunky right now, but we will round over all the edges to soften the aesthetic. |
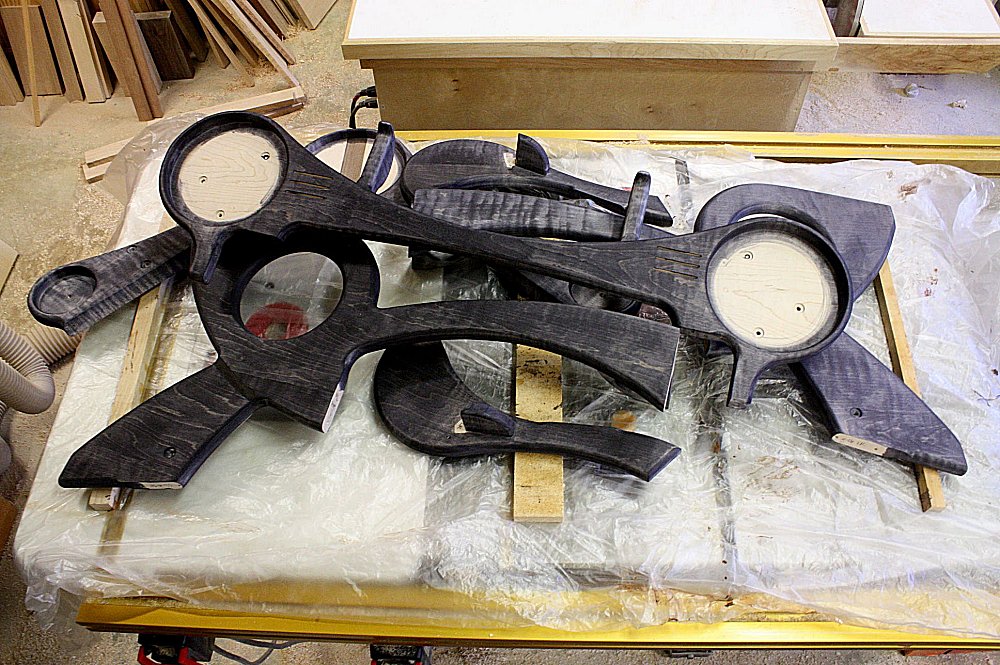
| January 31, 2016 |
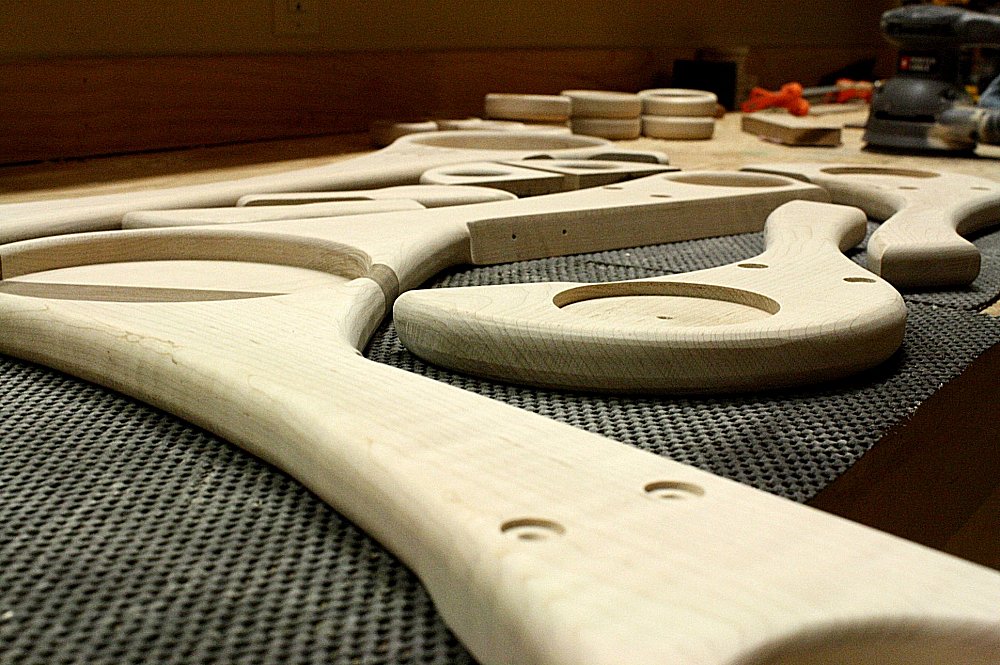
 We
continued getting the component pieces roughed out to shape. I
think we got them all now! You'd never believe 32 pieces would
comprise this piece, but there they all are (count them up in this
and the photos above). Next will be some initial assembly to
see if everything looks like it will fit together properly. If
the guitars won't fit on here right, then it's back to the drawing
board. We
continued getting the component pieces roughed out to shape. I
think we got them all now! You'd never believe 32 pieces would
comprise this piece, but there they all are (count them up in this
and the photos above). Next will be some initial assembly to
see if everything looks like it will fit together properly. If
the guitars won't fit on here right, then it's back to the drawing
board. |
| February 8, 2016 |
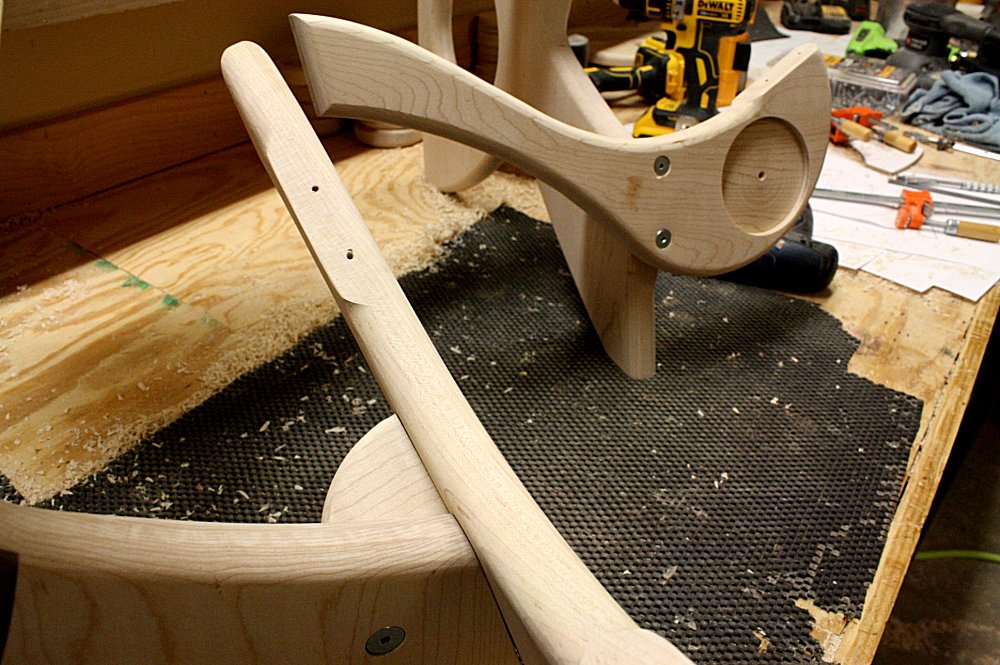
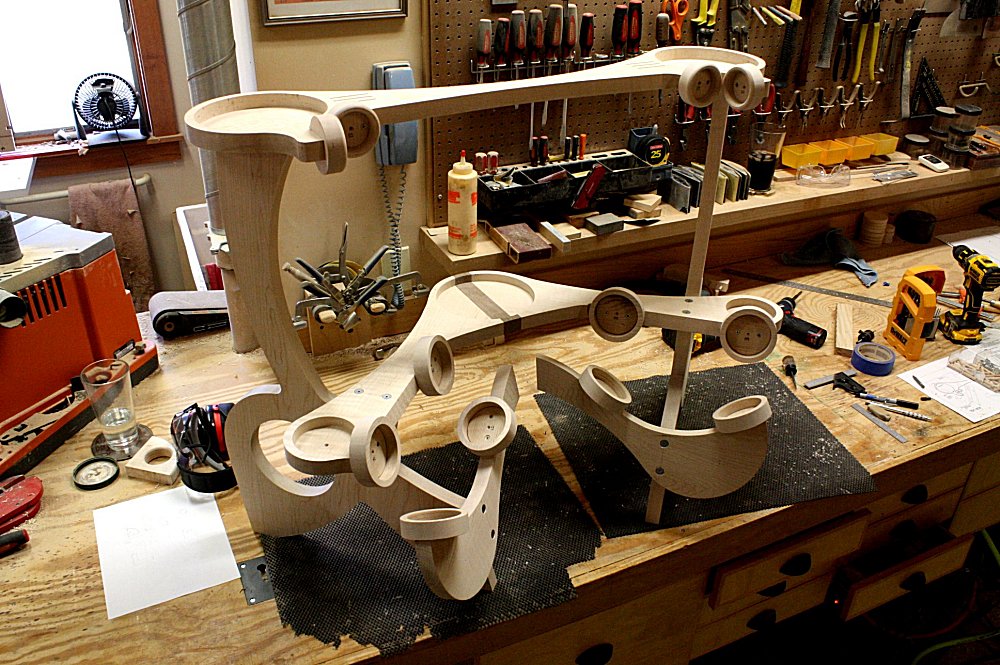  Since
this is the first guitar stand of its kind, I don't have any of the
usual templates and jigs made up yet in order to streamline
production. Everything has to be made from scratch.
Since the guitars will lean back slightly, I needed to put a
corresponding bevel on the back rail. I had to make something
that would hold the router at the correct angle so I could make a
clean and precise cut. It's something simple, but you can't
get a good product without it. I will hold on to this jig so
I'll have it ready for the next stand. Since
this is the first guitar stand of its kind, I don't have any of the
usual templates and jigs made up yet in order to streamline
production. Everything has to be made from scratch.
Since the guitars will lean back slightly, I needed to put a
corresponding bevel on the back rail. I had to make something
that would hold the router at the correct angle so I could make a
clean and precise cut. It's something simple, but you can't
get a good product without it. I will hold on to this jig so
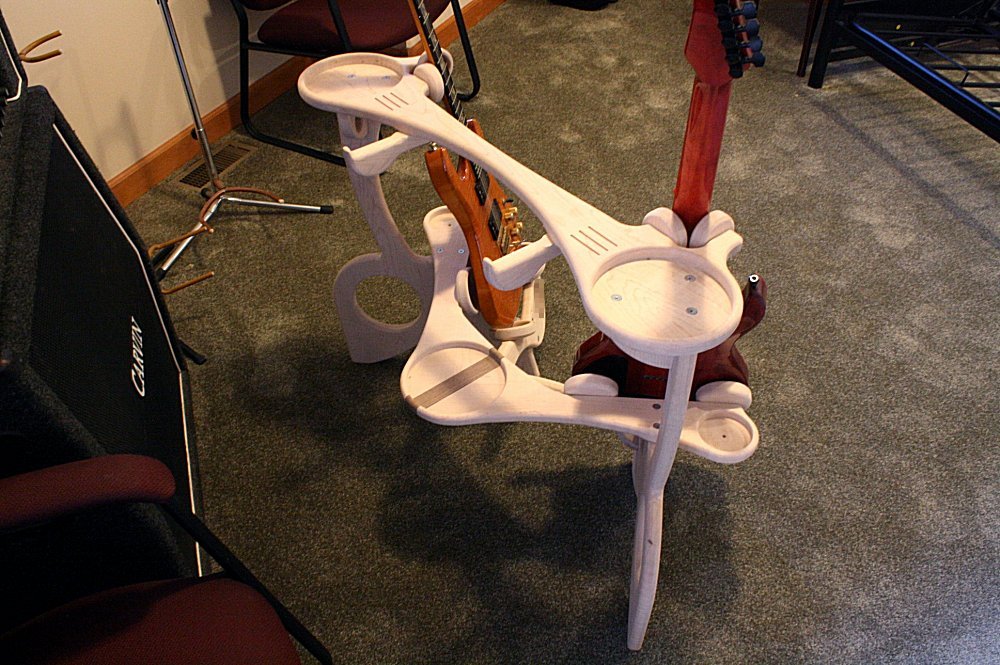
I'll have it ready for the next stand.Now for a little excitement! We have to see if all the pieces actual fit together as planned. I call this "pre-assembly" since it will all be taken apart again. Wow, it looks like some kind of alien demon spawn, but I think it's pretty evident where the guitars will sit ... maybe. |
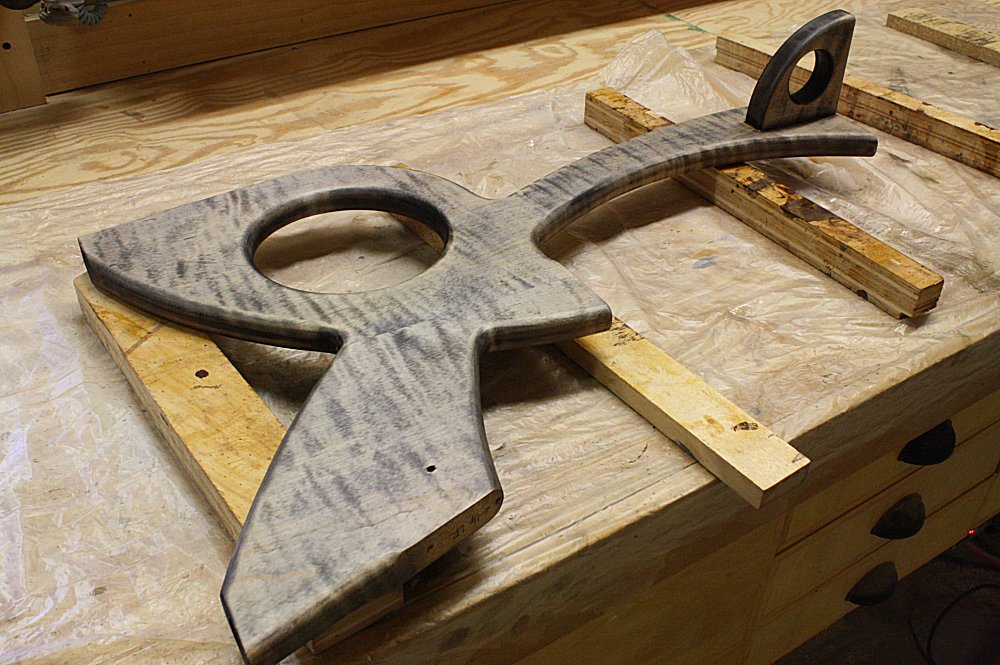
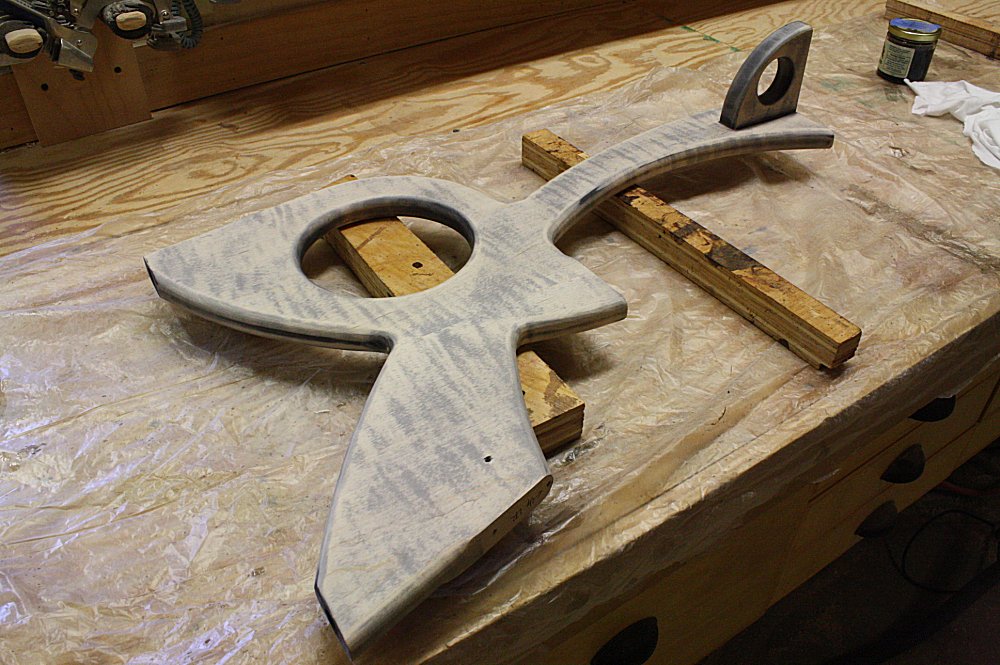
| February 15, 2016 |
   Curves
are sexy! And this piece has a lot of sexy. We rounded
over all the edges to soften up the aesthetic. Curves
are sexy! And this piece has a lot of sexy. We rounded
over all the edges to soften up the aesthetic.It was also time to install the rubber feet. They're recessed a little just to make them less noticeable when we put it all together, and they'll keep the stand from sliding around on a hard floor. Then it was all about a woodworker's favorite part to any project: sanding, sanding, sanding. It's probably not evident in the photos, but there are a lot of small scratches, planer marks, and router burns all over the wood. The finish we're going after here will need to compliment the guitars that will be sitting on them. Everything has to be smooth. We started sanding with 120 grit paper and will work up to 220 grit over the next week. |
| February 22, 2016 |
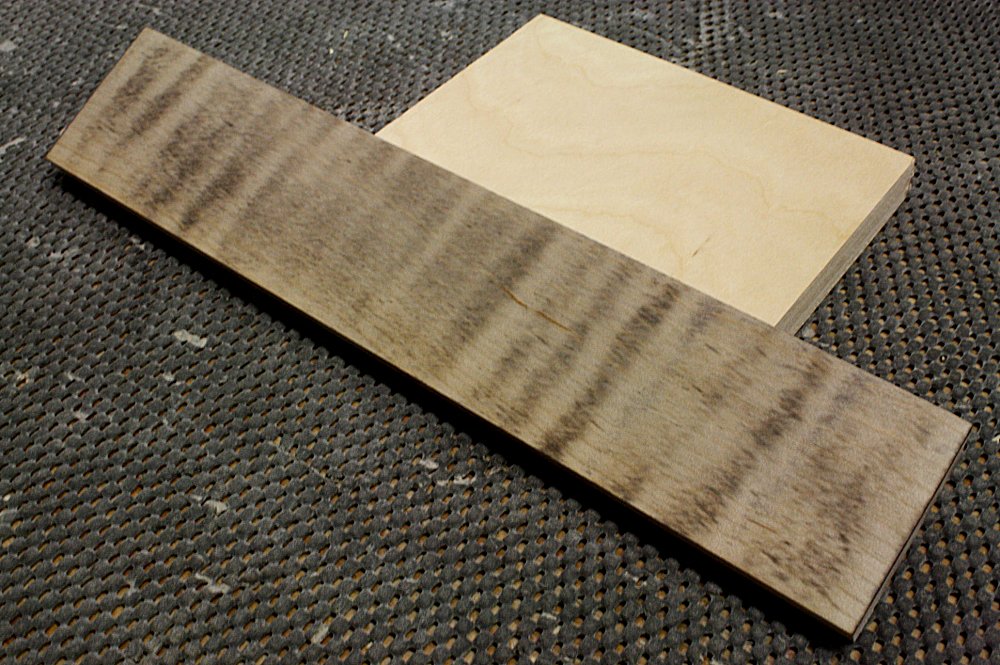
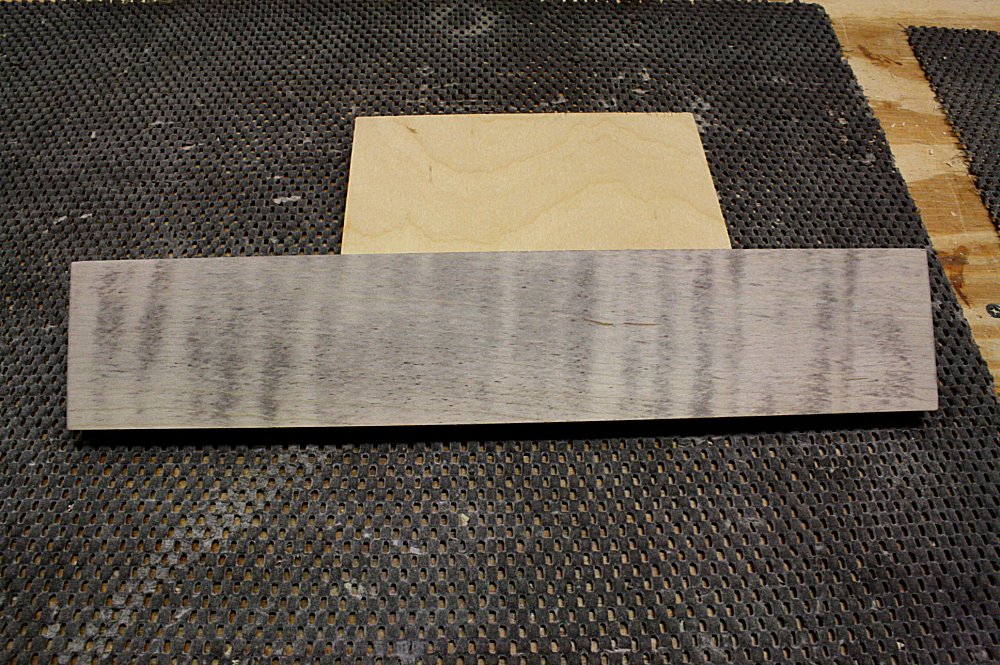
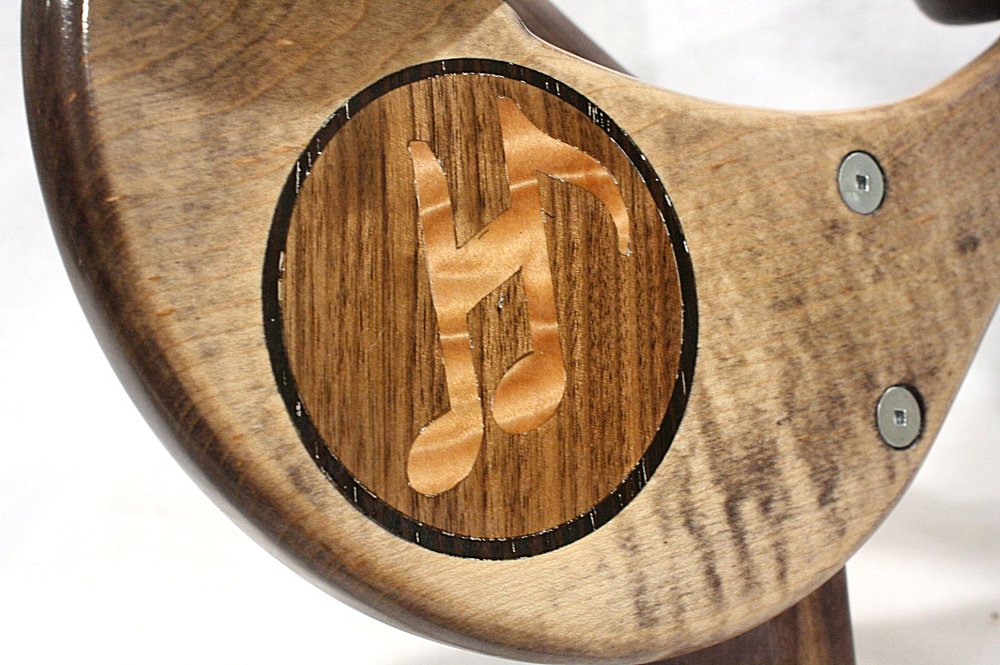
  A
one-off, custom guitar stand wouldn't be cool if it didn't have some
one-off, custom inlays. Mark tried his (well-supervised) hand
at his first inlay project. First, he carefully cut out a (top
secret) design in some spectacular quilted maple using a tiny saw
with a blade not much thicker than a strand of hair (obviously not
his). Then that small puzzle piece was recessed into a some
walnut for contrast using a Dremel to cut the pocket for a perfect
fit. This precise work (and the old eyes) require that funky
party hat. A
one-off, custom guitar stand wouldn't be cool if it didn't have some
one-off, custom inlays. Mark tried his (well-supervised) hand
at his first inlay project. First, he carefully cut out a (top
secret) design in some spectacular quilted maple using a tiny saw
with a blade not much thicker than a strand of hair (obviously not
his). Then that small puzzle piece was recessed into a some
walnut for contrast using a Dremel to cut the pocket for a perfect
fit. This precise work (and the old eyes) require that funky
party hat. |
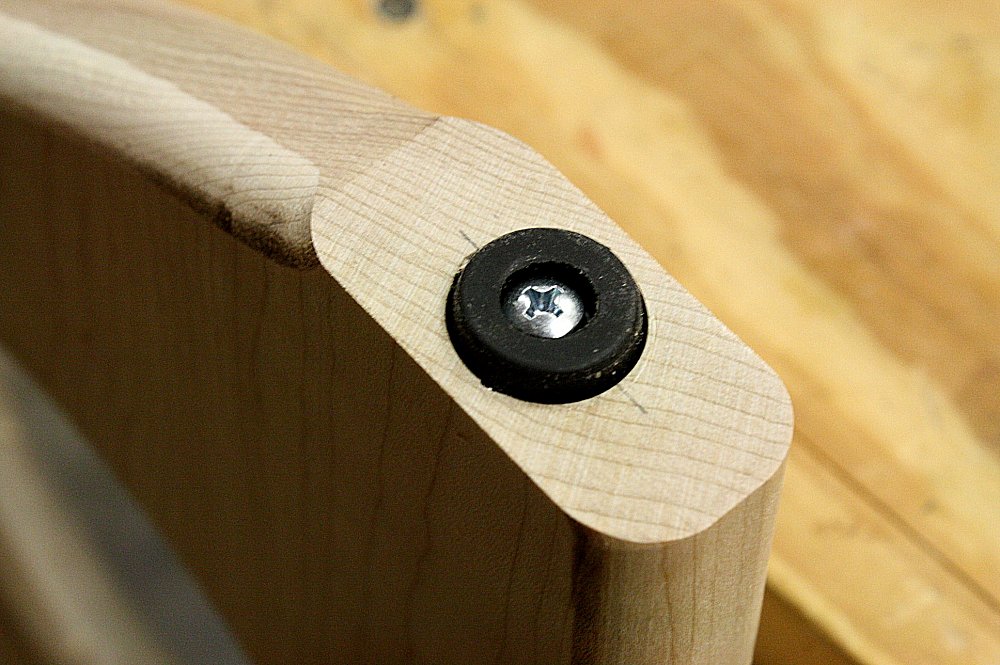
 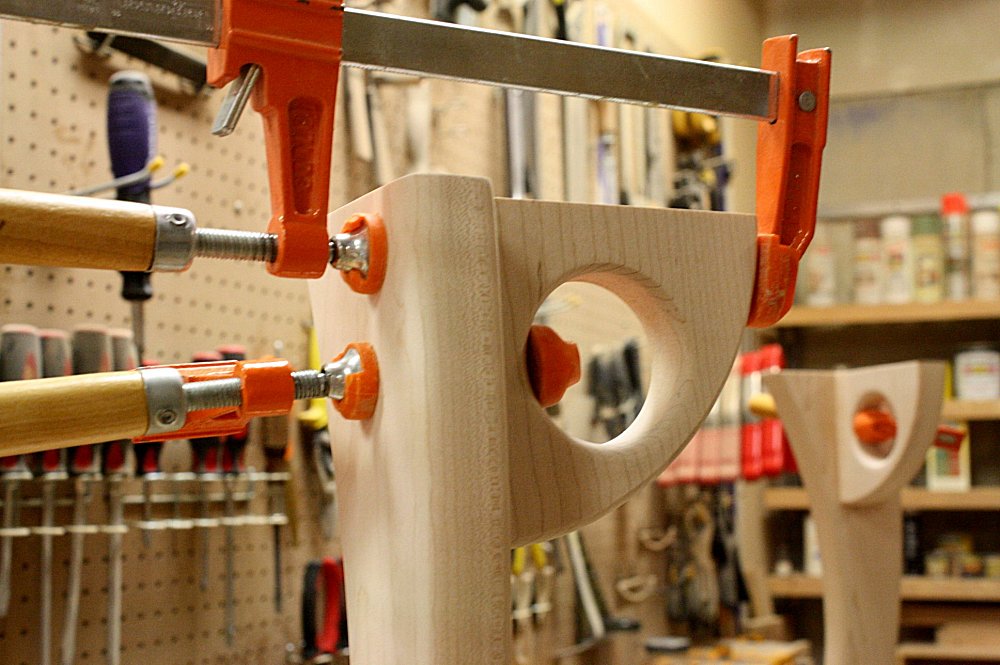 While
Mark was busy with the inlays, I worked on adding a couple sets of
gussets. These little braces help the structure of the piece
resist any racking or unwanted side movement. While
Mark was busy with the inlays, I worked on adding a couple sets of
gussets. These little braces help the structure of the piece
resist any racking or unwanted side movement.You may have noticed that there are some screwed connections. This thing is going to Belgium so it will be broken down to fit into a smaller box to save on shipping costs. Some assembly will be required upon receipt. Hopefully Herbie's man-card is up to date and he knows how to operate a screwdriver. |
| February 29, 2016 |
 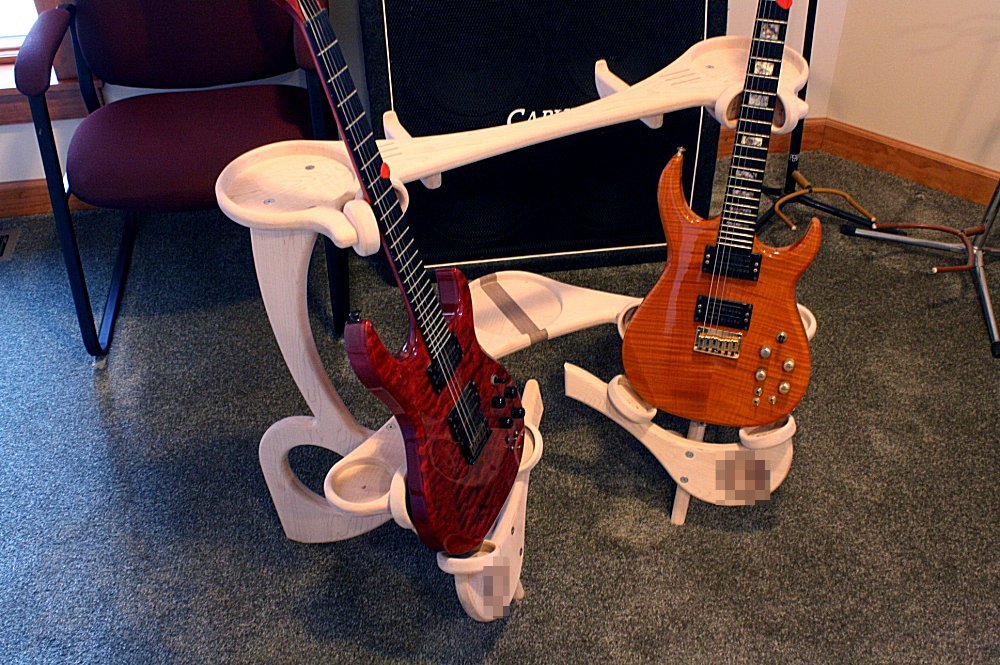 The
title "Woodworker" should be more aptly named "Wood Sander."
At this point in the project, that seems to encompass all of one's
time. But it's finally time for the dress rehearsal! On
the first run of a prototypical project, this is the moment of
truth. Will the guitars actually sit on there right? The
answer is yes, they will. We don't have the padded cushions on
there yet, but we know that the stand will work as intended.
Oh, Herbie, don't try to zoom in on the inlays. We need to
leave a little mystery for Christmas morning. The
title "Woodworker" should be more aptly named "Wood Sander."
At this point in the project, that seems to encompass all of one's
time. But it's finally time for the dress rehearsal! On
the first run of a prototypical project, this is the moment of
truth. Will the guitars actually sit on there right? The
answer is yes, they will. We don't have the padded cushions on
there yet, but we know that the stand will work as intended.
Oh, Herbie, don't try to zoom in on the inlays. We need to
leave a little mystery for Christmas morning. |
| March 5, 2016 |
  The
standard finish for my guitar stands is usually pretty simple, some
linseed oil and some lacquer. This stand will be getting a
high quality guitar-like finish. Herbie wants the color to be
just right so we went through a battery of test panels to narrow
down just the right hue. Herbie lives in Belgium, and we're in
the United States, not just around the corner and with a seven hour
time difference. Everything had to be done via photos and
email. Here is what we came up with. The
standard finish for my guitar stands is usually pretty simple, some
linseed oil and some lacquer. This stand will be getting a
high quality guitar-like finish. Herbie wants the color to be
just right so we went through a battery of test panels to narrow
down just the right hue. Herbie lives in Belgium, and we're in
the United States, not just around the corner and with a seven hour
time difference. Everything had to be done via photos and
email. Here is what we came up with. Herbie wanted gray, but wood is naturally brown. We tried some gray dye, but it was masking the flamed figure in the wood. I added some linseed oil over that which starts to pop out that grain pattern, but the oil is brown and tilted the color in that direction. I think we're on the right track, so at the end we will air brush on some gray to fade the edges of the piece darker, which hopefully tilt the overall color impression back towards the gray side and add a little visual interest. We'll only get one shot at this so we will proceed with some prudence. |
| March 12, 2016 |
  This
will be a multi-step process so follow along closely so you don't
get lost. The first step is to dye everything black. This
will be a multi-step process so follow along closely so you don't
get lost. The first step is to dye everything black. Then after all that hard work, I sanded off most of the black. The black soaks deeper into the pores of the maple making the flamed areas darker. So we just sand off the surface black and the darker figure remains. This will accentuate the grain pattern through the following steps. |
| March 19, 2016 |
  As
mentioned, Herbie wants this to lean a bit more towards the gray
tones. So as in our test panel above, we hit all the pieces
with a lighted, diluted gray dye. This lessened the contrast
with the black we did last week, so we layered on a thick slathering
of linseed oil, which soaks into the pores and pops that wood grain
out again. As
mentioned, Herbie wants this to lean a bit more towards the gray
tones. So as in our test panel above, we hit all the pieces
with a lighted, diluted gray dye. This lessened the contrast
with the black we did last week, so we layered on a thick slathering
of linseed oil, which soaks into the pores and pops that wood grain
out again. |
| March 23, 2016 |
  Next
step, we sealed the surface with a couple coats of blonde shellac.
Lacquer is pretty toxic stuff and spraying it on first might
encourage it to react with the dye where it might want to bleed and
look smudgy. Shellac will help protect our first coloring
efforts and keep some of that crispness. Next
step, we sealed the surface with a couple coats of blonde shellac.
Lacquer is pretty toxic stuff and spraying it on first might
encourage it to react with the dye where it might want to bleed and
look smudgy. Shellac will help protect our first coloring
efforts and keep some of that crispness.Then we threw a little dye into the shellac and did some air brushing, fading the edges out to a dark gray, but not so dark that you lose the grain. Curious, but the gray over the brownish wood gave the piece a little underlying purple tone. Not bad, just a pleasant surprise. This is really starting to look interesting and gain a lot of depth. |
| March 27, 2016 |
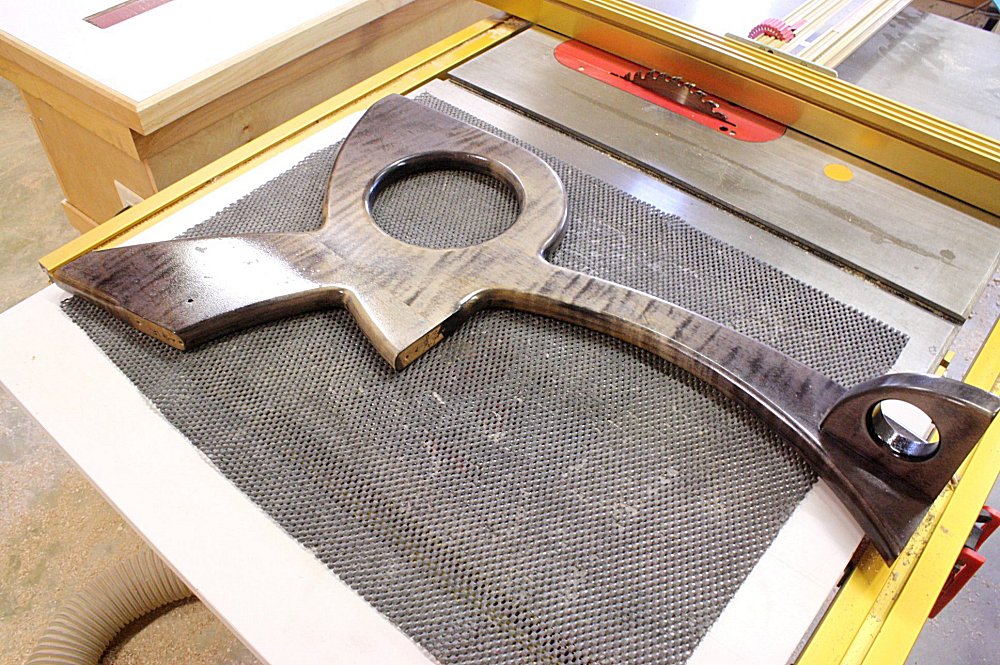 Man,
this is more work than finishing a guitar! A guitar has only a
small top, there's about a dozen big pieces to work on here.
This is after 4 coats of lacquer. It's shiny, but it is a bit
brash at this point. Next will be some sanding and buffing to
get it silky smooth. Man,
this is more work than finishing a guitar! A guitar has only a
small top, there's about a dozen big pieces to work on here.
This is after 4 coats of lacquer. It's shiny, but it is a bit
brash at this point. Next will be some sanding and buffing to
get it silky smooth. |
| April 2, 2016 |
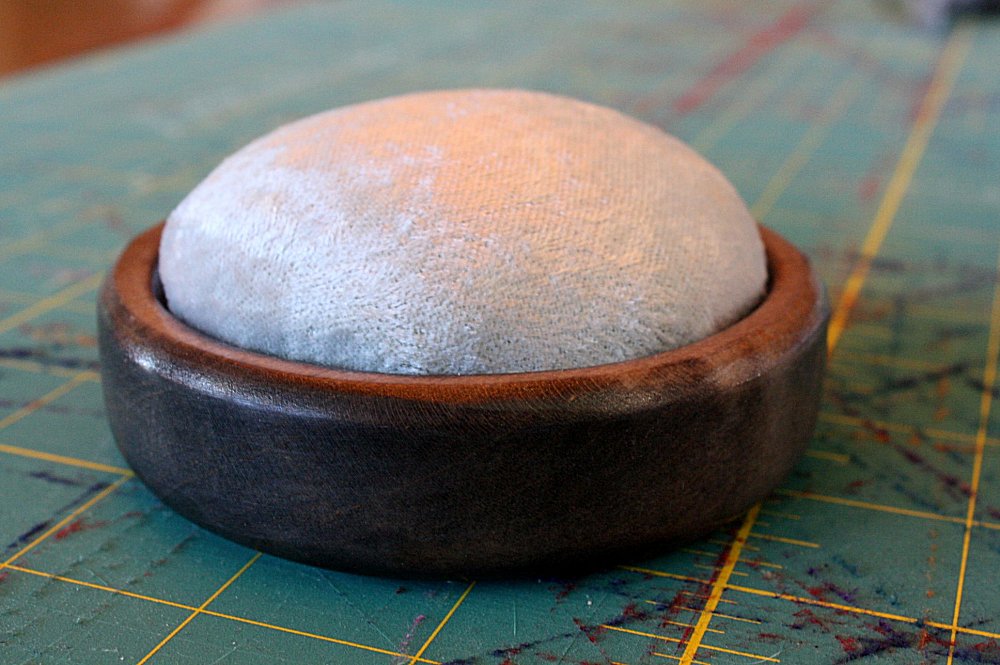  The
final day! We let the lacquer cure for about a week.
Then it was ready for a final sanding and buffing to bring out the
shine and give it that velvety texture. The
final day! We let the lacquer cure for about a week.
Then it was ready for a final sanding and buffing to bring out the
shine and give it that velvety texture.Next was some wax. Mark has a really great touch with the handwork. I didn't ask him where he developed his stamina. 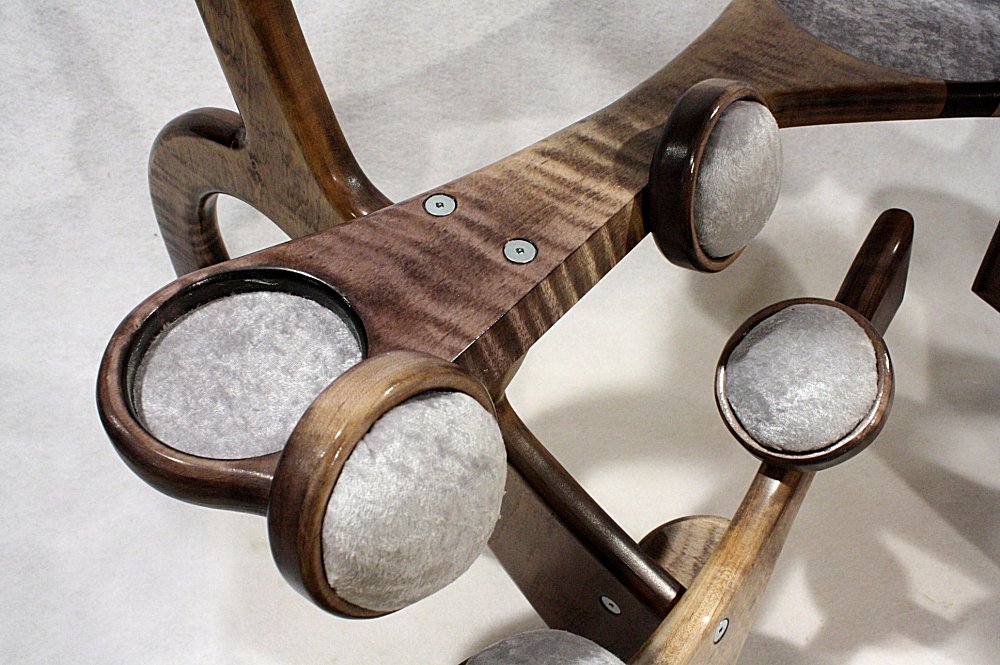 The
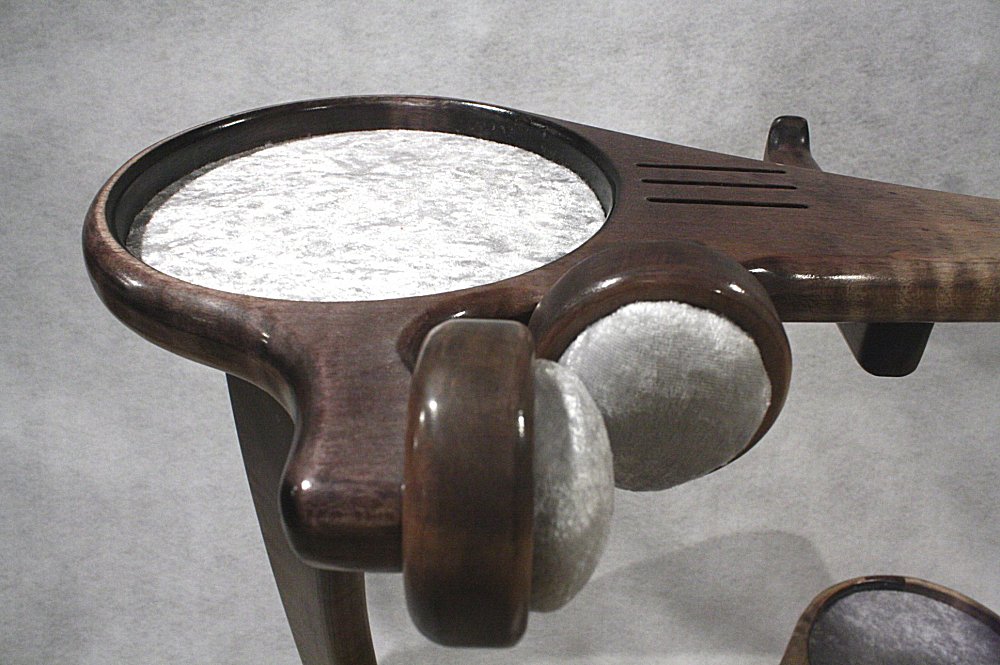
stand won't work unless it has a delicate interface with the
guitars. So we made up some foam pads with silver crushed
velvet fabric for the finishing touch. The
stand won't work unless it has a delicate interface with the
guitars. So we made up some foam pads with silver crushed
velvet fabric for the finishing touch.Herbie's been dying for more detailed photos, but I've been intentionally holding back. There will be no peaking at your presents before Christmas morning! And he will get no satisfaction yet again today. Here's another teaser. Remember, you can click on these thumbnails for a higher resolution picture. Check out that subtle fade out to dark at the edges. Sweeeet! No more photos until I get confirmation that Herbie has the stand in hand. |
| April 6, 2016 |
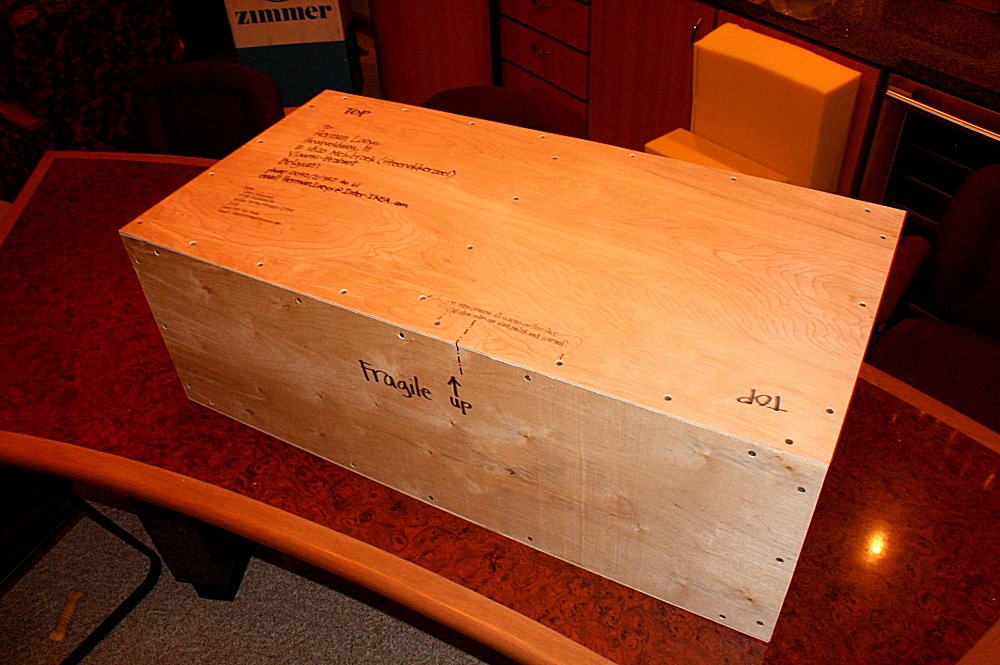
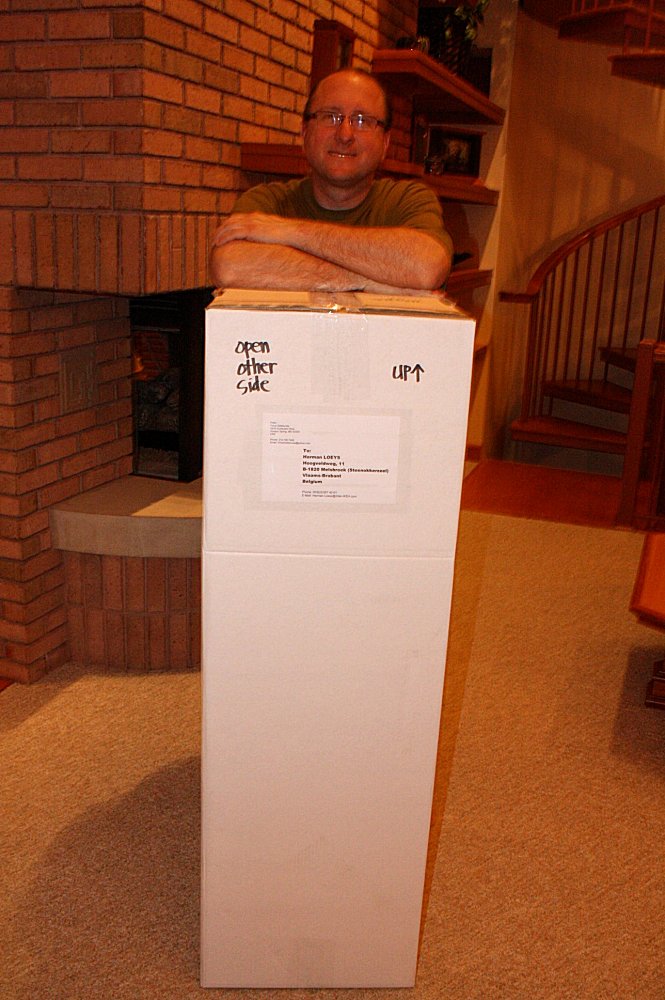 Sometimes
it's hard to see your children grow up and leave the house. We
nurtured this baby for about three months, but it's time she finds a
new home. Sometimes
it's hard to see your children grow up and leave the house. We
nurtured this baby for about three months, but it's time she finds a
new home.That's a big-ass box! I was tempted to crawl in there myself. I hope the US Postal Service treats her right. This is going to Belgium, so Customs can sometimes be a hurdle, too. Well, it's off to the Post Office to place all my trust in a herd of underpaid, disgruntled, government employees. |
| April 8, 2016 |
 Ugh!
F'ing US Postal Service! Ugh!
F'ing US Postal Service!Admittedly, I do not have a lot of experience with international shipping. I have shipped a few items overseas, but the boxes were smaller and they never challenged the US Post Office's weight/size limitations. We were well below their weight requirement; however, the size of the box must be less than 108 inches (274cm) total, which they calculate as the longest dimension of the box plus the circumference. The box I took to them yesterday was 53 x 16 x 20 inches (135 x 41 x 51 cm) equaling 125 inches (319cm), which exceeded their size limit. Rejected. Ugh! F'ing FedEx! After the Post Office turned me away, I went down the street to FedEx. They quoted me a price of $800! UPS wanted $950, and DHL wanted $1250. I could buy a plane ticket and get myself to Belgium for that much. So what to do? We wept and sulked for a few hours, Herbie and I exchanged frustrations, Mark and I pondered the next course of action. On the way home from work, I cursed some more, then I ran the Post Office's dimensions through my head and did some cyphering. I knew the dimensions of the largest guitar stand parts, length and depth. I added a couple of inches for padding and figured out exactly how tall the box could be to arrive at the 108" size limit. The question remained, "Could I get all the pieces to fit in a box that size?" I stopped by Home Depot and picked up some plywood. When I got home, I hit the shop and whipped up a custom wood crate that would satisfy the Post Office's size requirements, precisely, exactly, down to the gnat's ass. Now it was time to test my Tetris skills. I padded the interior of the box with sofa foam, firm yet pliant (insert boob joke here). With the tight quarters, I also used felt fabric between everything so if the pieces did shift during shipping, they wouldn't rub on each other. The pieces fit! It's a bit tighter than I'd like, but we're going to roll with it. Well, I guess it's off to the Post Office again tomorrow to yet again place all my trust in a herd of underpaid, disgruntled, government employees. |
| April 23, 2016 |
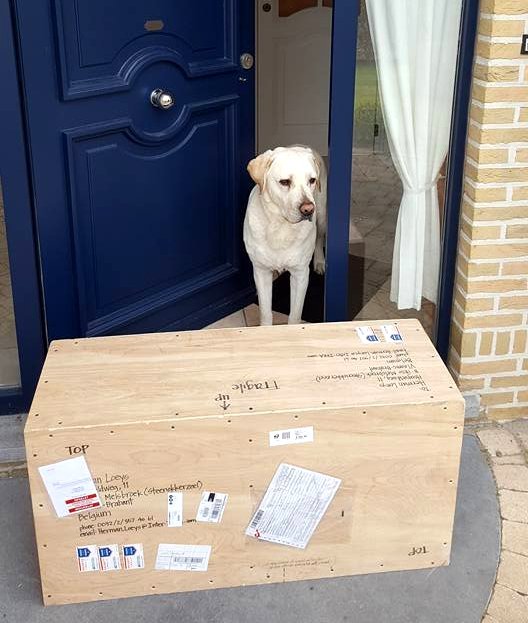 Wow,
what an experience. A tracking number can be fun so you can
watch your package travel halfway around the world, but it can also
torment you to within an inch of sanity. The crate made it to
Germany very quickly, and the next stop was Brussels. It was
reported at Belgium Customs and sat for a few days, which is normal.
Then the tracking info reported that the package was on its way back
to Chicago. Wow,
what an experience. A tracking number can be fun so you can
watch your package travel halfway around the world, but it can also
torment you to within an inch of sanity. The crate made it to
Germany very quickly, and the next stop was Brussels. It was
reported at Belgium Customs and sat for a few days, which is normal.
Then the tracking info reported that the package was on its way back
to Chicago.We were all devastated. We felt that for some reason, Customs rejected the crate. There was no report as to why, and no notification even though our phone numbers and email addresses were clearly written all over the crate. I was waiting for the package to show back up at my front door, but instead it mysteriously landed on Herbie's front stoop. Most importantly, it arrived unscathed and in good condition. I've been holding back on final photos as to not spoil the surprise, so here they are now! |
 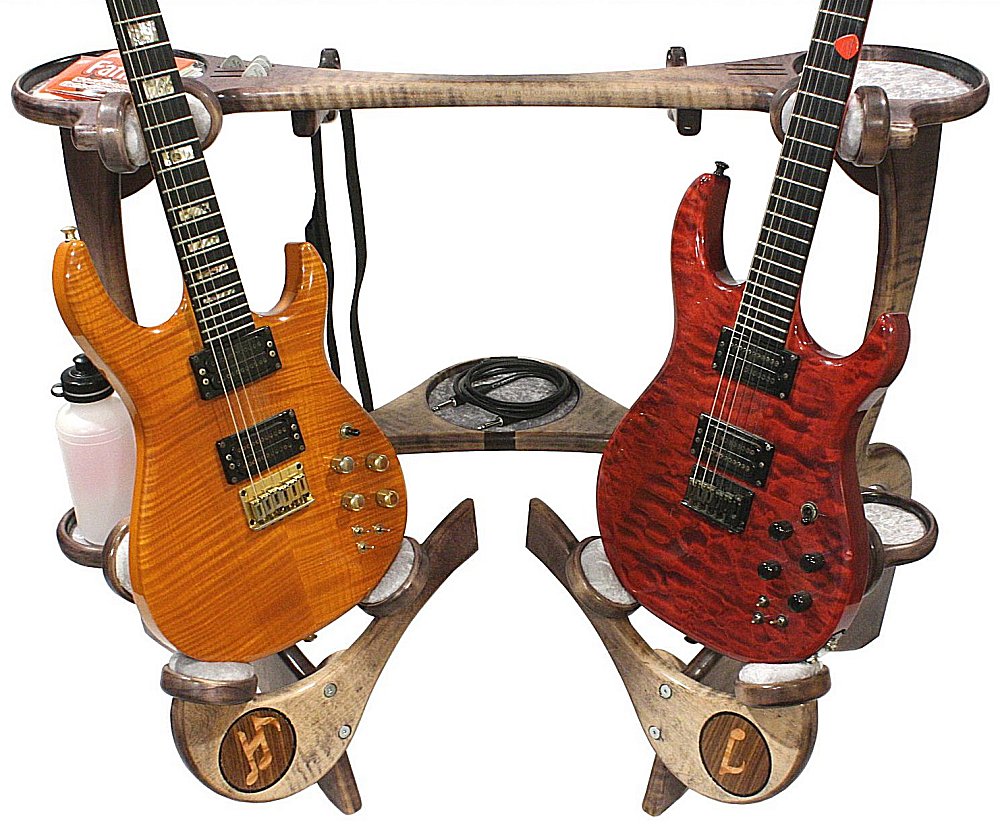 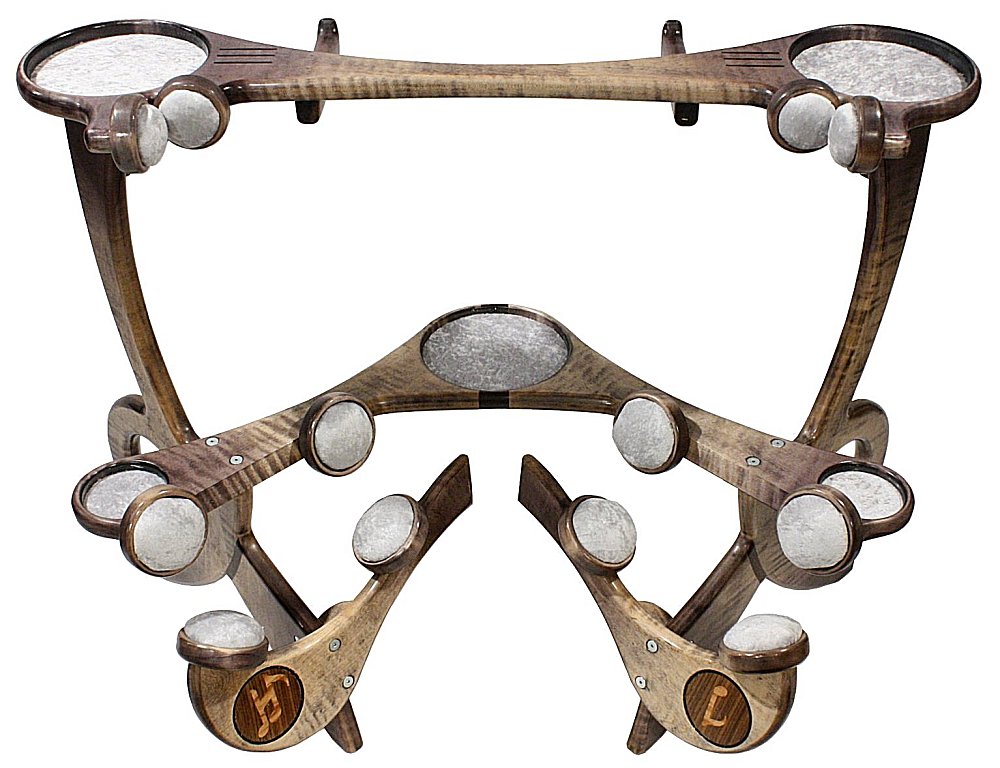 It
looks like some kind of alien being. One would not know what
it even is until placed in its determined context of a guitar stand.
This stand received a high quality guitar-like finish. It
would have actually been easier to finish a guitar since there would
have been much less surface area to buff and wax. It
looks like some kind of alien being. One would not know what
it even is until placed in its determined context of a guitar stand.
This stand received a high quality guitar-like finish. It
would have actually been easier to finish a guitar since there would
have been much less surface area to buff and wax. |
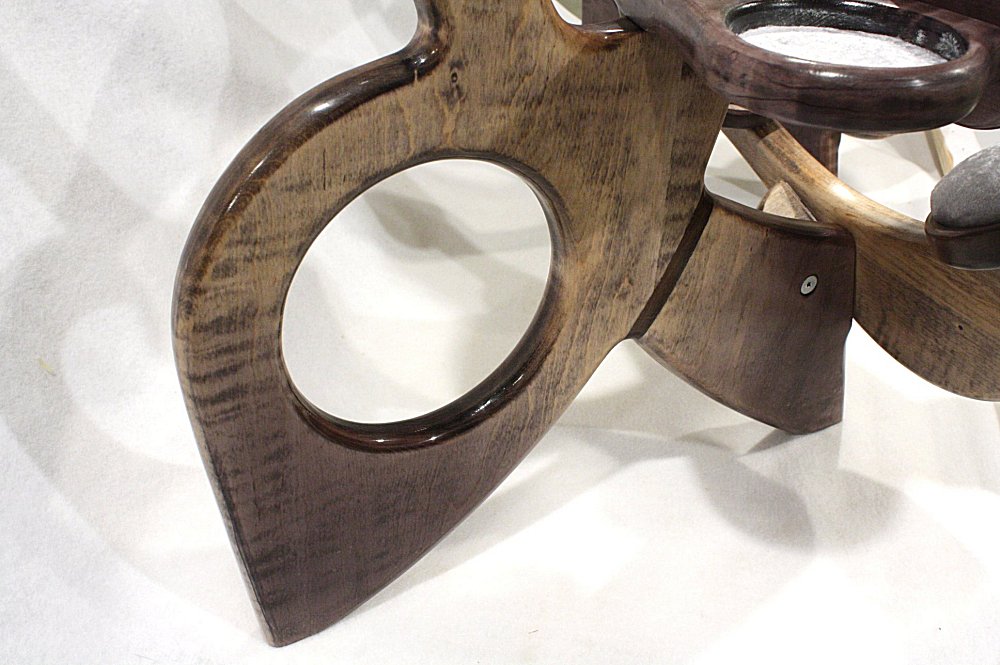
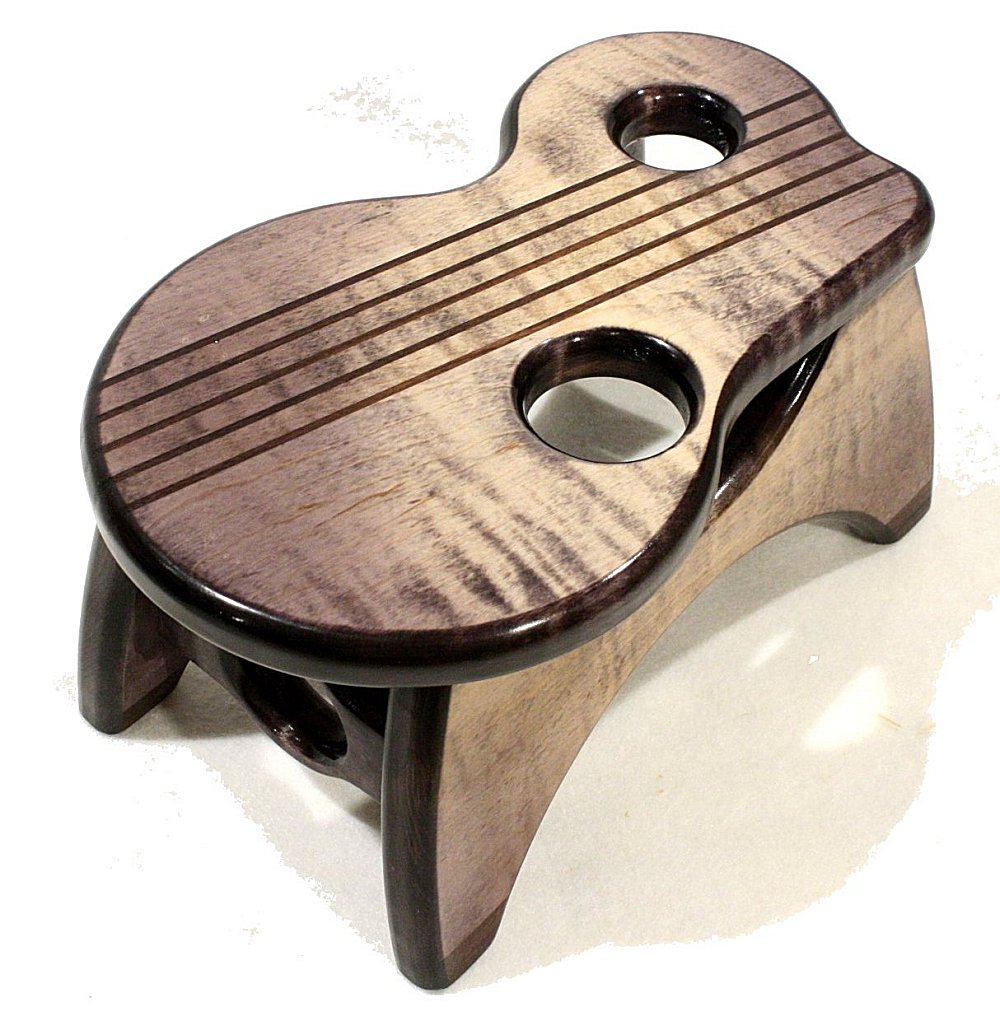   Herbie
got his monogram inlaid on the lower supports. He also asked
for plenty of storage trays and some slots to hold his picks.
He went with silver crushed velvet pads which would compliment his
guitars. He also asked for a matching foot stool, and we
delivered. It was adorned with a music staff inlay of walnut.
All custom touches for a one-off, unique piece of art. Herbie
got his monogram inlaid on the lower supports. He also asked
for plenty of storage trays and some slots to hold his picks.
He went with silver crushed velvet pads which would compliment his
guitars. He also asked for a matching foot stool, and we
delivered. It was adorned with a music staff inlay of walnut.
All custom touches for a one-off, unique piece of art. |
 Music
has the power to bring people together. We met Herbie on
Facebook due to our mutual appreciate of guitars and the joy they
provide. We built the stand with pride knowing it would be
going to a good home with someone who would cherish it. Maybe
some day our paths will cross, but until then, "Greetz!" from 4,600
miles away, and
genieten, mijn vriend. Music
has the power to bring people together. We met Herbie on
Facebook due to our mutual appreciate of guitars and the joy they
provide. We built the stand with pride knowing it would be
going to a good home with someone who would cherish it. Maybe
some day our paths will cross, but until then, "Greetz!" from 4,600
miles away, and
genieten, mijn vriend. |