 |
||
| Beauty is in the details. Click on the photos to see them in a larger size. Use your browser's "Back" button to return. | ||
| June 11, 2010 | ||
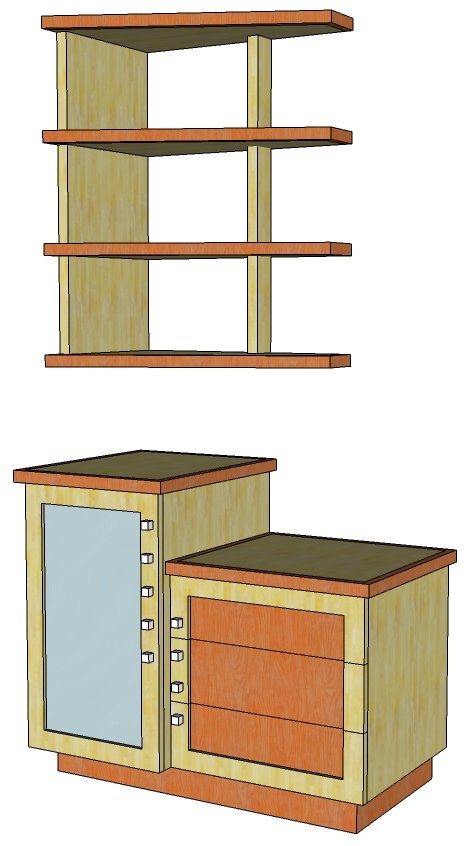 Welcome, Brian & Tasha! Welcome, Brian & Tasha!Brian and Tasha already know what they're getting, but if you're here to follow along with the construction, here is a SketchUp rendering of where we're going. Time for the back story. The Meyer's moved into their new house and treated themselves to a brand new, big, flat panel TV. The room layout didn't quite fit their original entertainment unit, and when the TV was mounted above the fireplace, everything looked a little out of place. So my task was to skinny things up a little to fit the space and to provide room for some media storage which would be concealed from view. The solution was to get the A/V components in the left cube behind semi-frosted or textured glass. The trick will be finding glass which is obscured yet still allows proper functioning of the remote controls. The right cube will consist of three drawers. It may not look like a lot of room, but the drawers will be able to hold up to 480 CD's! Plenty of room. Since this piece of furniture no longer has to be capable of holding a TV, the top could be staggered to provide a little visual interest and to step your eye down towards the fireplace. Notice that the drawer unit is also a little shallower front to back. This will also help alleviate that big, hulking visual associated with entertainment centers and give me some room for designing a composition of forms and textures. I found some stunning wood on eBay to use on the drawer fronts and other trim accents, and we'll have a bit of fun with the shiny knobs. I'll also be making a wall-mounted shelving unit above with an angled front. |
||
| June 14, 2010 | ||
  What
better and more exciting place to start but at the bottom.
This unit will be supporting a lot of weight so I used a full base
(kind of like your kitchen cabinets, but this will look nicer).
This is the rough structure which will be covered with some fancy
wood which will match the drawer fronts (see the design sketch
above). What
better and more exciting place to start but at the bottom.
This unit will be supporting a lot of weight so I used a full base
(kind of like your kitchen cabinets, but this will look nicer).
This is the rough structure which will be covered with some fancy
wood which will match the drawer fronts (see the design sketch
above).This unit will be primarily made from birch plywood. My dad would have a fit since he believes that if it's not solid wood, it's not real furniture. Plywood does not warp like solid wood and it does not expand and contract like solid wood. Also, since there's not that many two-foot thick birch trees out there, I don't have to glue up several boards to make a side panel resulting in some noticeable seams. Do you have a piece of furniture at home where the edge banding has become unglued or broken off completely? To save money, much of the production furniture you'll find at the store utilize 1/32" thick, iron-on banding. Yes, it's quick and easy, but it just doesn't last. I prefer to edge my plywood with 1/8" thick, homemade banding which I glue on. This takes extra time, but when it's built well it will last forever. I will be the first to admit that custom furniture does cost more than off-the-floor, store-bought furniture. I can not compete with them on price, but they can not compete with me quality. I provide a lifetime guarantee on all of my work; see if the furniture store will offer you that. |
||
| June 20, 2010 | ||
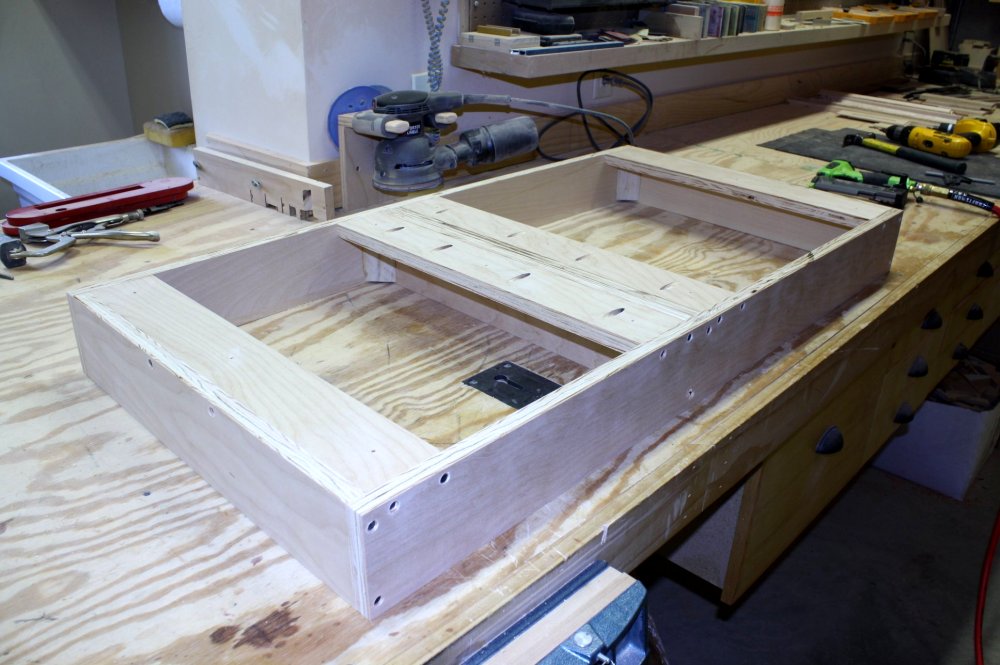
  The
component case will have adjustable shelves. So a small groove
was cut in both sides so that the shelving brackets could be secured
and nested in flush with the surface. You have to remember to
do these things now since it would be rather difficult to do after
the case is assembled. The
component case will have adjustable shelves. So a small groove
was cut in both sides so that the shelving brackets could be secured
and nested in flush with the surface. You have to remember to
do these things now since it would be rather difficult to do after
the case is assembled.Again with some overkill, I reinforced all of the corner joints with biscuits, glued all the abutments, and mechanically fastened the two pieces together with screws. You should be able to park a small SUV on this without an issue. |
||
| June 22, 2010 | ||
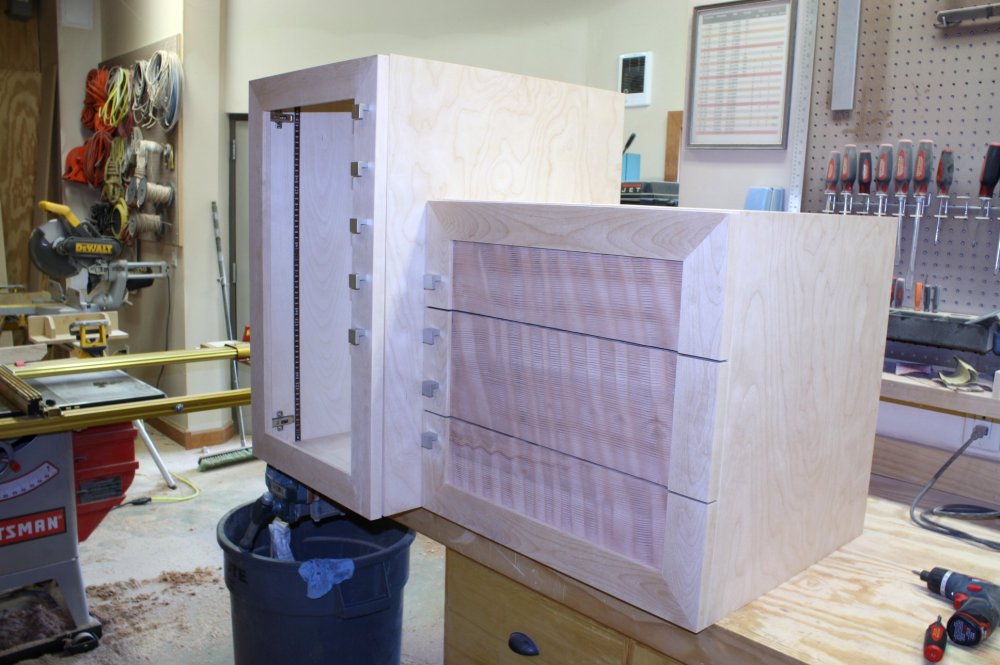
  Now
that the case is glued up, accurate dimensions can be taken to make
the drawers. Precision is a must; if you're 1/32" off, the
drawer won't work. The ball-bearing drawer slides are the
full-extension type. They pull all the way out so you can
easily access items in the back of the drawer. These also have
a soft-close feature which grabs the drawer about 2" out and gently
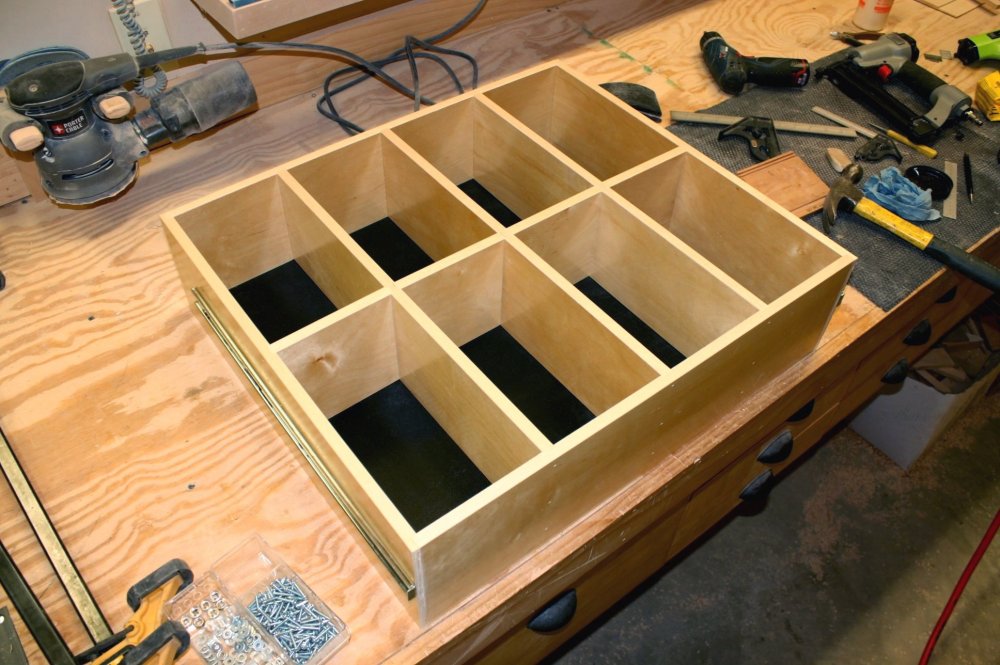
pulls it in the rest of the way. Now
that the case is glued up, accurate dimensions can be taken to make
the drawers. Precision is a must; if you're 1/32" off, the
drawer won't work. The ball-bearing drawer slides are the
full-extension type. They pull all the way out so you can
easily access items in the back of the drawer. These also have
a soft-close feature which grabs the drawer about 2" out and gently
pulls it in the rest of the way.Your drawers are subdivided for CD and DVD storage. Aside from the organizational benefits, the dividers will also help strengthen the drawer to carry the weight of the 160 CD's which you'll put in it. All of the dividers are notched into the adjacent piece, nailed from the side, and screwed from the bottom - built like a tank. |
||
| June 28, 2010 | ||
  The
fancy redwood I bought on eBay came in and it looks hot! Even
though the boards are dead-on flat in these photos, the grain
texture is three dimensional, almost holographic. The series
of three boards will be used on the drawer fronts. The other
four boards will be used for edge banding around the various
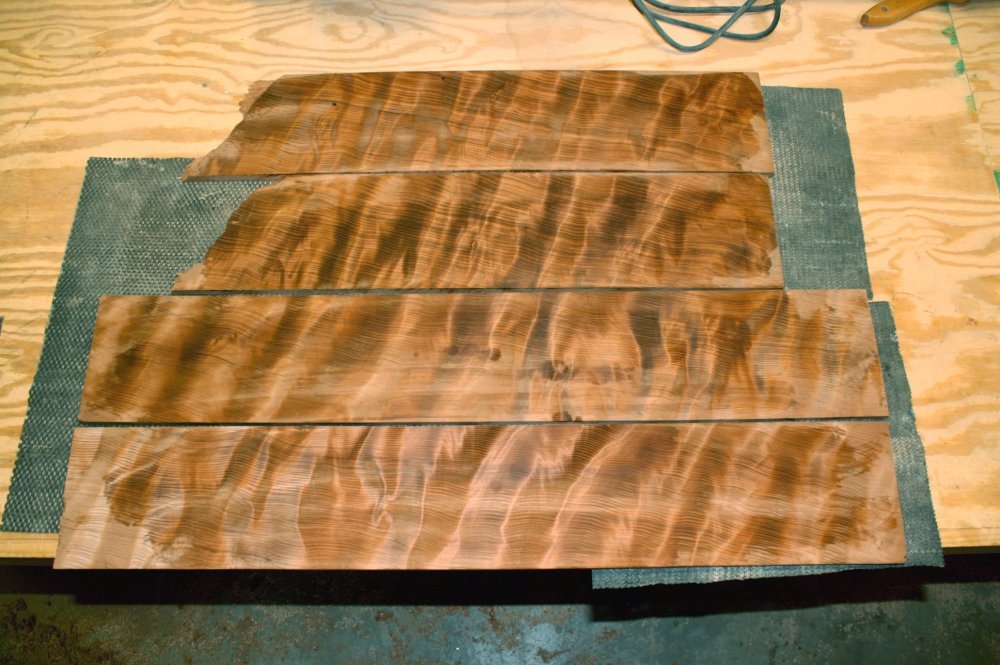
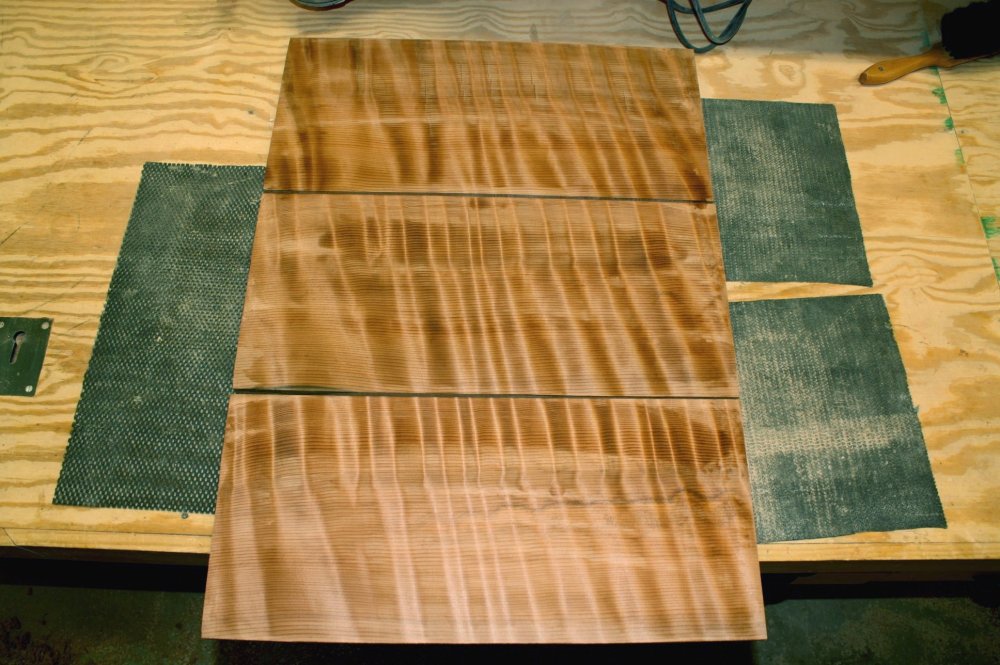
countertops and shelves. The
fancy redwood I bought on eBay came in and it looks hot! Even
though the boards are dead-on flat in these photos, the grain
texture is three dimensional, almost holographic. The series
of three boards will be used on the drawer fronts. The other
four boards will be used for edge banding around the various
countertops and shelves. |
||
| June 30, 2010 | ||
 Personally,
I sometimes find the glue-up more attractive than the actual
finished piece! You probably don't agree. But there is
something to be said about using every clamp you own to bring things
together. This photo is of the cabinet's base receiving its
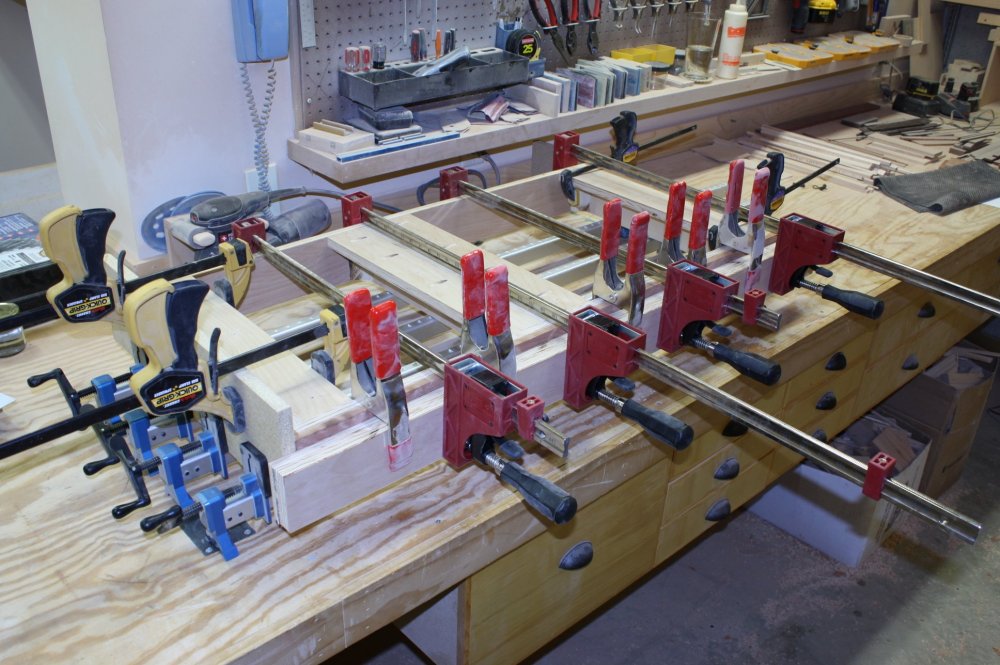
redwood veneer. Personally,
I sometimes find the glue-up more attractive than the actual
finished piece! You probably don't agree. But there is
something to be said about using every clamp you own to bring things
together. This photo is of the cabinet's base receiving its
redwood veneer. |
||
| July 2, 2010 | ||
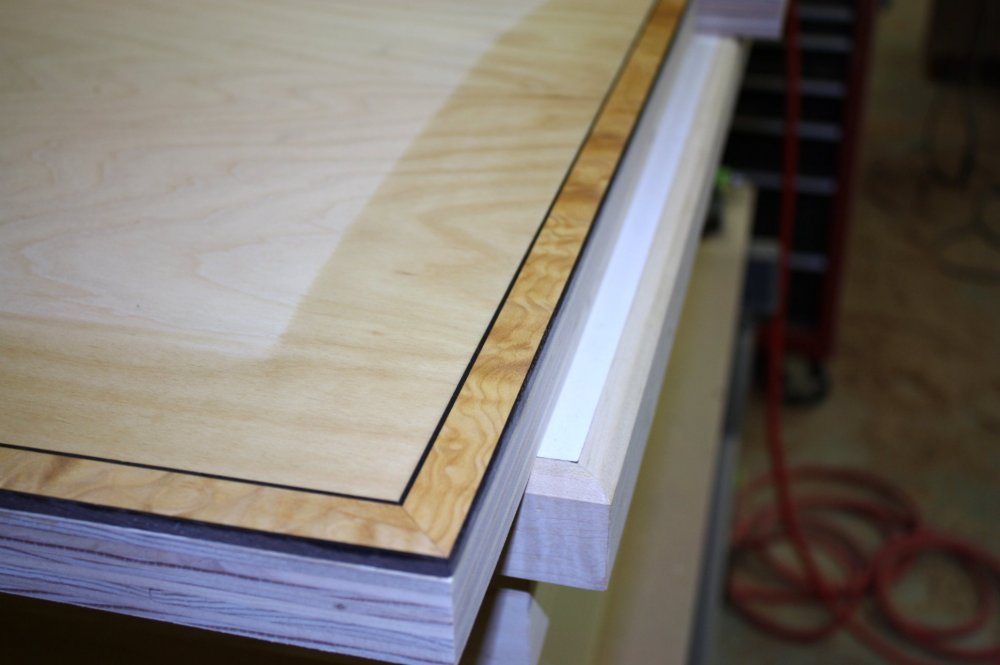  After
mocking up the countertops, I was not content on simply leaving them
alone. I felt they needed a little extra pizzazz, so I took
some artistic license and decided to add some top banding. I
cut some thin twigs of wenge wood and a band of quilted maple.
A small "shelf" was routed out around the edge of the tops to hold
the band, and all was glued into place. We still need the
redwood around the sides to cover up the edges of the plywood, but
that'll be another day. After
mocking up the countertops, I was not content on simply leaving them
alone. I felt they needed a little extra pizzazz, so I took
some artistic license and decided to add some top banding. I
cut some thin twigs of wenge wood and a band of quilted maple.
A small "shelf" was routed out around the edge of the tops to hold
the band, and all was glued into place. We still need the
redwood around the sides to cover up the edges of the plywood, but
that'll be another day. |
||
| July 5, 2010 | ||
 |
 |
 |
|
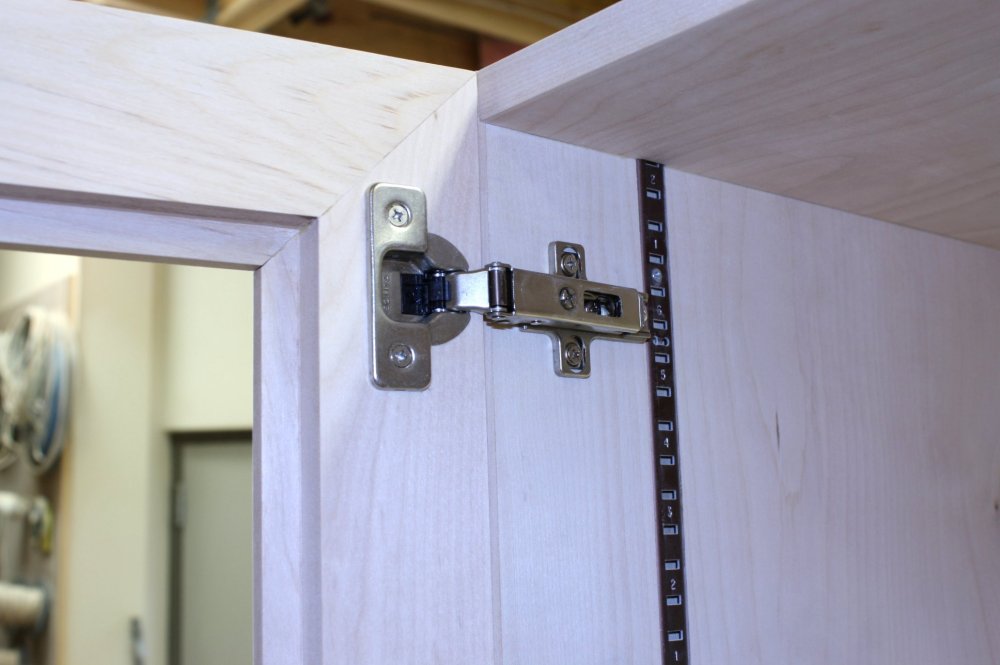
I installed the door hinges. These are really cool as they
have a soft-close feature. Try to slam the door and the hinges
will grab it about 2" away and gently pull it in the rest of the
way. Check out the full-extension drawer slides which allow
you to pull the drawer all the way out and let you easily access
items in the back. The slides also have the soft-close
feature, so feel free to slam away! Now it's time to get a little excited with some "pre-assembly". The call it "pre-assembly" since you have to put it all together to make sure everything will fit the way it's supposed to; then you have to take it all apart in order to apply the finish. Even the knobs were installed to make sure those lined up right. Yes, I know, there are more knobs than are actually needed and those on the drawers are all off to one side. But we're making art here and we're not worried about shaving off that extra $10 worth of knobs. And do you really want to stick a few knobs right in the middle of that awesome field of tiger-striped redwood? |
||
| July 8, 2010 | ||
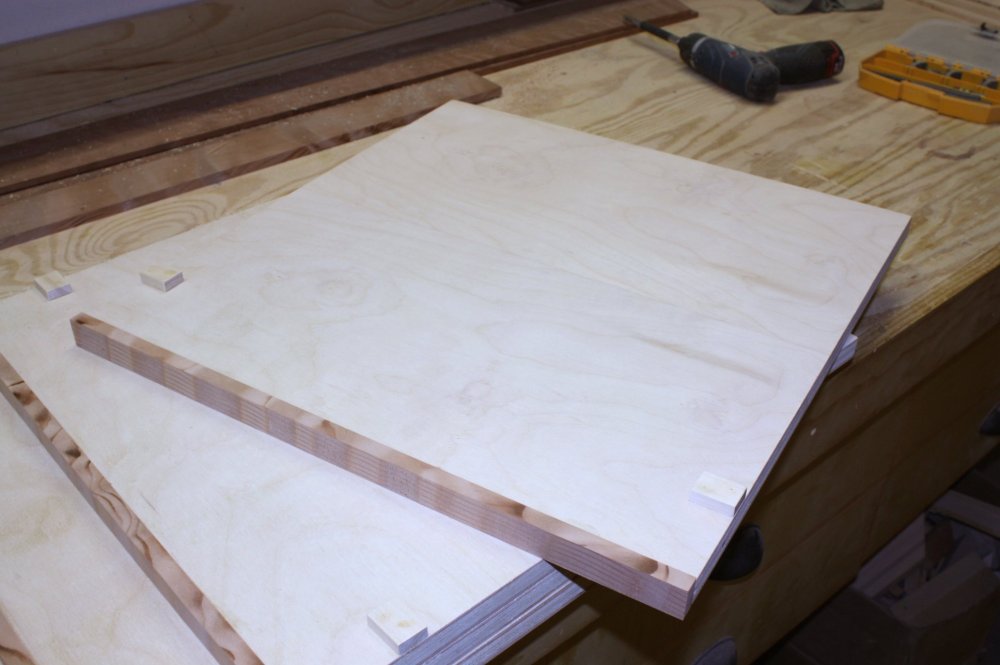 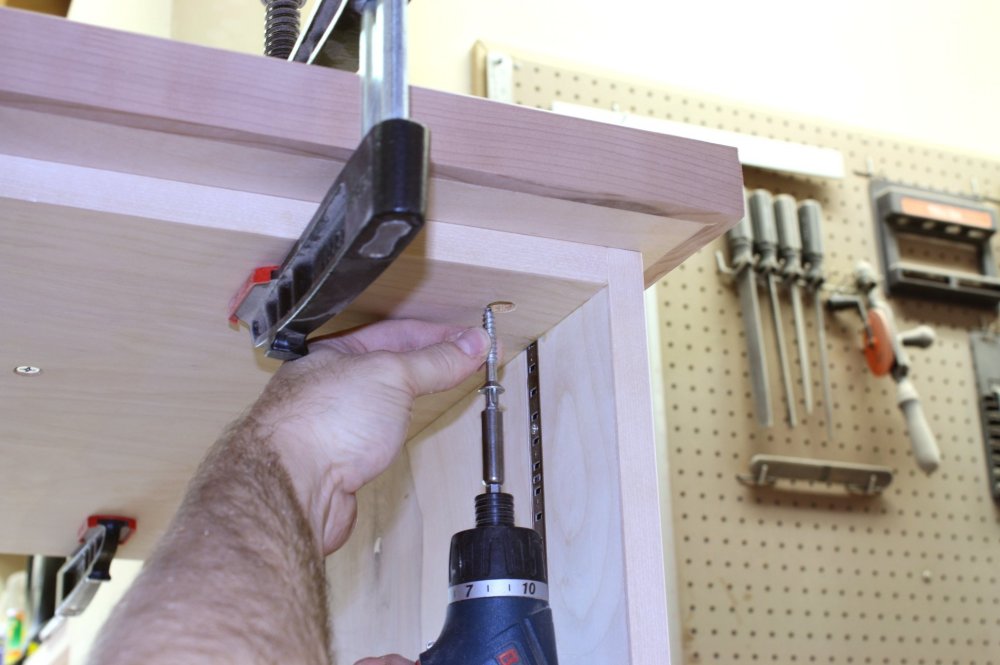 The
table tops received their redwood edge banding and now it's time to
screw them on. Each of the two table tops are secured with (8)
1/4" diameter screws. These won't pull out if you pick up the
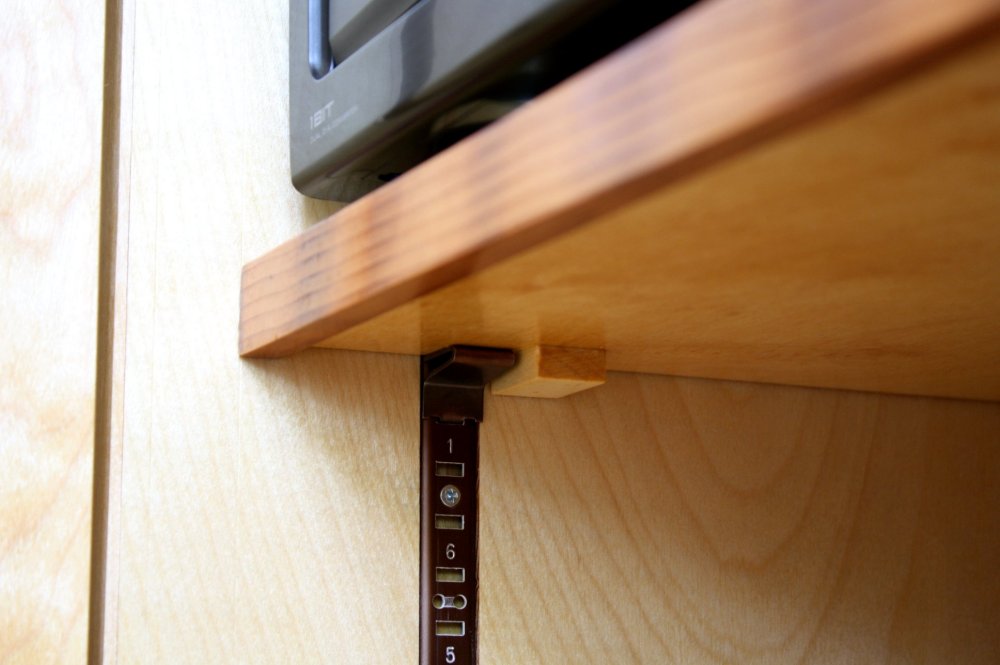
finished piece by the top. The
table tops received their redwood edge banding and now it's time to
screw them on. Each of the two table tops are secured with (8)
1/4" diameter screws. These won't pull out if you pick up the
finished piece by the top.The shelves inside the component case also got their front edges banded with some redwood. The custom touches here are the little tabs on the underside of the shelves (see the photo). A back stop in the cabinet prevents the shelves from being pushed in too far. These tabs lock into the shelf supports to keep the shelves from pulling forward. The shelves are locked in place. So the next time Brian pulls out his receiver to plug some speakers in, he won't pull the whole shelf out along with it. |
||
| July 12, 2010 | ||
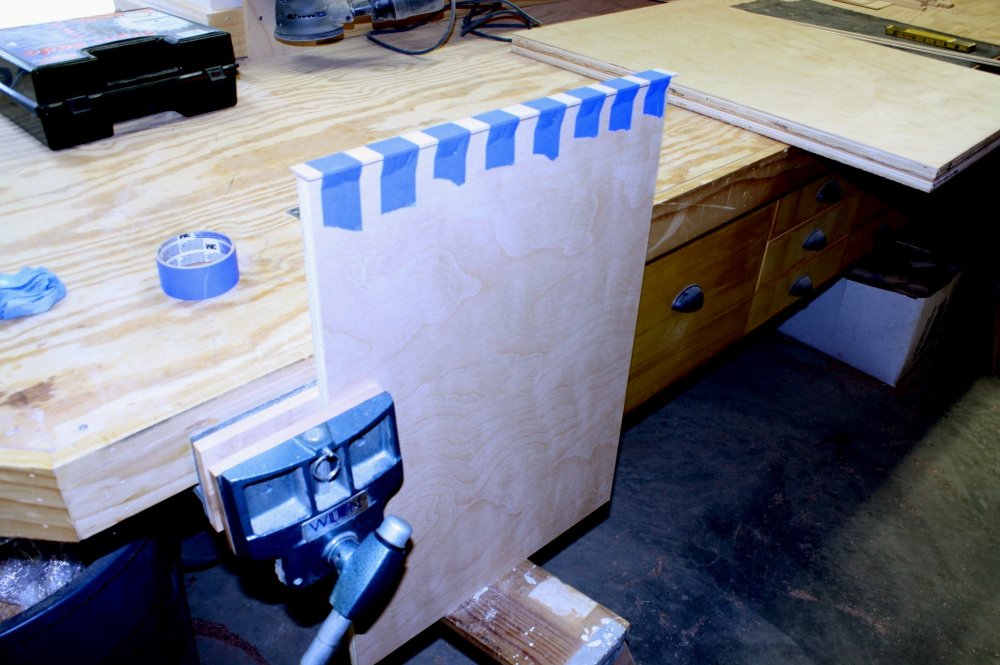
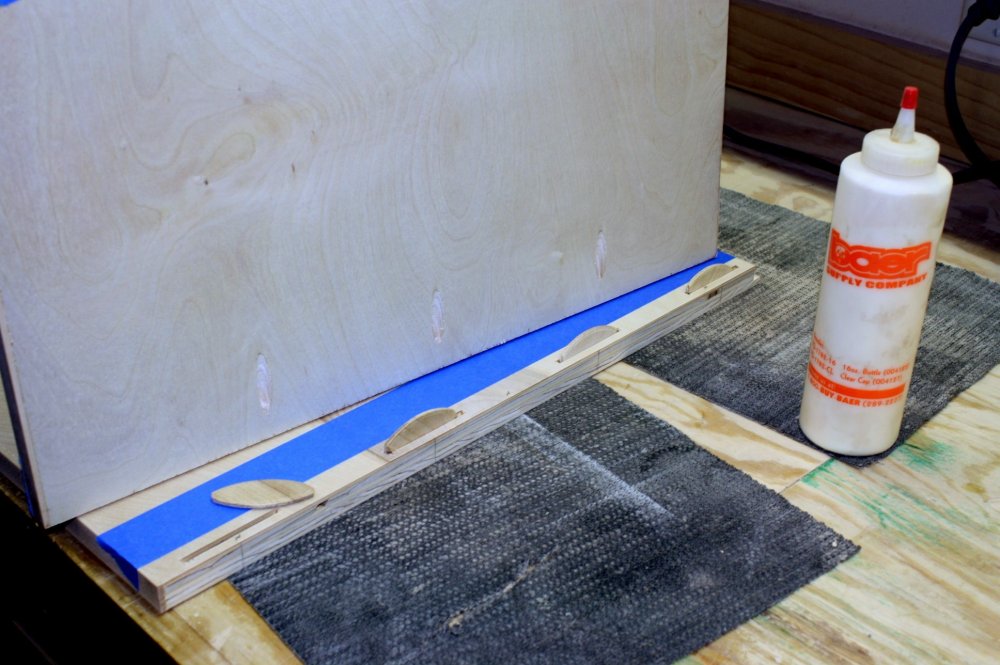
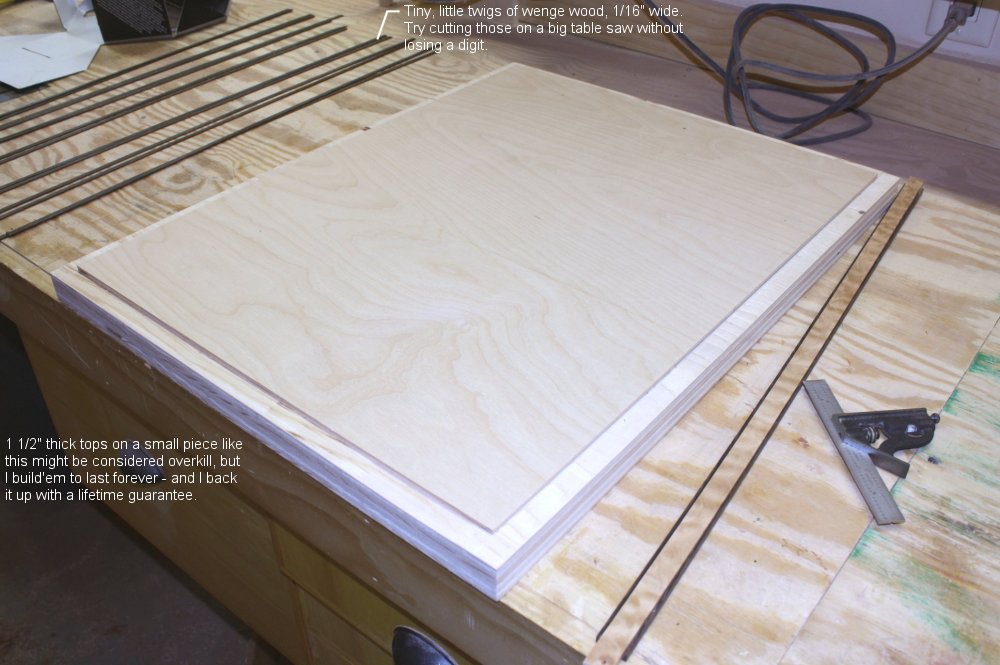
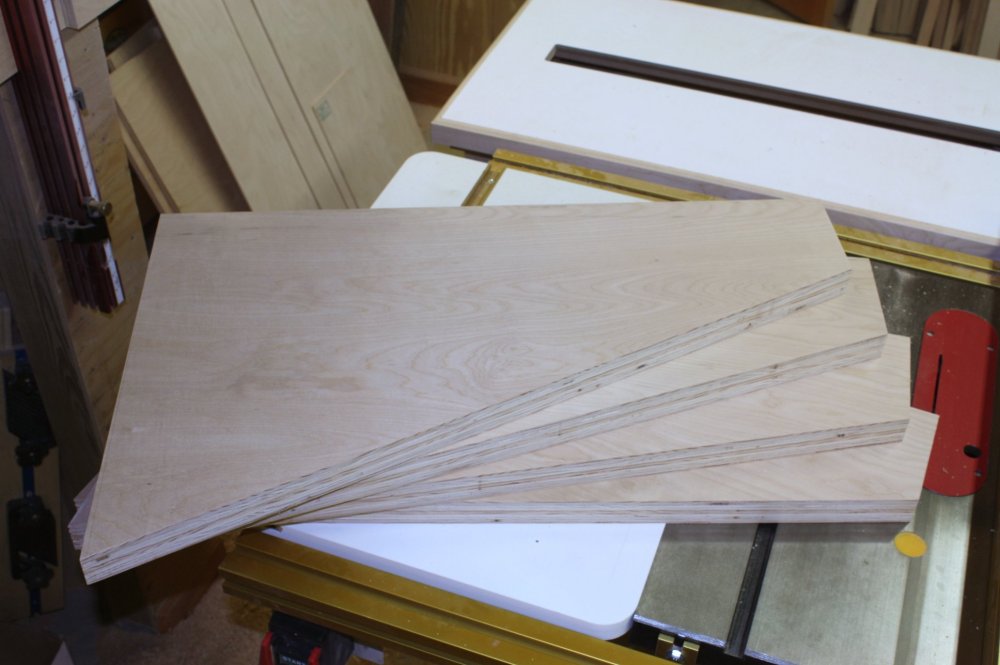  We're
going to have some wall mounted shelves with angled fronts above the
entertainment unit (see the sketch at the beginning). These
will be made from double-thick plywood. To get it
double-thick, you need to glue them together. This job is a
little bit bigger than you can tackle with your finger, so I poured
the glue straight from the gallon jug and spread it around with a
paint roller. We're
going to have some wall mounted shelves with angled fronts above the
entertainment unit (see the sketch at the beginning). These
will be made from double-thick plywood. To get it
double-thick, you need to glue them together. This job is a
little bit bigger than you can tackle with your finger, so I poured
the glue straight from the gallon jug and spread it around with a
paint roller.There is no such thing as a square house. They're usually close, but close won't cut it when you try to mount something into a corner and you end up with a big, unsightly gap. A simple check with a framing square here showed that the sidewall was about 1/4" out of square over the depth of the shelves. So I made a template of the corner where the shelves will be hung. I trimmed the template until we had a nice, tight fit. Now I can take that template back to the shop to help cut the actual shelves for a perfect fit. |
||
| July 18, 2010 | ||
 The
two shelf uprights received some grooves and the two middle shelves
were notched to fit inside those grooves. Everything
interconnects so it's especially strong. Next up will be
securing the top and bottom shelves. I'm also waiting on the
delivery of another piece of redwood so I can trim out the front
edges of the shelves to match the base cabinets. The
two shelf uprights received some grooves and the two middle shelves
were notched to fit inside those grooves. Everything
interconnects so it's especially strong. Next up will be
securing the top and bottom shelves. I'm also waiting on the
delivery of another piece of redwood so I can trim out the front
edges of the shelves to match the base cabinets. |
||
| July 20, 2010 | ||
 Great,
the redwood showed up! It makes a big difference in adding a
little contrast to the ensemble. The redwood was machined down
to the appropriate thickness and cut to fit the sides of the
shelves. After the glue dried, the edging was sanding to be
perfectly smooth and flush with the adjacent surfaces. In this
photo, you can see how the shelves are notched to interlock with the
uprights. Great,
the redwood showed up! It makes a big difference in adding a
little contrast to the ensemble. The redwood was machined down
to the appropriate thickness and cut to fit the sides of the
shelves. After the glue dried, the edging was sanding to be
perfectly smooth and flush with the adjacent surfaces. In this
photo, you can see how the shelves are notched to interlock with the
uprights. |
||
| July 25, 2010 | ||
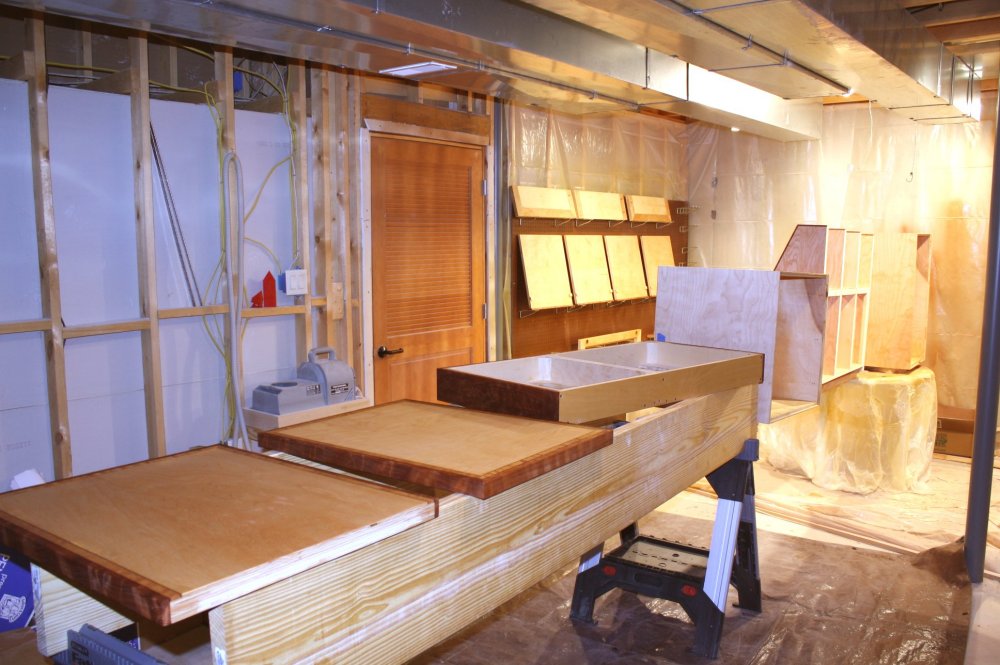  Everything
received its final sanding; now it's time to make it come alive.
The Meyer's want a natural finish, and linseed oil is the answer.
It brings a subtle amber glow to the party and it really pops out
the grain and natural beauty of the wood. The quilted maple
framing the table tops looks awesome and the richness of the figured
redwood adds a wonderful depth. Everything
received its final sanding; now it's time to make it come alive.
The Meyer's want a natural finish, and linseed oil is the answer.
It brings a subtle amber glow to the party and it really pops out
the grain and natural beauty of the wood. The quilted maple
framing the table tops looks awesome and the richness of the figured
redwood adds a wonderful depth.Even on a smaller entertainment unit like this, there seems to be a hundred pieces to oil up. I had to expand my spray booth just a little to cope with this one. |
||
| August 1, 2010 | ||
 We've
got this beautiful new entertainment center, do you really think I
would let it out the door with a plain ol' clear glass front?
I run a "custom" shop here; I make "custom" things. Clear
glass does not exude "custom" and will not propel something to "over
the top", bragging rights status. We've
got this beautiful new entertainment center, do you really think I
would let it out the door with a plain ol' clear glass front?
I run a "custom" shop here; I make "custom" things. Clear
glass does not exude "custom" and will not propel something to "over
the top", bragging rights status.The Meyer's picked out some cool textured glass and I drew up a design inspired by the tiger-striped redwood which was used on the drawer fronts, but with a contemporary flair. If you scroll up to that photo, you'll notice that the redwood has some distinct angled graining. The adjacent stained glass will pick up on the angle of the grain stripes (8 degrees off vertical if you must know). I'll also incorporate some aluminum squares within the glass design to extend the pattern of the aluminum knobs. You can pick up on these design elements and make them sing when you make the stained glass yourself - with a little help from intern, Cindy (although some may call her my wife). This will conceptually tie the whole piece together and make a cohesive unit. |
||
| August 7, 2010 | ||
 Delivery
Day! Now it's time for a little tour of the new entertainment
center. Delivery
Day! Now it's time for a little tour of the new entertainment
center.After the move, the old entertainment center simply didn't fit where it was supposed to. The new one looks like it was made to fit the available space - oh, wait, it was! The Meyer's liked the lighter colored wood for the case, no problem. We found some really cool tiger-striped redwood on Ebay for some contrast, no problem. Can we add some matching angled shelving above, no problem. How about some stained glass on the front, no problem. When it's custom, you get exactly what you want. |
||
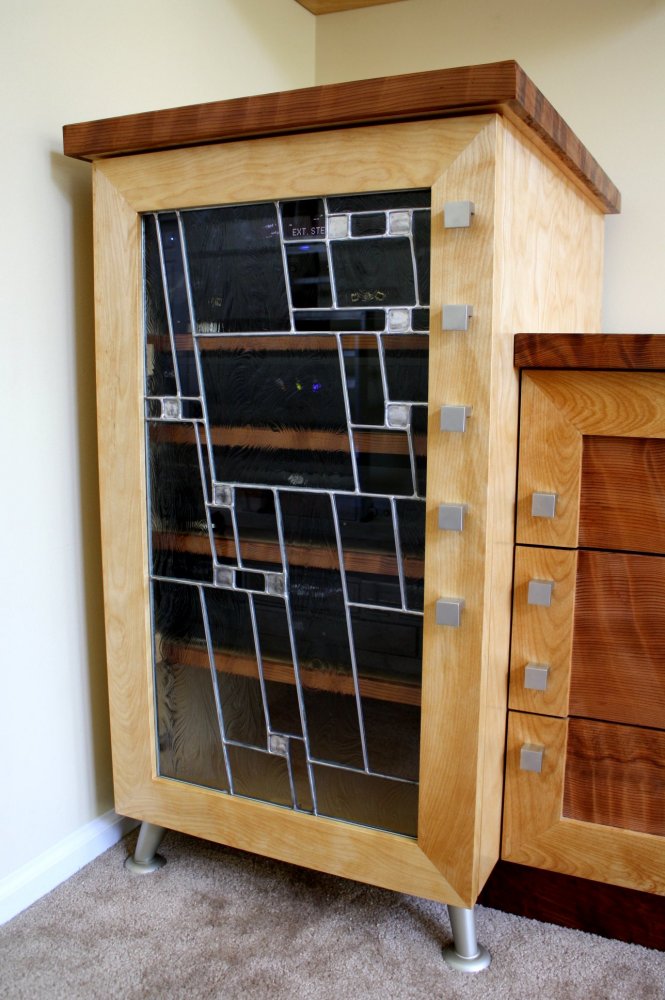  Check
out the detailing on those tops! The figured redwood
edging is off the charts. The banding on top is made from a
strip of quilted maple with a thin strip of wenge wood on each side.
It really frames the tops nicely. Check
out the detailing on those tops! The figured redwood
edging is off the charts. The banding on top is made from a
strip of quilted maple with a thin strip of wenge wood on each side.
It really frames the tops nicely.Wow! That stained glass is cool! It adds a little contemporary flair. Notice how the angle of the pattern matches the angle of the tiger stripes in the redwood. That wasn't simply a coincidence. When it's custom made, these things can be designed to play off one another. Also note how the aluminum insets in the glass line up perfectly with the door and drawer knobs. And those angled metal legs play on the contemporary theme as well. It's all these little design elements which pull the whole piece together. |
||
 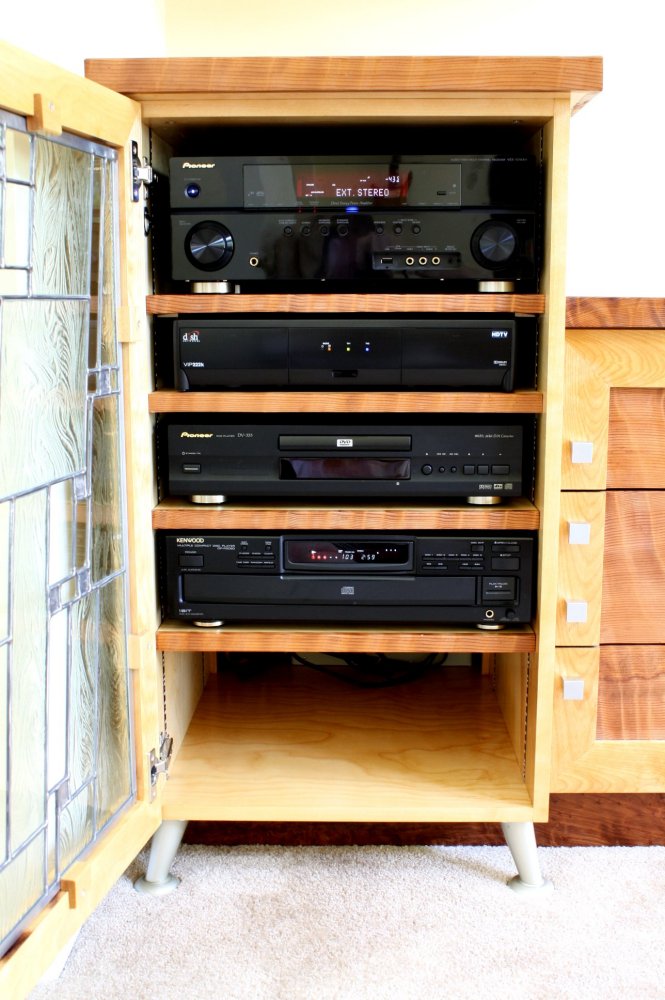 Let's
open the door and take a peek inside. There we find fully
adjustable shelves so one can arrange their components where they
see fit. The shelves also received that fancy redwood front
edge treatment. You can't see it here, but there's a back stop
so the shelves do not slide all the way against the back of the
case. This leaves room to route all those wires. If
you've ever hooked up a TV and stereo with surround sound, you know
what I'm talking about. There's also a stop on the front edge
of the shelf to keep the shelves from sliding forward while you're
in there messing around. I also included a built in power
surge in the back of the case for convenience. Now go ahead
and slam the door. The hinges have a soft-close feature which
grabs the door about 3" out and softly eases it into its proper
resting place. These are just a few more of those little
custom details that make a big difference. Let's
open the door and take a peek inside. There we find fully
adjustable shelves so one can arrange their components where they
see fit. The shelves also received that fancy redwood front
edge treatment. You can't see it here, but there's a back stop
so the shelves do not slide all the way against the back of the
case. This leaves room to route all those wires. If
you've ever hooked up a TV and stereo with surround sound, you know
what I'm talking about. There's also a stop on the front edge
of the shelf to keep the shelves from sliding forward while you're
in there messing around. I also included a built in power
surge in the back of the case for convenience. Now go ahead
and slam the door. The hinges have a soft-close feature which
grabs the door about 3" out and softly eases it into its proper
resting place. These are just a few more of those little
custom details that make a big difference. |
||
 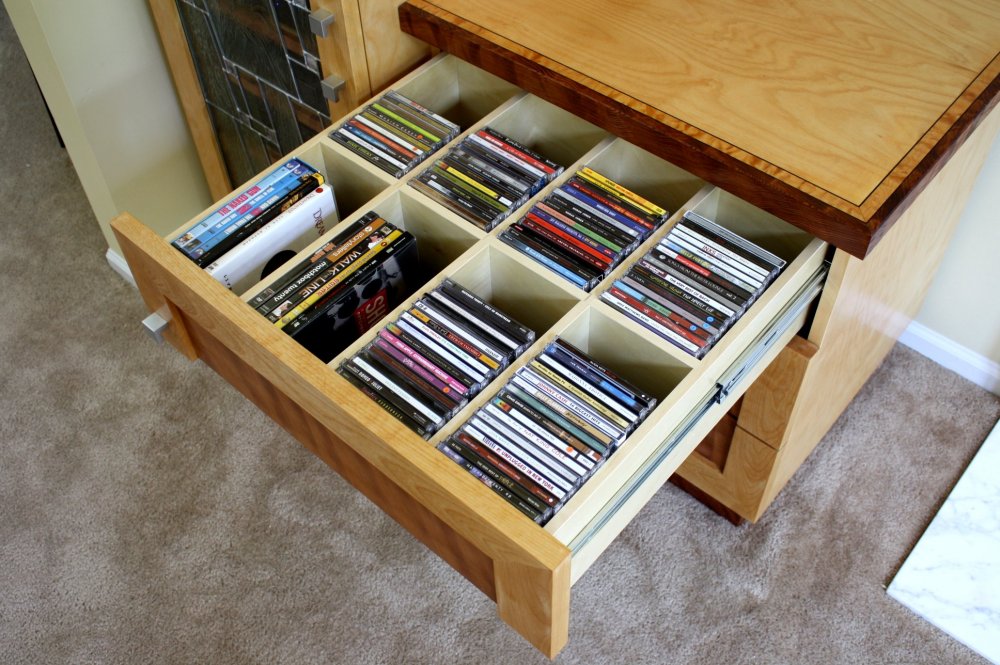 Look
inside the drawers. No way! They're all custom divided
to organize your CDs and DVDs. The full extension drawer
slides let you easily access everything even if it's all the way in
the back of the drawer. Now go ahead and slam the drawer shut.
You can't! Soft-close drawer slides protect your investment
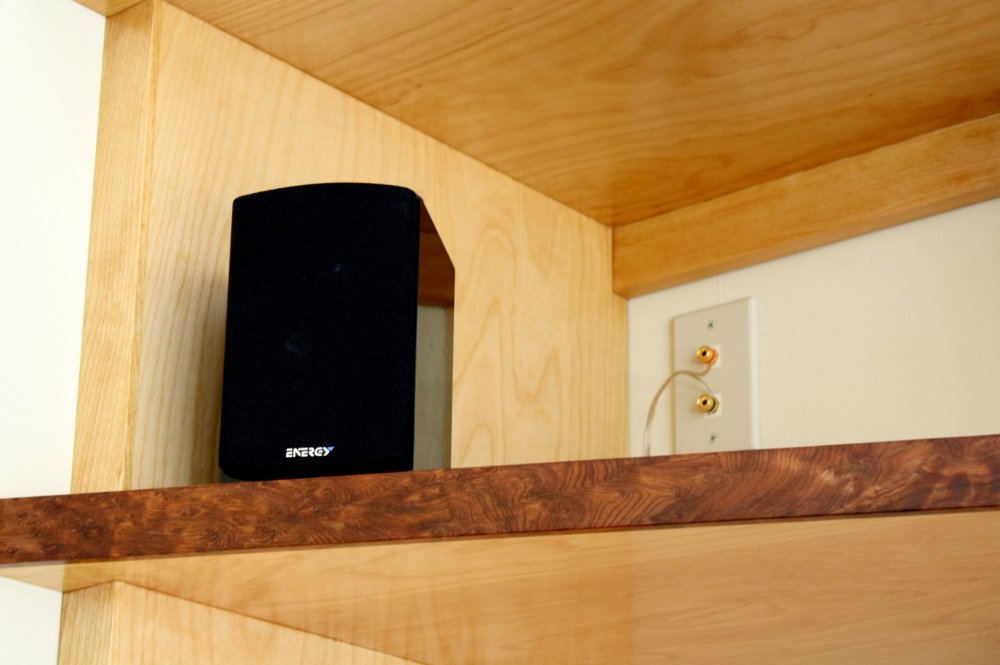
and any stray fingers which might be lurking about. Look
inside the drawers. No way! They're all custom divided
to organize your CDs and DVDs. The full extension drawer
slides let you easily access everything even if it's all the way in
the back of the drawer. Now go ahead and slam the drawer shut.
You can't! Soft-close drawer slides protect your investment
and any stray fingers which might be lurking about.Also included in this project was in-wall wiring for the surround sound system. I am fully equipped and versed in all low voltage wiring applications. Routing the wires inside the walls is more work, but you eliminate the visual clutter. Imagine that TV above the fireplace with a trail of wires draping back to the stereo. It just doesn't look clean. Each connection point features appropriate cover plates and jacks, not just a wire poking out through a hole in the wall. Again, a clean and professional installation. Oh, and while I was there I helped hang the TV, too. |
||


