|
|
| Beauty is in the details. Click on the photos to see them in a larger size. Use your browser's "Back" button to return. | |
| Introduction | |
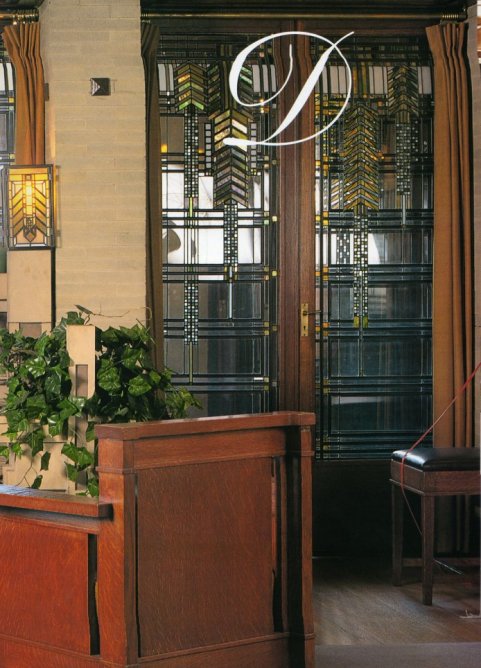
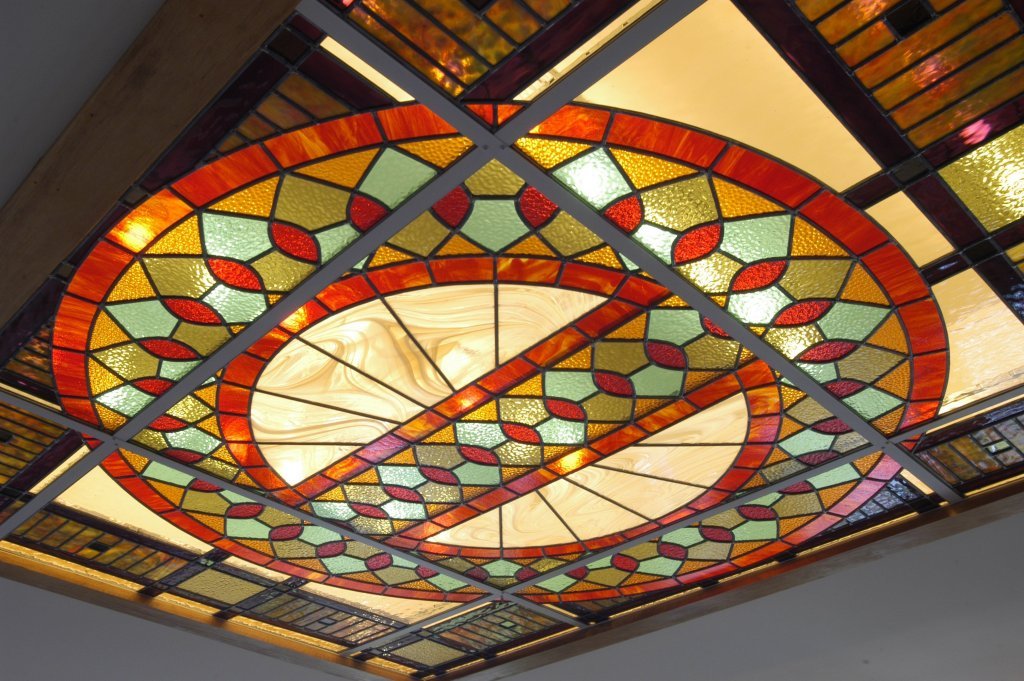 I
usually use this area of the web site to post photos of the various
projects I'm currently working on. But in this instance, I
will give you a little look into how stained glass goes together. I
usually use this area of the web site to post photos of the various
projects I'm currently working on. But in this instance, I
will give you a little look into how stained glass goes together.Many people love the look of stained glass. It adds color, texture, interesting shadows, and drama to any room. It can also lend a unique privacy screen to an area where one would prefer others not see. Back "in the day" it was commonplace (almost requisite) for the builder to add stained glass to a home, usually at the front facade or at those little windows which flank the fireplace. However, these days trimming costs from the selling price of a home usually means trimming out some of those pretty details. The first to go would likely be the stained glass. I will not argue with you that stained glass is expensive. You may be able to find a salvaged panel at a flea market which might get the job done, but you may want a perfect fit or to add your own colors, unique design, or personal monogram to the art. This can only be accomplished by having a custom piece made for you. Depending on complexity, a stained glass panel can run from $100-$200 per square foot, which is a lot, but consider that the glass alone can run up to $25 per square foot. Then you must add on the cost of the lead came which holds each piece of glass in place, the solder, the flux, the cement, and the frame to hold it all together, not to mention the time involved and the equipment required. This work is VERY tedious. This glass ceiling (in the photo above) has 604 pieces of glass, and the door panels (in the photo below) have an astonishing 1,578 individual pieces of glass, and each one must be individually loved into its final position. This doesn't happen in one night; it takes many, many hours. Imagine sitting down and simply cutting out each of those pieces from paper (which is much easier than cutting glass) then taping them together (which is much easier than soldering) and you'll begin to understand what I'm talking about. The purpose of this article is to give you some insight into what it takes to make art in stained glass, and perhaps you may gain some appreciation for the artistry, skill, time, patience, and ultimately the cost which goes into such a project. |
|
| Develop a Pattern | |
  If you can put a pencil to paper, you can create a design. But
making a "good" design requires being able to materialize the idea
with the understanding of proportion, balance, and style.
Understanding how glass allows itself to be cut and how the pieces
will go together may dictate some of the design elements.
Drawing a pattern comes from what you wish to convey and how it will
work with the glass medium. And for a custom fit, your
dimensions of the existing opening and your construction of the
panel must be dead on accurate or the
piece will simply not fit. If you can put a pencil to paper, you can create a design. But
making a "good" design requires being able to materialize the idea
with the understanding of proportion, balance, and style.
Understanding how glass allows itself to be cut and how the pieces
will go together may dictate some of the design elements.
Drawing a pattern comes from what you wish to convey and how it will
work with the glass medium. And for a custom fit, your
dimensions of the existing opening and your construction of the
panel must be dead on accurate or the
piece will simply not fit.In the case of this example, I will be creating a replica of some stained glass from Frank Lloyd Wright's Dana-Thomas House. Wright was an architect noted for his extensive use of stained glass and the many unique glass designs he created. Making a replica requires the real glass panels in front of you from which to take accurate measurements. However, these panels are in Springfield, Illinois (not close by). So the next best thing was to find very detailed photographs from which to work (which are usually as close as the internet). The next consideration is how the pattern will translate to the size of (in this case) the doors in which they will be mounted. The proportions of our doors were quite similar (see photos above), so the pattern would work out well.  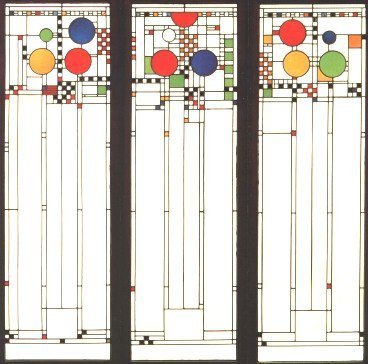 In the case of another replica I made of
stained glass
from Wright's Coonley Playhouse, the original windows (left photo)
were much taller than those to which the replicas would be fit. So I
truncated a portion out of the middle of the design. Each case
is different, and some design liberties may have to be taken to make
things work. In the case of another replica I made of
stained glass
from Wright's Coonley Playhouse, the original windows (left photo)
were much taller than those to which the replicas would be fit. So I
truncated a portion out of the middle of the design. Each case
is different, and some design liberties may have to be taken to make
things work.The design must be drawn to full scale. Fortunately I have a computer which makes some of the layout a bit easier, but stained glass has been made for centuries and the cathedral artists had no problem working without one. The process is tedious and involves scaling the original design, translating the dimensions to the replica drawing, documenting the color, and rechecking for accuracy...then repeat a thousand times! Feel free to review the original to the replica in the photos above; color for color, circle for circle, and square for square. You'd be hard-pressed to find a discrepancy. |
|
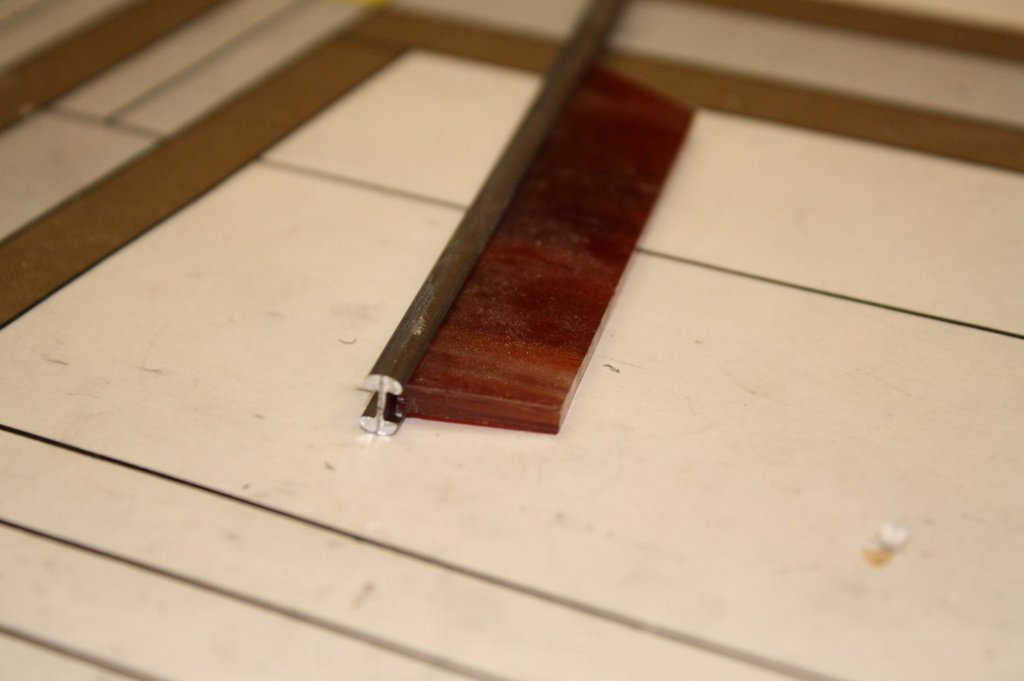
| Cut and Fit the Glass | |
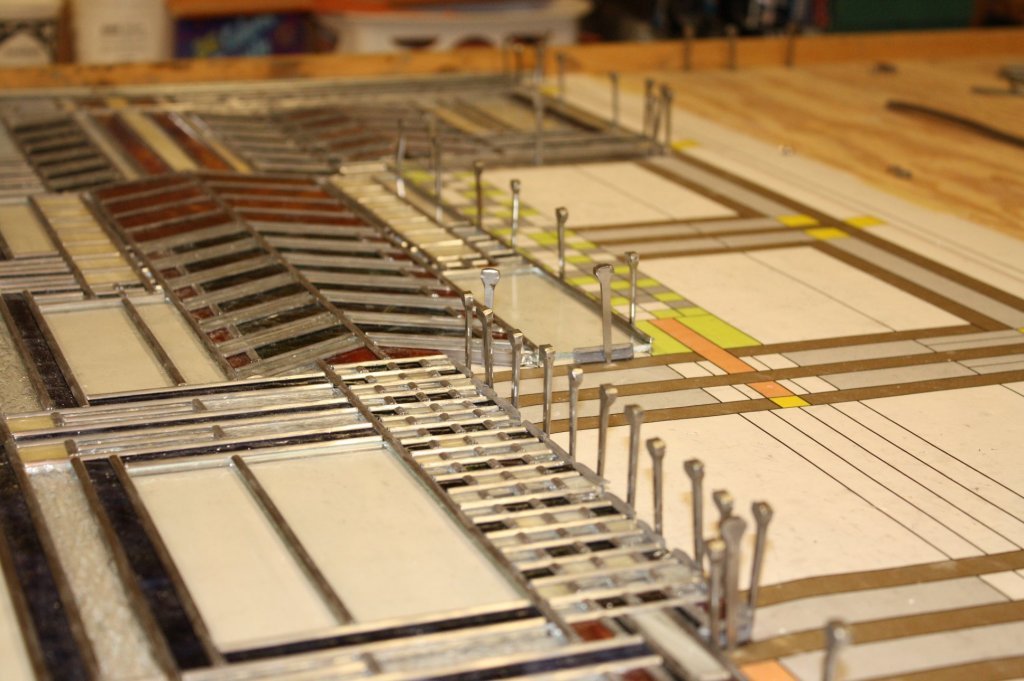 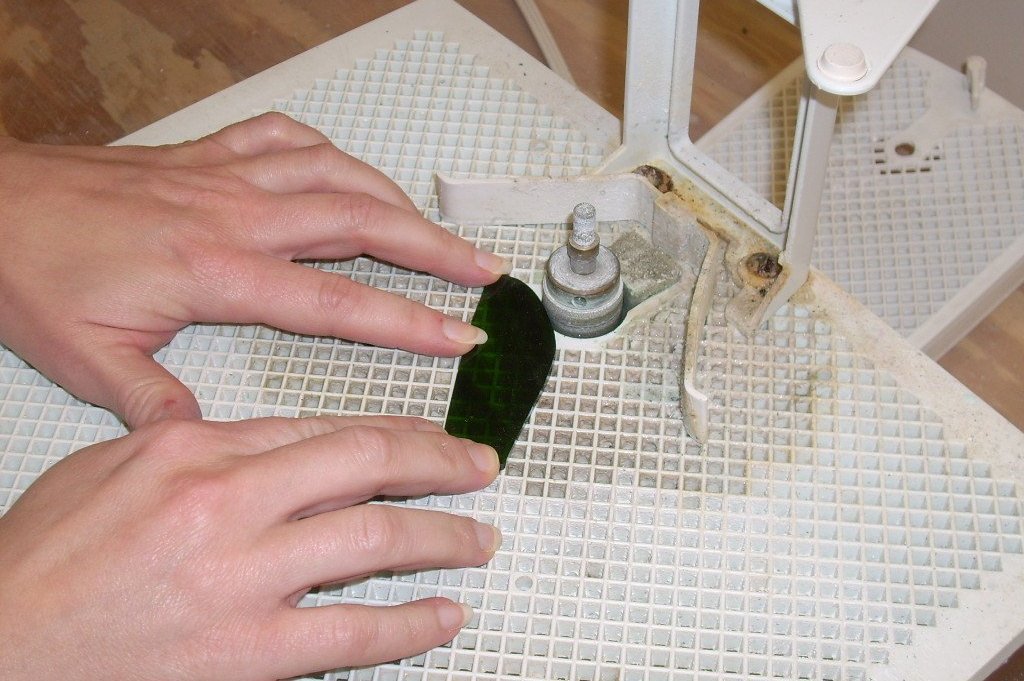 Once
a full size pattern is developed, I print out two copies: one from
which to trace the shape of each piece of glass and a second on
which to assemble the actual panel. This will keep things from
growing or shrinking as more pieces are added. Basically you
start in one corner and work out from there: find the correct color glass,
cut the shape from it, then grind the edges down for a perfect fit
(as shown in the photo). Since you are working directly on top
of the pattern, you can fine tune the fit to split the lines.
The nails you see in the far right photo are holding the partial
assembly tight in place. Once
a full size pattern is developed, I print out two copies: one from
which to trace the shape of each piece of glass and a second on
which to assemble the actual panel. This will keep things from
growing or shrinking as more pieces are added. Basically you
start in one corner and work out from there: find the correct color glass,
cut the shape from it, then grind the edges down for a perfect fit
(as shown in the photo). Since you are working directly on top
of the pattern, you can fine tune the fit to split the lines.
The nails you see in the far right photo are holding the partial
assembly tight in place. |
|
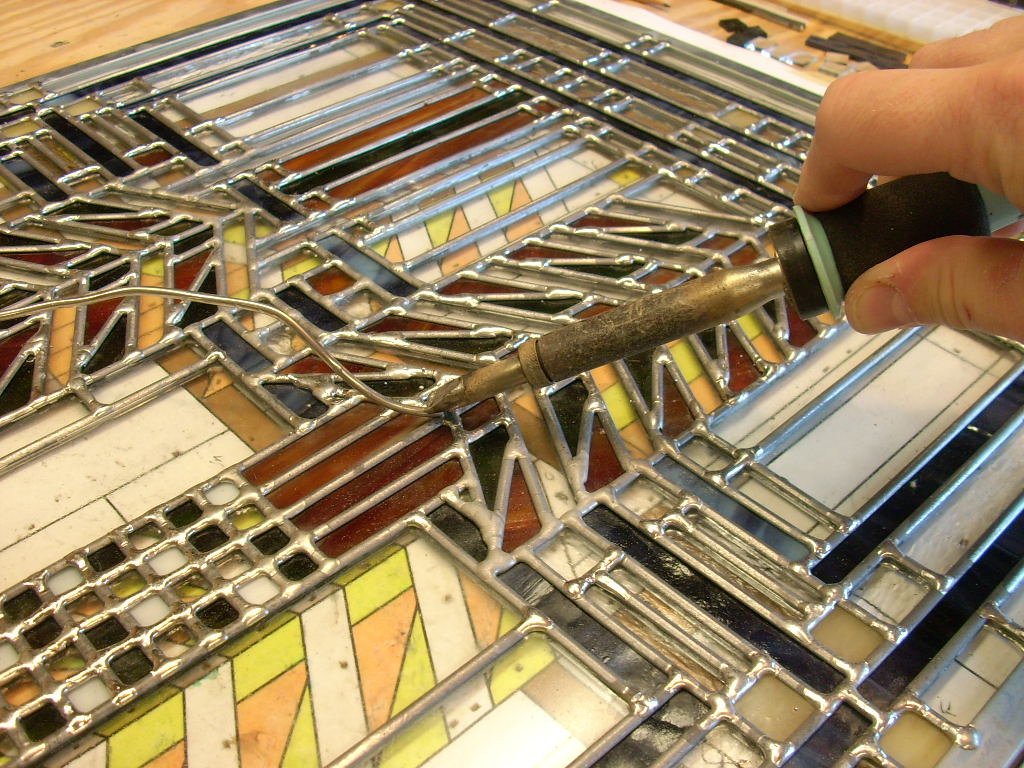
| Solder the Joints | |
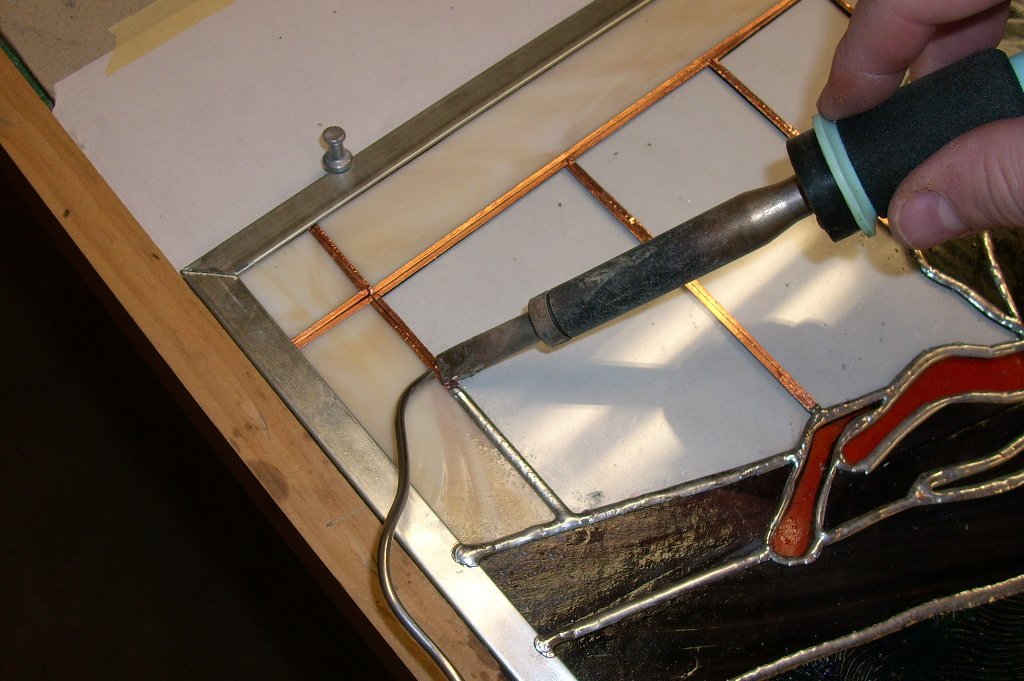 Once
a piece's fit is fine tuned, it needs to be held in place and
joined to the next piece of glass so that everything doesn't just
fall out. There are two methods of "gluing" the glass
together both involving the use of solder: "foil" and "lead". Once
a piece's fit is fine tuned, it needs to be held in place and
joined to the next piece of glass so that everything doesn't just
fall out. There are two methods of "gluing" the glass
together both involving the use of solder: "foil" and "lead".The foil method requires that you stick a thin, adhesive-backed, copper foil strip around the edges of each piece. You place all of your pieces together and solder over the entire joint. The solder only sticks to the foil, not to the glass. After soldering both sides of the panel, you ultimately create a small channel in which the glass is secured (as in the photo to the right). |
|
|
|
|
| Cement the Joints | |
  After
soldering, the panel is looking pretty good aside from some excess flux
here and there. However, one of the cons to using lead is that
the individual pieces of glass are not always the same exact
thickness and they will not always fit tightly in the lead's groove.
That extra space may cause the pieces to wiggle around a little.
Forcing cement into those grooves will fill that extra space and
make the panel a little more structurally sound overall. After
soldering, the panel is looking pretty good aside from some excess flux
here and there. However, one of the cons to using lead is that
the individual pieces of glass are not always the same exact
thickness and they will not always fit tightly in the lead's groove.
That extra space may cause the pieces to wiggle around a little.
Forcing cement into those grooves will fill that extra space and
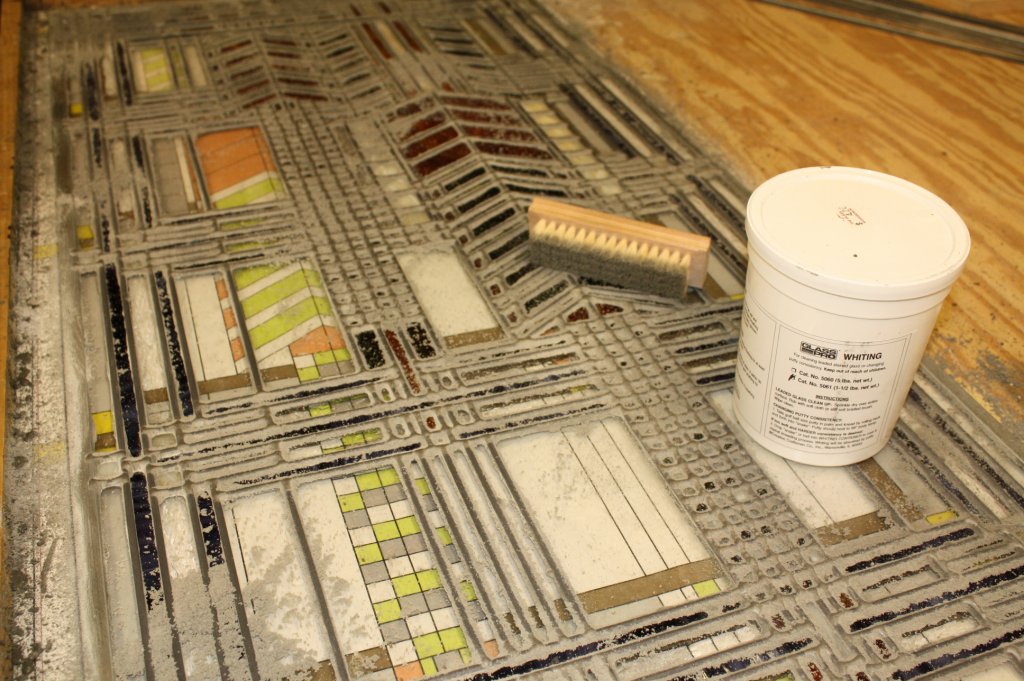
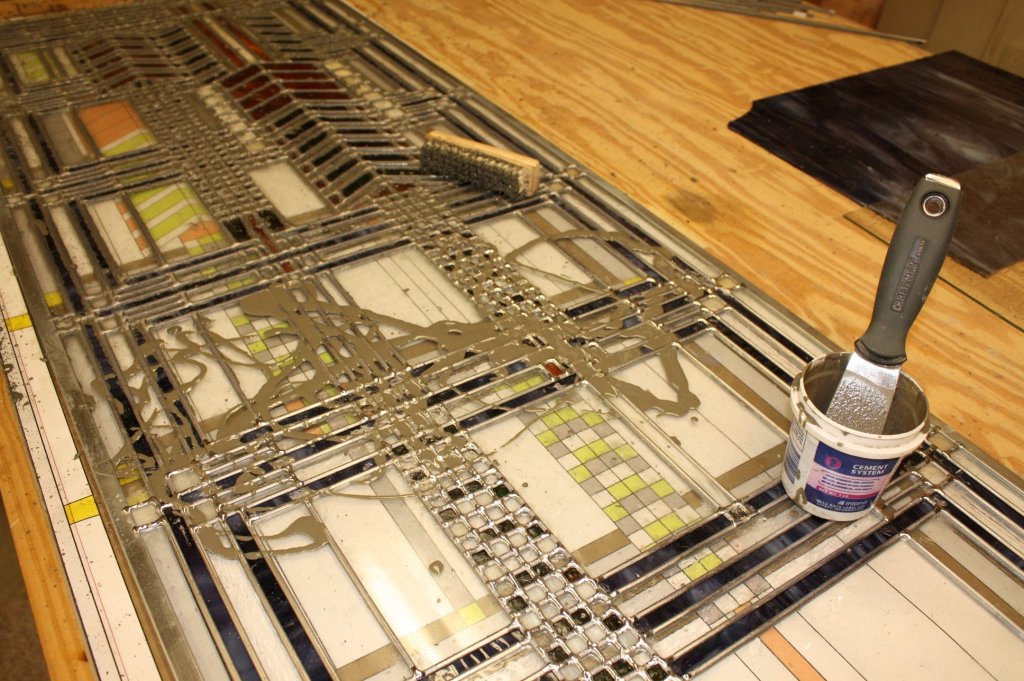
make the panel a little more structurally sound overall.The cement, or mud as it's sometimes called, is a syrupy mixture with turpentine as it's solvent, not the best odor to work with, but certainly not the worst. The cement is mixed up then poured over your beautiful panel. A soft bristled brush is used to force the cement under the face of the lead and into those grooves. Don't wear your Sunday whites for this chore. After that, a thin layer of powder called "whiting" is sprinkled over the top and spread around to cover the cement. This helps speed up the drying process. Leave the panel to cure for about 8 hours or overnight. You need to leave the cement on long enough to dry a little and still be workable, but not so long that you'd need to chisel the excess cement from the glass. |
|
| Clean Up the Panel | |
 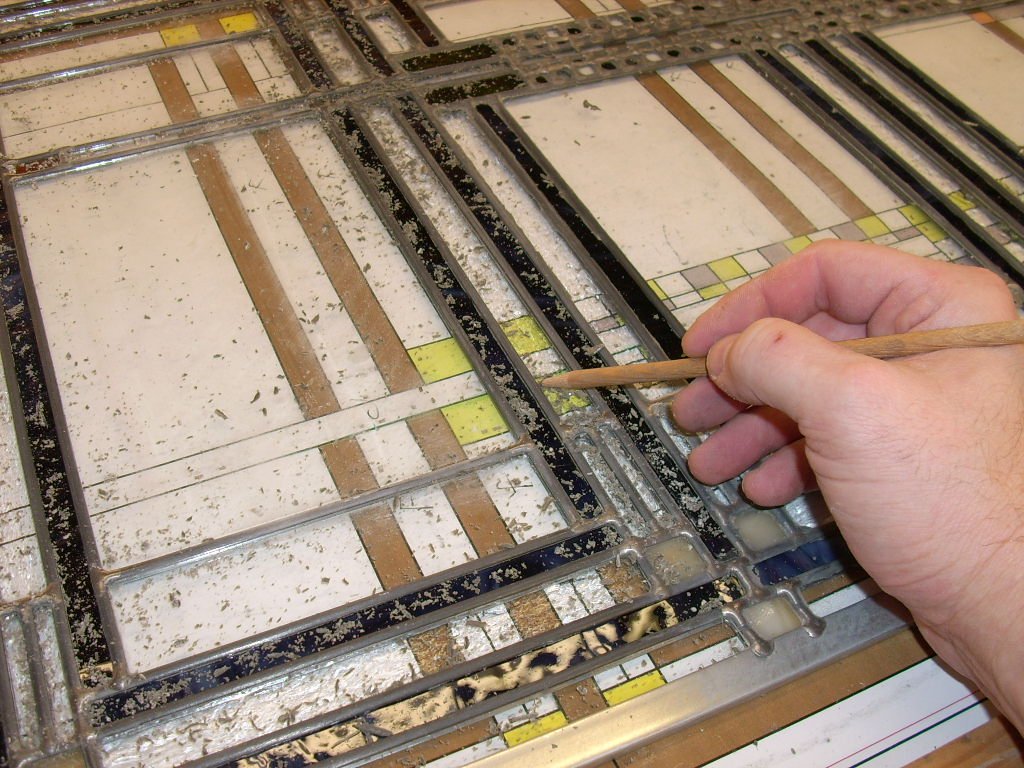 The
next day it's time for clean up. You start off by using a shop vac to suck up all the excess whiting so you can see where you'll be
working. Then a small pick is used to remove any excess
cement. I'm using a sharpened oak dowel in the photo, but I
carry around a wooden popsicle stick in my arsenal as well. As
you remove the cement, you will also be pushing in and forming some of the
partially cured cement under the face of the lead creating a tight
seal. Once done, hit it with the shop vac again. The
next day it's time for clean up. You start off by using a shop vac to suck up all the excess whiting so you can see where you'll be
working. Then a small pick is used to remove any excess
cement. I'm using a sharpened oak dowel in the photo, but I
carry around a wooden popsicle stick in my arsenal as well. As
you remove the cement, you will also be pushing in and forming some of the
partially cured cement under the face of the lead creating a tight
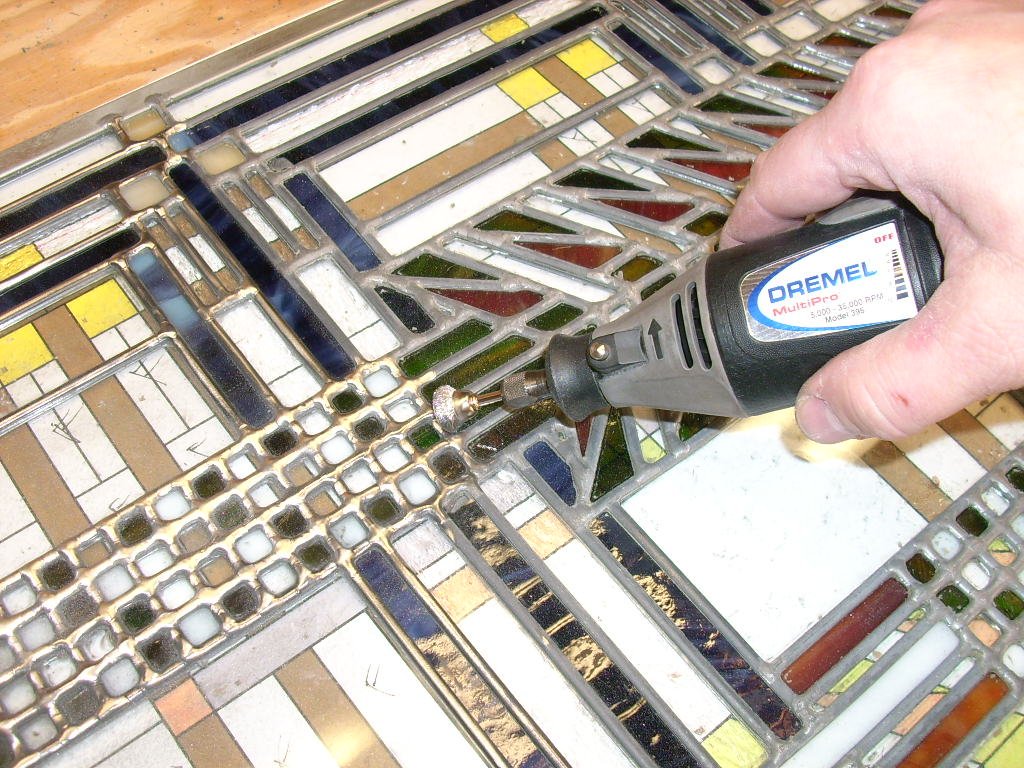
seal. Once done, hit it with the shop vac again.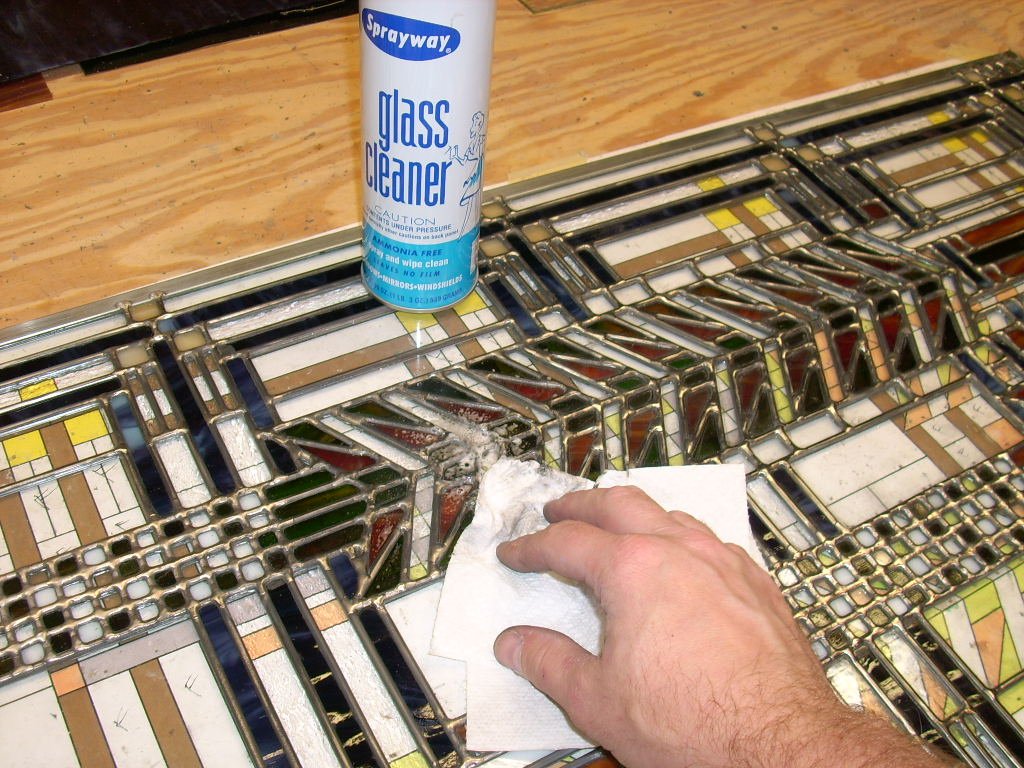 No
shop is complete without some power tools. I use a Dremel tool equipped with a wire cone brush
to clean excess cement from the face of the lead and give it a nice
sheen. That sheen will dull over time since lead oxidizes like
many other metals, but I'm not going to deliver dirty art to anyone. No
shop is complete without some power tools. I use a Dremel tool equipped with a wire cone brush
to clean excess cement from the face of the lead and give it a nice
sheen. That sheen will dull over time since lead oxidizes like
many other metals, but I'm not going to deliver dirty art to anyone.The final touch is to clean all the glass. This isn't as easy as it sounds since each piece needs to be polished individually and you have to get into all the many corners. Spray a small section at a time so the cleaner doesn't evaporate before you get there. |
|
| Installation | |
 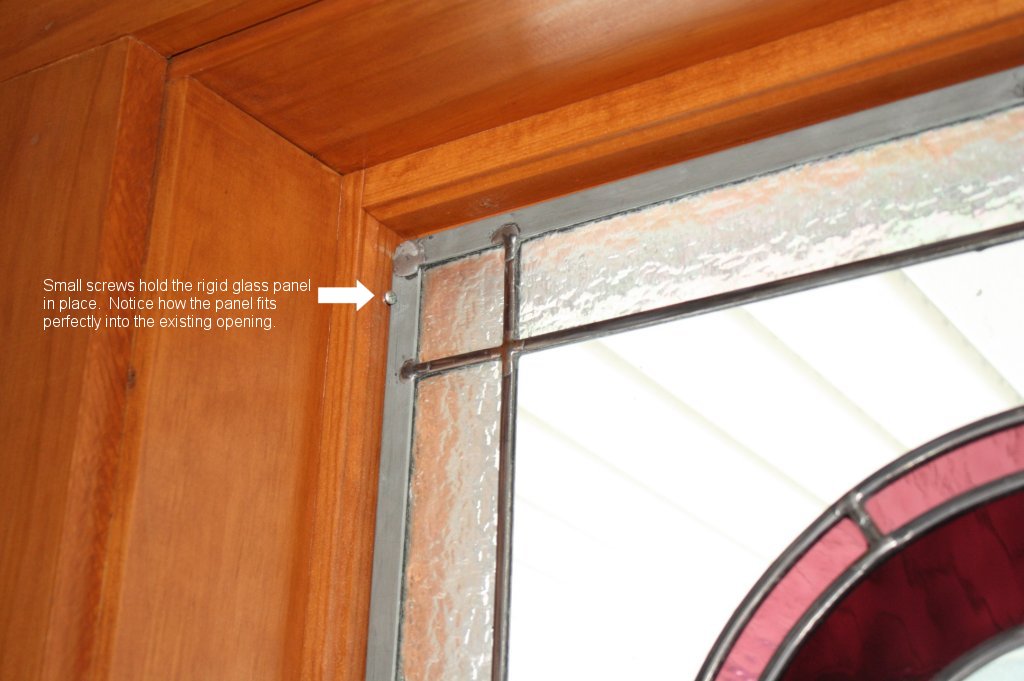 I
always prefer to measure and install the panels when possible.
That way I know it will fit and it will stay there forever.
Depending on the situation, there are a few ways to mount the glass.
You could just hang the piece from a chain in front of your window,
but a piece which is custom-sized to your window gives you a
cleaner, built-in look. The window's original insulating
glass is left in place. Only a few very small screws are used
where the heads of the screws hold the stained glass panel up
against the existing window's stops. In the case of the door
panels, the profile of the door frame was too thin and there was no
room to use the screw-head method. Here, I built a wood frame
which was screwed to the face of the door and holds the glass in
place. The frame was stained to match the doors and a foam
gasket was inserted between to hold the glass gently yet securely without
allowing any wobbling around when the door is operated. I
always prefer to measure and install the panels when possible.
That way I know it will fit and it will stay there forever.
Depending on the situation, there are a few ways to mount the glass.
You could just hang the piece from a chain in front of your window,
but a piece which is custom-sized to your window gives you a
cleaner, built-in look. The window's original insulating
glass is left in place. Only a few very small screws are used
where the heads of the screws hold the stained glass panel up
against the existing window's stops. In the case of the door
panels, the profile of the door frame was too thin and there was no
room to use the screw-head method. Here, I built a wood frame
which was screwed to the face of the door and holds the glass in
place. The frame was stained to match the doors and a foam
gasket was inserted between to hold the glass gently yet securely without
allowing any wobbling around when the door is operated.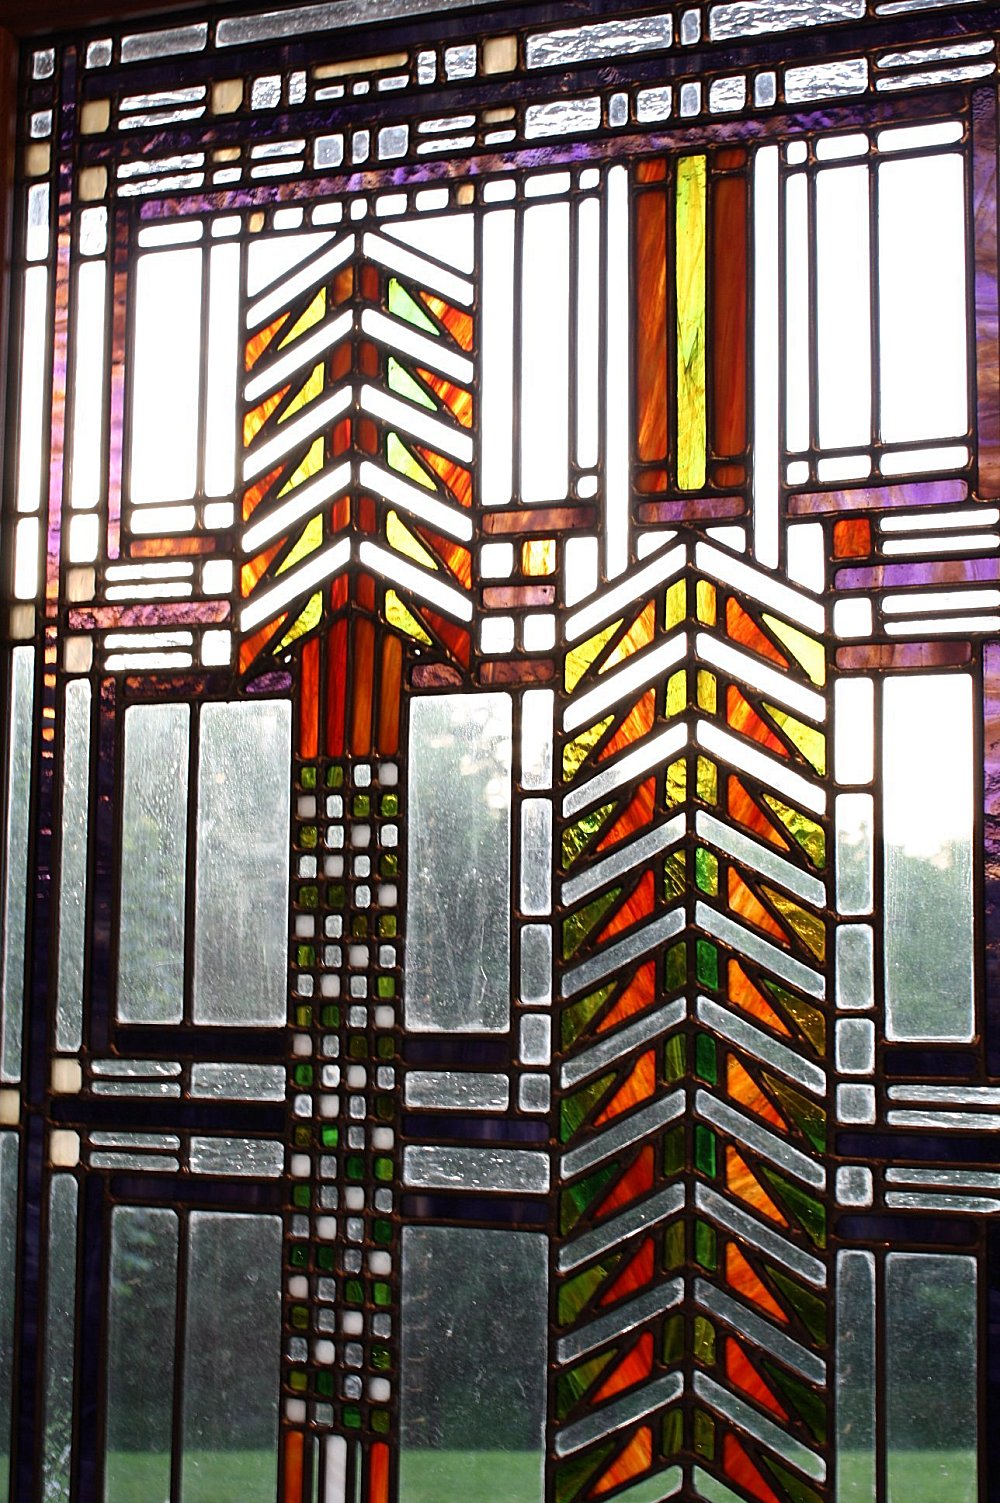 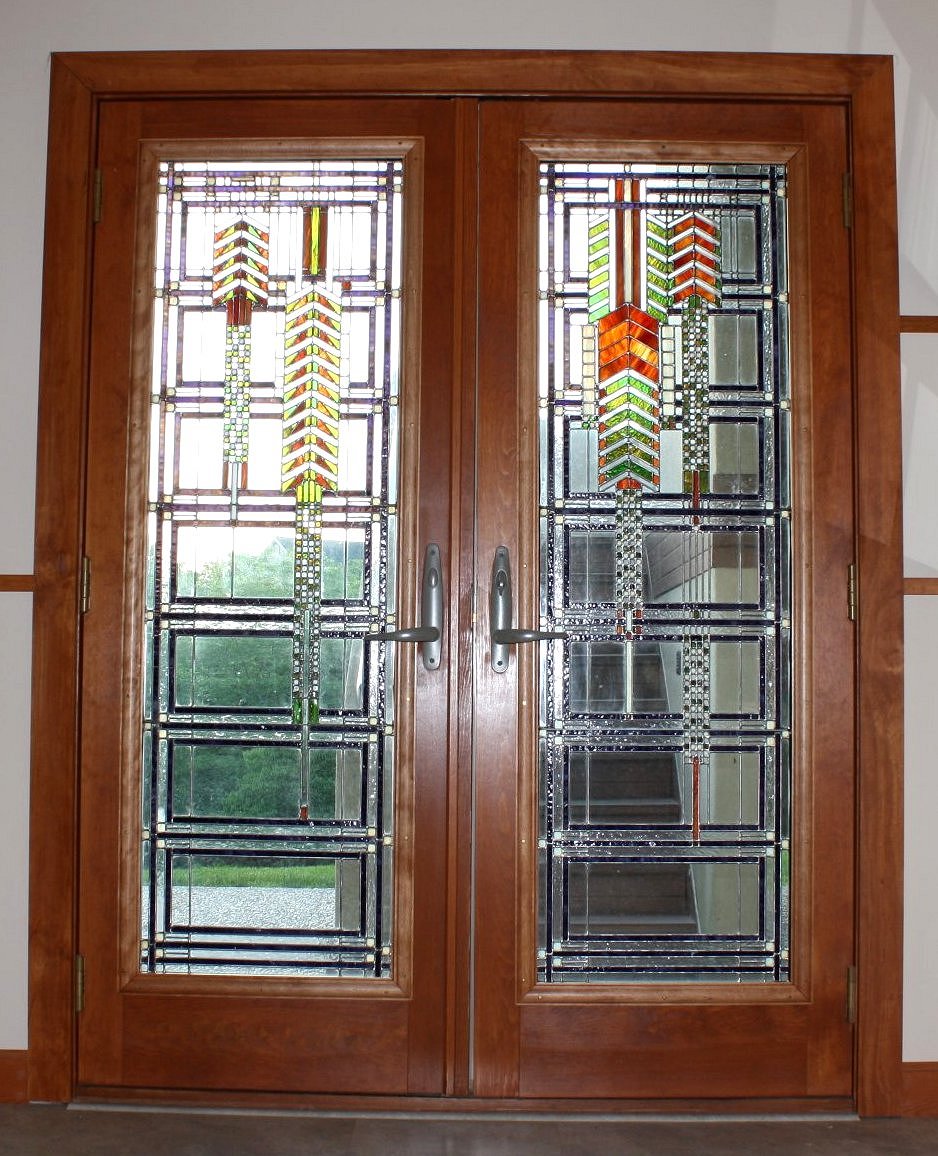 I
don't think a lot of commentary is needed when you see the final
product. A good design executed with the proper skill and
attention to every detail speaks for itself. Spectacular! I
don't think a lot of commentary is needed when you see the final
product. A good design executed with the proper skill and
attention to every detail speaks for itself. Spectacular!
|
|