| Brian's Guitar from Conception to Birth or How to Build a Guitar in 62 Easy Steps! |
| Preparation |
| You won’t want to
attempt to do your own build unless you have some knowledge of how
to use woodworking tools. This project will require a high level of
skill, patience, and experience in woodworking. If you’re missing
any of those traits, your build will probably not come out as
professional looking as you might expect. I don’t want to discourage
anyone, but this will cost a good sum of money and a large
investment of time. If this is your first guitar build, you
obviously won’t know what you’re doing. This dialogue will recount
my experience on this particular guitar. Your experience may vary
and difficult situations might arise so you will have to fall back
on your woodworking experience to fill in the gaps. I can’t teach
you woodworking here or show you how to use every tool, but I can
outline the steps in making a guitar and throw in a few tips here
and there. If you’re planning on building a guitar to save some money, you’d be in it for the wrong reason. The tab for this build was over $1,000 in materials alone (see the Specifications listing in Appendix A). This does not count the cost of the tools used. Building your own guitar is a mark of pride in your craftsmanship and a sense of accomplishment. You can create your own designs and include the components and details you want. You don’t have to settle for what’s hanging up in the store. Before you start whacking away at a pile of wood, you’ll want to get yourself a little prepared and build up a some confidence. I started off by reading books and scouring the internet to gain as much background knowledge as I could. Through that research, I developed a checklist of everything Brian would have to consider when writing the specs for his new instrument, and I put him to work (see the Design Considerations checklist in Appendix B). While Brian was busy researching and buying parts for his dream machine, I got to work on sorting out the details of the design. You need to make ALL of your choices up front (notice the bold and all caps). You have to be VERY thoroughly prepared because once you start cutting and gluing up wood, there’s no going back. It is also imperative that you purchase everything before you start. You need to have all the parts in your hand so you can measure all the components and prepare an accurate design based on precise and actual dimensions. Little things like the height of your bridge or the width of your nut will dramatically effect the way the guitar is put together. Avoid the temptation to just start cutting wood until you’ve developed a full scale drawing of the guitar. 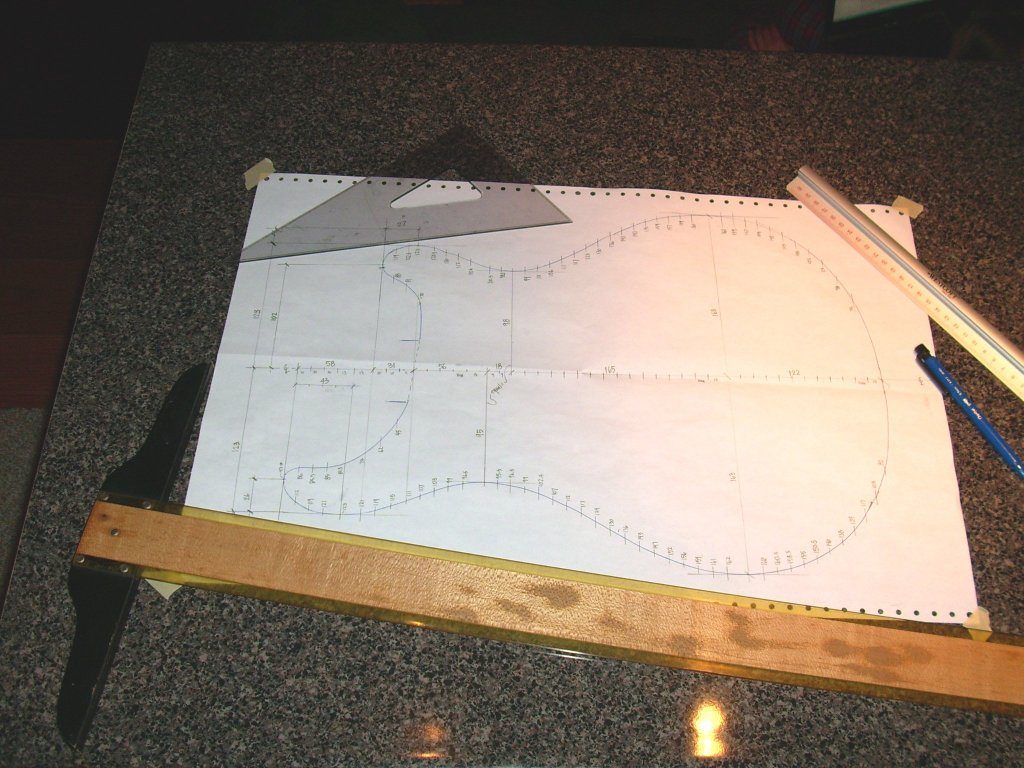 Brian
loves the Paul Reed Smith body style, so we went to Guitar Center
and traced one. Please ask permission first and don’t use indelible
ink which might end up on the guitar or you’ll end up buying that
guitar instead of making one. I took the tracing to the drawing
board, laid out a centerline, and plotted all the points around the
body. Fortunately I have AutoCAD at work so I could transfer
everything into the computer and work with more precision than doing
everything with a pencil and a ruler. I input the dimensions into
the computer and refined things up a bit. Though complete
plagiarization is alright here, you should tweak some of the details
to make the design your own (otherwise just buy the PRS). I tweaked
the proportions a little and played around with the headstock design
and inlay patterns. Brian wanted to personalize the electronics
package. Brian
loves the Paul Reed Smith body style, so we went to Guitar Center
and traced one. Please ask permission first and don’t use indelible
ink which might end up on the guitar or you’ll end up buying that
guitar instead of making one. I took the tracing to the drawing
board, laid out a centerline, and plotted all the points around the
body. Fortunately I have AutoCAD at work so I could transfer
everything into the computer and work with more precision than doing
everything with a pencil and a ruler. I input the dimensions into
the computer and refined things up a bit. Though complete
plagiarization is alright here, you should tweak some of the details
to make the design your own (otherwise just buy the PRS). I tweaked
the proportions a little and played around with the headstock design
and inlay patterns. Brian wanted to personalize the electronics
package.While I was busy on the design and layout, Brian was buying stuff like a kid in a candy store. There are a few local sources for things, but the internet proved to be the best resource for opening up the most options for all the products. As Brian received the goods he passed them along to me. I in turn got out my (metric) ruler and digital calipers to document all the components and draw them up on the computer. The details of the design will start to come together as you let the individual components steer you. 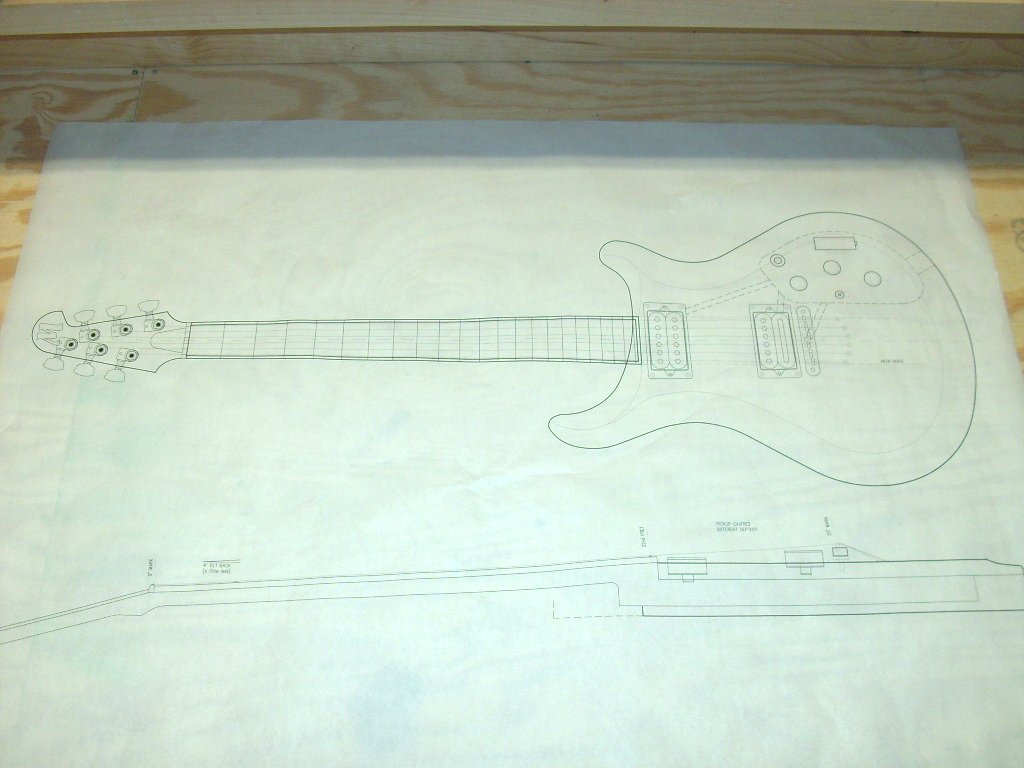 To
lay out the neck, you need the nut width on one end and the bridge
width on the other. You need to know your scale length and fret
spacing (there are plenty of charts for this on the internet). The
bridge height will dictate how much your neck tilts back from the
body. The dimensions of the tuning machines will place some
restrictions on how you lay them out on the headstock. The depth of
your electronics will let you know how thick to make the body and
how large the control cavity has to be. You definitely don’t want to
find out that you don’t have enough room inside after you’ve got the
guitar completely finished. You get the drift. You want to avoid
being surprised after mis-cutting that $100 piece of quilted maple.
The photo shows a full scale drawing of Brain’s guitar and a section
through it. Both are critical to have worked out before you start
(see the Design Diagrams in Appendix C). To
lay out the neck, you need the nut width on one end and the bridge
width on the other. You need to know your scale length and fret
spacing (there are plenty of charts for this on the internet). The
bridge height will dictate how much your neck tilts back from the
body. The dimensions of the tuning machines will place some
restrictions on how you lay them out on the headstock. The depth of
your electronics will let you know how thick to make the body and
how large the control cavity has to be. You definitely don’t want to
find out that you don’t have enough room inside after you’ve got the
guitar completely finished. You get the drift. You want to avoid
being surprised after mis-cutting that $100 piece of quilted maple.
The photo shows a full scale drawing of Brain’s guitar and a section
through it. Both are critical to have worked out before you start
(see the Design Diagrams in Appendix C).We got excited to jump into things so we satisfied that urge by buying some wood (December 14, 2007). I took a few rough dimensions off my old guitar so I was sure we would get enough. Wood choice is mostly dictated by personal preference, but there is one major rule to follow: select hard woods which resist warping. Brian decided on the following (from top to bottom in the photo): 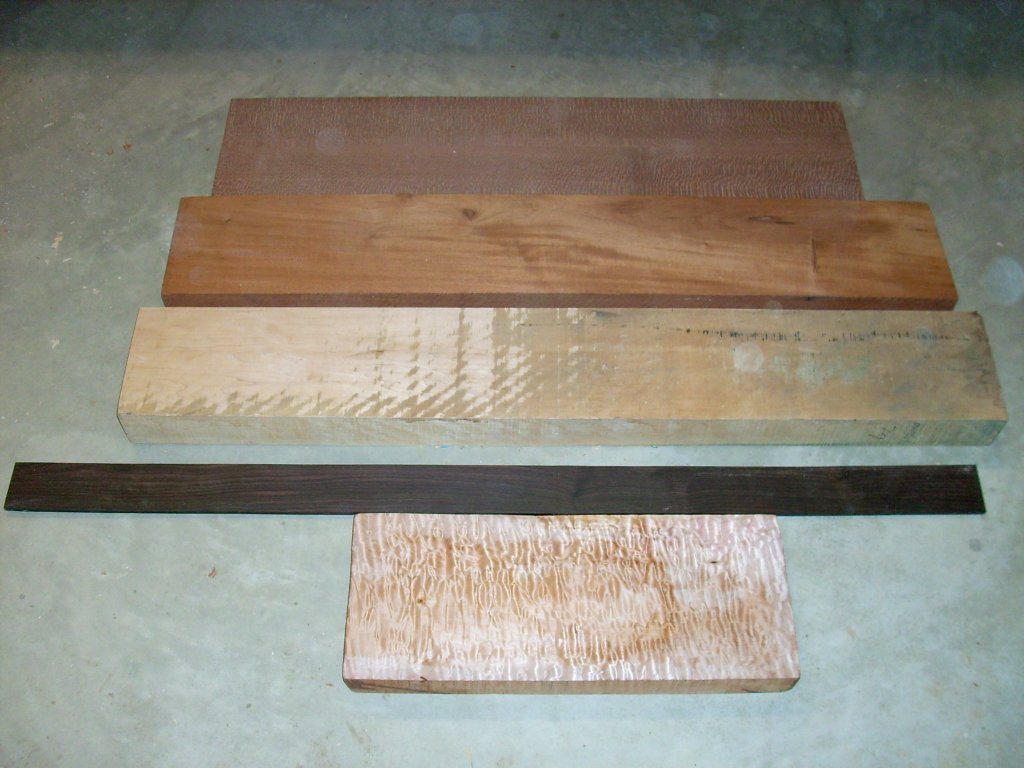 ●
Headstock Veneer: Lacewood. While in the wood store, Brian just
thought this looked cool so we found a use for it. It’s only about
3mm thick and it will simply be used to dress up the headstock and a
few other areas. Oh, get used to the millimeter thing. It is far
easier to work in metric for this precise work than in imperial
units. Where do you mark 1.693"? Or what is half of 3 19/64"? If you
always use millimeters, you will always know where to mark 43mm or
what half of 84mm is. Don’t worry, you’ll get used to it and
appreciate it after a while. But most importantly, you will make
less measuring and calculating errors. ●
Headstock Veneer: Lacewood. While in the wood store, Brian just
thought this looked cool so we found a use for it. It’s only about
3mm thick and it will simply be used to dress up the headstock and a
few other areas. Oh, get used to the millimeter thing. It is far
easier to work in metric for this precise work than in imperial
units. Where do you mark 1.693"? Or what is half of 3 19/64"? If you
always use millimeters, you will always know where to mark 43mm or
what half of 84mm is. Don’t worry, you’ll get used to it and
appreciate it after a while. But most importantly, you will make
less measuring and calculating errors.● Body Back: Mahogany. A stable and lighter wood that cuts like butter. ● Neck: Hard Maple. Look for straight grain which is less likely to warp. ● Fretboard: Macassar Ebony. This is a very hard wood which is also very dark so you won’t see your finger grunge as much. This comes in jet black, but we selected a piece with some attractive grain pattern in it for a little visual interest. ● Body Front: Quilted maple. This is where Brian splurged, but this is also the part everyone sees first. We got a piece thick enough where we could cut it in half and bookmatch the leaves. This piece was purchased on Ebay while all the other wood was purchased at The Wood & Shop, a local wood supply store. We had to buy a little more wood than we actually would use since the wood stores usually won’t slice things down for you. Use the leftover pieces to practice cutting or finishing on or save them for your next guitar! A note on safety. You’ll see that all of the photos of me operating a table saw show that I’ve removed the blade guard and splitter. Some folks will tell you it’s for clarity of the photograph. I won’t tell you that; I never use them since they get in the way more often than not. But I am also fully aware that my finger might get in the way, too. I won’t preach to you on your own safety; that’s your own responsibility. One simple rule in woodworking is that if you don’t feel comfortable doing it, don’t do it. But you might not be experienced enough (or smart enough) to know when something is unsafe. If that’s the case, again, don’t do it. Find someone who can help you through the tough bits. It would really kind of suck to build this great guitar and not have any fingers left to play it. Even though this will be a one-off guitar, making some jigs and templates will greatly increase the accuracy of your build, and you will be able to use some of them on your future builds if you aim on doing another. A template is always better and safer to use than free-hand routing. A router bit spins at over 20,000 rpm’s. If it grabs the wood unexpectedly, it will take you for a ride in the best case; it will easily take a finger off in the worst case. With a table saw you might have something to sew back on. Planting a router into your hand is akin to sticking your digits in a blender. Templates will help you keep control of the tool and are essential for making precise, straight, and repeatable cuts. You will notice that I made many jigs and templates to help me with this build. You can make them as basic or as complete and full-featured as you see fit. Make them as you need them and design a few of your own. I don’t include a lot of dimensions here as many of them will be tailored to this particular build. Use the concepts and make the designs your own with available materials. The goal for any jig and template is precision, repeatability, and safety. |


