|
Brian's Guitar from Conception to Birth
or How to Build a Guitar in 62 Easy Steps! |
|
6
Rout the Front Body Panel |
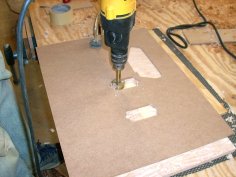 Now
that youíve gained some confidence, itís time to start whittling
away on the show side. First off, the pickup cavities. My design
allowed me to only have to rout cavities in the top body panel; the
pickups wonít go deep enough to intersect the back body panel. Be
aware that you are working on the backside of the top half. Make
sure to flip your template upside down as well. I definitely suggest
placing masking tape on the front of the body panel and backing it
up with scrap plywood to avoid any splintering when your tools break
through. Hog the meat of the holes out with a forstner bit. Follow up by
cleaning the edges up to your template with a 1/2" bearing guided
bit. Now
that youíve gained some confidence, itís time to start whittling
away on the show side. First off, the pickup cavities. My design
allowed me to only have to rout cavities in the top body panel; the
pickups wonít go deep enough to intersect the back body panel. Be
aware that you are working on the backside of the top half. Make
sure to flip your template upside down as well. I definitely suggest
placing masking tape on the front of the body panel and backing it
up with scrap plywood to avoid any splintering when your tools break
through. Hog the meat of the holes out with a forstner bit. Follow up by
cleaning the edges up to your template with a 1/2" bearing guided
bit. |
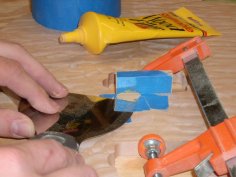 I
love reading the books on making guitars where the author always
gets it right the first time and the guitar comes out beautifully.
As careful as youíll be, you will likely take out a chunk of wood
somewhere you shouldnít have (like I did). The best thing to do is
to retrieve the actual chunk and glue it back in. If you canít find
the chunk, tape off the surrounding area and patch with stainable
wood filler. Donít skip the taping off step since stainable wood
filler will take stain, but it may not take it the way you wish.
Even a little smudge outside the area will clog the wood pores and
affect the way the stain penetrates leaving a nice thumb print in
the middle of your quilted maple top. Immediately remove the tape,
but let the patch dry overnight. Then sand the area flush. A third
option is to use the opportunity to create a special inlay over the
damaged area: creative camouflage. Youíll see an example of this
technique later on. I
love reading the books on making guitars where the author always
gets it right the first time and the guitar comes out beautifully.
As careful as youíll be, you will likely take out a chunk of wood
somewhere you shouldnít have (like I did). The best thing to do is
to retrieve the actual chunk and glue it back in. If you canít find
the chunk, tape off the surrounding area and patch with stainable
wood filler. Donít skip the taping off step since stainable wood
filler will take stain, but it may not take it the way you wish.
Even a little smudge outside the area will clog the wood pores and
affect the way the stain penetrates leaving a nice thumb print in
the middle of your quilted maple top. Immediately remove the tape,
but let the patch dry overnight. Then sand the area flush. A third
option is to use the opportunity to create a special inlay over the
damaged area: creative camouflage. Youíll see an example of this
technique later on.
|
 |
 |
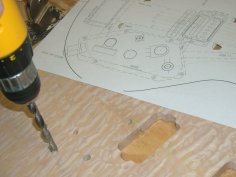 |
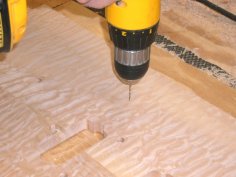
Remove the template, and with the top body panel still upside down,
layout the hole locations for your knobs and switches. Remember to
flip your paper pattern over and carefully align it. I cut half the
dowel holes out of the pattern and used those and the center lines
to position the paper pattern accurately. Mark the hole locations
with an awl and hammer. Drill through with a 1/16" drill bit making
an effort to stay straight up and down. Use a drill press if you own
one. Now flip the body panel over and drill your holes to size from
the front using brad point bits. Do not use regular twist drill bits
that you buy at Home Depot. These will shred the wood. Brad point
bits have a center brad and two sharp tines which score the wood
first before drilling it out. For fine woodworking (like a guitar)
theyíre worth the investment. Check the diameter of each of the
knob/ switch posts and select a drill bit about 1/64" larger. Donít
worry if the switch posts donít go all the way through the top
panel. This guitar will have a carved top and it hasnít been carved
yet. Later weíll hollow out the back of the top body panel at the
control cavity to thin it out some after the carving has been done.
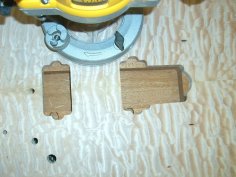 The
last item of business is to rout out the area where the neck
intersects the top body panel. Again, this is easily accomplished by
using the alignment dowels. Index the top body panel onto the back
body panel. Using a 1/2" bottom bearing bit, you can simply transfer
the exact shape cut earlier in the bottom panel onto the top body
panel. If youíre scratching your head looking at the picture, keep
in mind that the body shape has not been cut out yet. When cutting
out the body shape later on, it will open up the area where the neck
will lock in. Also note in the photo where the wire channels
can be seen in the bottoms of the pickup cavities. Careful planning
has its rewards. The
last item of business is to rout out the area where the neck
intersects the top body panel. Again, this is easily accomplished by
using the alignment dowels. Index the top body panel onto the back
body panel. Using a 1/2" bottom bearing bit, you can simply transfer
the exact shape cut earlier in the bottom panel onto the top body
panel. If youíre scratching your head looking at the picture, keep
in mind that the body shape has not been cut out yet. When cutting
out the body shape later on, it will open up the area where the neck
will lock in. Also note in the photo where the wire channels
can be seen in the bottoms of the pickup cavities. Careful planning
has its rewards. |