|
Brian's Guitar from Conception to Birth
or How to Build a Guitar in 62 Easy Steps! |
|
53
Rub Out the Finish |
Remember to wait a week after spraying the last coat before you
touch the guitar. If you did all of your preparation, sanding, and
spraying carefully, you should see a pretty smooth surface. But itís
not smooth enough! As they stay in all of the books Iíve read (and
itís clever enough to repeat here), itís time to finish the finish.
|
 |
 |
 |
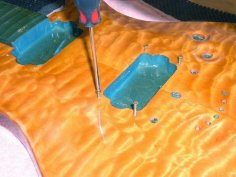
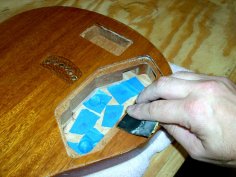
From now on, always rest your guitar on a clean, soft towel when
working on it so it doesnít get scratched. Start off by removing the
screws protecting the mounting holes and take all of the tape off
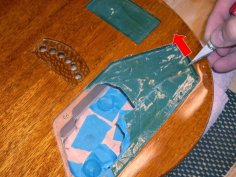
the guitar. The lacquer will have built up over the top of the tape
and you want to be sure the sanding youíll be doing will ease the
edges of the lacquer to bare wood abutments. Also, even though you
used the easy-release painterís tape, after being on for about a
month, it will have begun to stick and leave some residual goo
behind. Use an Exacto blade, but do NOT cut with it which might
gouge the wood. Instead, scrape backwards with the blade at the
corners of the cavities. This will shave the edge of the lacquer off
so when you peel off the tape, you donít peel the lacquer off with
it. Use the point of the knife or a dental pick to thoroughly clean
off all of the tape which might be hiding in the corners. Inspect
for any sticky glue stuff remaining on the bare wood and clean it
off with some mineral spirits.
They call it rubbing even though it is actually sanding. The high
grit sandpapers donít produce much visible dust, so I guess they
thought rubbing was a better term. When rubbing out the finish with
these fine grit sandpapers, you need some kind of lubricant. It
makes the rubbing a bit easier, it extends the life of your sand
papers, and it helps carry off the fine dust. In an old spray
bottle, mix up one part mineral spirits with one part paraffin oil
(about 8 ounces of each should be enough for the whole job).
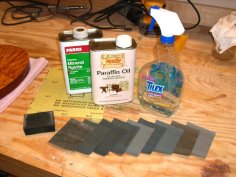 Use
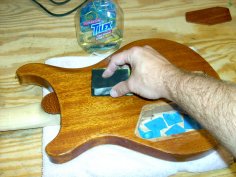
a foam or felt sanding block as much as possible and for all grits
which helps keep the surface level and eases hand fatigue. I like to
start with 600 grit wet/dry sandpaper before moving into the
MicroMesh abrasives. Now donít go hosing down the piece with the
lubricant; youíll end up with oil all over the place. Just spray
once in the middle of the guitar and a little here and there, or
when rubbing a smaller area or and edge, spray a small amount
directly on the paper. Sand with firm pressure. Start by rubbing the
whole surface in small circles, then rub 45 degrees to the grain
direction, then rub with the grain direction. Now repeat this to
yourself over and over again: ďDo not skimp on the sanding.Ē If you
get lazy on only one grit, it wonít become evident until you get to
the last grit and itís not as glossy as it should be. This is why I
recommend rubbing in three different fashions, so youíre sure to rub
everything thoroughly. With these finer grits, itís impossible to
sand too much. Donít worry, there is no danger of sanding through 30
coats of lacquer. Use
a foam or felt sanding block as much as possible and for all grits
which helps keep the surface level and eases hand fatigue. I like to
start with 600 grit wet/dry sandpaper before moving into the
MicroMesh abrasives. Now donít go hosing down the piece with the
lubricant; youíll end up with oil all over the place. Just spray
once in the middle of the guitar and a little here and there, or
when rubbing a smaller area or and edge, spray a small amount
directly on the paper. Sand with firm pressure. Start by rubbing the
whole surface in small circles, then rub 45 degrees to the grain
direction, then rub with the grain direction. Now repeat this to
yourself over and over again: ďDo not skimp on the sanding.Ē If you
get lazy on only one grit, it wonít become evident until you get to
the last grit and itís not as glossy as it should be. This is why I
recommend rubbing in three different fashions, so youíre sure to rub
everything thoroughly. With these finer grits, itís impossible to
sand too much. Donít worry, there is no danger of sanding through 30
coats of lacquer.
|
 |
 |
 |
The 600 grit is the most important since this will perform the
leveling; you will not be able to level the surface with the
MicroMesh abrasives. Start with the back of the guitar, spray on
some lubricant, and rub thoroughly as noted above. When youíre done
with the back, wipe it down with mineral spirits to remove any dust.
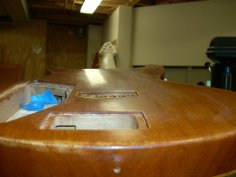
Now inspect the surface very carefully in a low-angle, grazing
light. Youíll first notice that your beautiful shiny guitar is
suddenly dull. Everythingís alright, thatís whatís supposed to
happen. Youíll get it brilliant looking again after working through
all of the grits. What youíre looking for are any shiny spots or any
unevenness in the surface. The shiny spots will show the low areas
which did not get sanded with the block. If the surface is not dead
flat, sand more with the 600 grit until it is. If the surface is
really off, you may have to take a step back to 400 grit for a more
aggressive attack, then back up to 600 grit again to start
smoothing. Take extra time on the first grit until the surface is
perfectly level with no dimples. Only then can you continue to the
finer MicroMesh abrasives.
There are 9 grits of MicroMesh abrasives, and at about 20 minutes
per grit, this will take you a while. Find your rhythm and rub all
surfaces in the same order so you donít forget an area. I did the
body back first, then the headstock, cavity cover, truss rod cover,
body front, then finally the body sides. Add a spritz of lubricant
as needed. When you finish an area, wipe it off with mineral spirits
and inspect. When you finish a grit, take a short break, then repeat
the procedure with the next grit. You can split the rub out over a
couple-three days so you donít get too tired or bored with it. |