|
Brian's Guitar from Conception to Birth
or How to Build a Guitar in 62 Easy Steps! |
|
35
Carve the Top |
Flat-fronted guitars are absolutely acceptable (ask any Stratocaster
player). But carved tops are much more visually exciting (ask any
Les Paul player). Honestly, would you rather play with an A-cup or a
Double-D? There are various methods in achieving the final product,
and after some internet research, we chose to use the angle grinder
technique. Itís pretty aggressive, but if you have a steady hand and
an eye for visualizing things, you should fare well. If youíre not
that confident, you can use a violin makerís finger-plane. Itís much
slower going, but it will lend more control.
  If
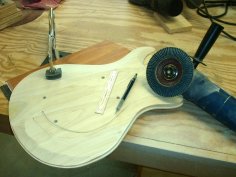
you havenít done this before, like me, practice first. Our quilted
maple top cost about $100 for the one piece of wood. This (less than
beautiful) practice mock-up was made from a $6 piece of poplar. Get
familiar with the technique before you go butchering up the real
thing. Since we still had all of our templates, it only took a
couple of hours to put together the inexpensive replica. Install a
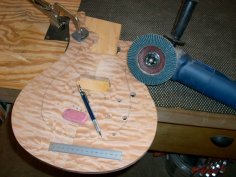
40 grit flap sanding disk into an angle grinder. The idea is to use
steady pressure and long flowing strokes. In the second photo above,
you can see the somewhat uniform paths the grinder takes. This is
the steady hand and visualization part. An angle grinder spins at
about 10,000 rpmís; there will be sawdust flying everywhere.
Protective eyewear is a must and a dust mask is highly recommended.
The grinder takes off a lot of material quickly, so concentrate on
your work, take frequent breaks, and donít sneeze while grinding.
Complete the entire mock-up so you get a feel for the differing
angles of the guitar front and how to hold and move the tool. If
you havenít done this before, like me, practice first. Our quilted
maple top cost about $100 for the one piece of wood. This (less than
beautiful) practice mock-up was made from a $6 piece of poplar. Get
familiar with the technique before you go butchering up the real
thing. Since we still had all of our templates, it only took a
couple of hours to put together the inexpensive replica. Install a
40 grit flap sanding disk into an angle grinder. The idea is to use
steady pressure and long flowing strokes. In the second photo above,
you can see the somewhat uniform paths the grinder takes. This is
the steady hand and visualization part. An angle grinder spins at
about 10,000 rpmís; there will be sawdust flying everywhere.
Protective eyewear is a must and a dust mask is highly recommended.
The grinder takes off a lot of material quickly, so concentrate on
your work, take frequent breaks, and donít sneeze while grinding.
Complete the entire mock-up so you get a feel for the differing
angles of the guitar front and how to hold and move the tool.
|
 |
 |
 |
Once you think youíre ready for the real deal, lay out the limits of
your carving using a pencil and a ruler. This is not an exact
science, a rough sketch is all you need to keep you on track. Our
guitar has placement dowels located in the underside of the top. If
yours has the same, be mindful you donít carve that area exposing
the dowels. During our trial run, we found that it was difficult to
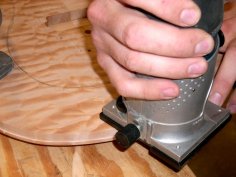
keep the side edge a consistent height. To address that issue, we
rabbeted the edge with a 1/2" diameter bit with a 3/8" diameter
bearing. This gave us a 1/16" ledge of a consistent height around
the guitar. While grinding, you just have to concentrate on coming
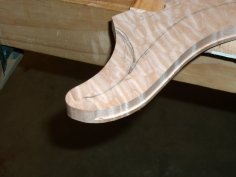
right up to and just short of that ridge, and then stop. Our trial
run also told us not to wrap the rabbet around the horns of the
guitar. It is very difficult to grind inside the horn. The sanding
disk is almost perpendicular to the wood so you canít mind the ledge
very well. We drew the offset on the horn in pencil and will tidy it
up later by hand.
|
 |
 |
 |
|
Firmly clamp the top body panel to your workbench. I found a scrap
of 1x material underneath would keep me from grinding my workbench
accidentally. The edges of the guitar are somewhat concave. Start on
the edge with your long, flowing strokes. Donít work too much in one
area; reposition your work frequently to slowly creep up on the
overall final shape. Remember to stop just short of your routed
ridge. The center of the guitar is convex. Use a random orbit sander
load up with some 60 grit to make that transition. Donít carve the
center area where your pickup bezels were drawn on; that area should
remain flat. Take off the last little bit of wood around the edge by
hand with 60 grit sandpaper. Finish things up by going over the
whole top with the orbital sander and some 60 grit to remove any
burn marks, then with some 100 grit to smooth things out. Weíll save
the final sanding for later. Be patient and you will be rewarded
with a curvaceous top that will send your flat-chested girlfriend
home weeping with jealousy. |