|
Brian's Guitar from Conception to Birth
or How to Build a Guitar in 62 Easy Steps! |
|
34
Oops! |
Shit happens! With woodworking, as with playing in a band, itís not how bad
you fuck up, but how well you cover up your mistake. The idea is to
take your mistake and use the opportunity to make something from it.
Most guitar instruction books show you that everything works great
the first time, but that is rarely the case. So here is how I dealt
with one of my unfortunate moments.
When drilling a couple of the holes for the through-body string
ferrules, the thin bit deflected and did not come out on the
backside of the guitar exactly where it should have. The holes
werenít lined up and it looked bad enough where I wasnít happy with
my work. So you sometimes have to say, ďGee, that would be a nice
spot for an inlay.Ē
|
 |
 |
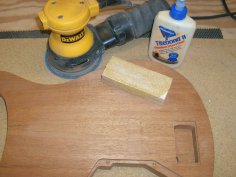 |
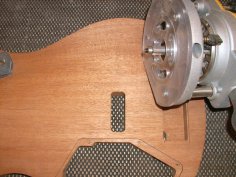
First, plug the hole. We chose to cut out the entire area of the
string ferrules on the back body panel. Use double-sided tape to
secure a couple of stop blocks at the limit you want to cut out.
Drill a larger pilot hole in the middle of the area which will allow
your bearing guided router bit to get through. Flip the body panel
over and rout out the offending area. Using the same species of
wood, cut a patch and fit it into the hole you just routed. Take
your time with some 60 grit sandpaper to achieve a tight fit. Glue
the patch in place and sand both sides flush with the adjacent
surfaces. You could stop here, but the patch is still noticeable and
not what someone would expect from a custom made guitar. An inlay
will hide the seam with some complementary colored wood (or you
could use pearl).
|
 |
 |
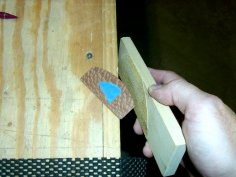 |
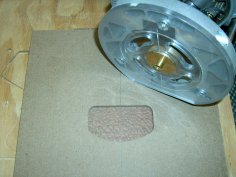
Make a template for your inlay. Weíll use the same concept as when
we made the control cavity cover. Weíll make one template which is a
1/4" wider all the way around which can be used to cut both the
cavity and the inlay. To cut the cavity, secure your template to the
back of the body panel with double-sided tape. Double-check your
measurements so you donít fuck up the fuck up youíre trying to fix.
Chuck up an 1/8" diameter router bit with a 5/8" OD guide bushing
and set the plunge depth. Clean out the whole cavity. To make the
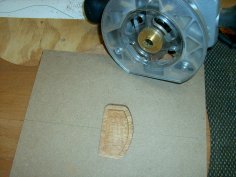
inlay, secure the same template to your inlay material with
double-sided tape. Secure the inlay material with the template to a
piece of scrap would with double-sided tape. Make sure you get a
piece of tape directly under the piece youíll be cutting out so it
doesnít go flying across the room when itís set free. Using the same
1/8" diameter router bit, install a 3/8" OD guide bushing. Set the
plunge depth to just below the thickness of the inlay material.
Position the guide bushing against the side of your template, plunge
through the material, and rout your way around the perimeter. Test
fit the piece into the cavity, but donít push your test fit too hard
or you wonít be able to pull it back out again to glue it. You will
have to do some fine tuning with some 60 grit sandpaper to get a
tight fit. Since my inlay is symmetrical, the blue tape shown on top
of the inlay (right photo above) reminds me which side is up.
|
  Now
glue it up and make it pretty. Apply a thin layer of glue to your
inlay and press it into place. Use a clamp with clamping block to
evenly distribute the pressure. Let it dry for at least an hour,
preferably two. Clean up any glue squeeze out with a small chisel or
screwdriver. the inlay may not fit perfectly, so tape off the seam
and apply some appropriately colored wood filler with a small
screwdriver. Wood filler does exactly what itís name describes,
fills wood. Though the manufacturer will tell you the filler is
stainable, it will not take stain the same as the surrounding wood.
The tape protects the surrounding wood from getting clogged with
stray filler. It might not be obvious now, but it will be when you
stain your guitar. Then itís too late to fix it. Take the time to
tape things off. Now
glue it up and make it pretty. Apply a thin layer of glue to your
inlay and press it into place. Use a clamp with clamping block to
evenly distribute the pressure. Let it dry for at least an hour,
preferably two. Clean up any glue squeeze out with a small chisel or
screwdriver. the inlay may not fit perfectly, so tape off the seam
and apply some appropriately colored wood filler with a small
screwdriver. Wood filler does exactly what itís name describes,
fills wood. Though the manufacturer will tell you the filler is
stainable, it will not take stain the same as the surrounding wood.
The tape protects the surrounding wood from getting clogged with
stray filler. It might not be obvious now, but it will be when you
stain your guitar. Then itís too late to fix it. Take the time to
tape things off.
|
 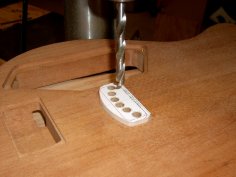 Lastly,
fix the original mistake. Make a template of your string hole
pattern from some 1/4" MDF. Mark and drill the holes in the template
using a drill press. Carefully locate and secure the template on the
back body panel. Now take your back body panel to the drill press,
set the depth if you need to (our holes were drilled all the way
through the back body panel), align the drill bit with your
template, and drill the holes. The template helps keep the drill bit
from deflecting. In hindsight, we probably should have used this
approach the first time through. Double-check that the holes are
continuous through the guitar and clean up any transitions between
the new holes and the old holes with a file. The result should be
perfection, and your client will get a nicely coordinated bonus
inlay. Your mistake might be in a different area, but the concept
will probably be the same: find a way to make something special from
your mistake. Lastly,
fix the original mistake. Make a template of your string hole
pattern from some 1/4" MDF. Mark and drill the holes in the template
using a drill press. Carefully locate and secure the template on the
back body panel. Now take your back body panel to the drill press,
set the depth if you need to (our holes were drilled all the way
through the back body panel), align the drill bit with your
template, and drill the holes. The template helps keep the drill bit
from deflecting. In hindsight, we probably should have used this
approach the first time through. Double-check that the holes are
continuous through the guitar and clean up any transitions between
the new holes and the old holes with a file. The result should be
perfection, and your client will get a nicely coordinated bonus
inlay. Your mistake might be in a different area, but the concept
will probably be the same: find a way to make something special from
your mistake. |