  After
months of watching from the sidelines, Brian finally got sent into
the game. He found something with which he was comfortable doing,
and I was all too happy to let him take over. Now repeat this to
yourself over and over again: ďDo not skimp on the sanding.Ē Some
scratches are not evident until you smear on the stain. Then the
stain concentrates a bunch of color into that scratch and makes it
stand out proudly. At that point, itís impossible to spot sand and
re-stain. Itís too late to do anything about it except to start
sanding the whole guitar all over again back down to bare wood. After
months of watching from the sidelines, Brian finally got sent into
the game. He found something with which he was comfortable doing,
and I was all too happy to let him take over. Now repeat this to
yourself over and over again: ďDo not skimp on the sanding.Ē Some
scratches are not evident until you smear on the stain. Then the
stain concentrates a bunch of color into that scratch and makes it
stand out proudly. At that point, itís impossible to spot sand and
re-stain. Itís too late to do anything about it except to start
sanding the whole guitar all over again back down to bare wood.
Now for a few comments on sanding technique:
● The idea of sanding is to make scratches in the wood, move to a
little smaller sand, then scratch out those scratches progressively
working toward the smallest possible scratch. Skipping a grit will
not completely remove the previous scratch, so donít be tempted;
thereís no easy way out here.
● Work on a padded surface so you donít create more scratches.
● Use a brand new piece of sandpaper for each grit. Now is not the
time to try to save forty cents on paper. If thereís no sand on the
paper, it wonít do what itís supposed to do.
● Use a foam, cork, or felt sanding block where possible. This will
alleviate a lot of hand fatigue and help keep things level. Use your
fingers to work on the tight spots.
● Cross-grain sanding is very noticeable, so sand with the grain or
at no more than about a 30 degree angle to the grain. Your final
pass with each grit should run with the grain.
● Sand enough to make sure you remove all the scratches from the
previous grit. Then sand with that grit a little more just to be
sure. Take your time and work through each grit slowly and
methodically. Achieve that disembodied level of Zen or sand in time
to some music, whatever works for you. This will take about 20
minutes per grit (about 2 1/2 hours total). Split it up over a
couple-three days if you want.
 ●
Start with 60 grit and concentrate on leveling out any deep
scratches that may have come up during the build. These first grits
are the most important as they take out the largest scratches. Some
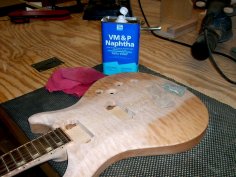
scratches may not be immediately evident. Wiping on some naptha or
mineral spirits will darken the wood a little without raising the
grain like water will. I like to use naptha as it evaporates more
quickly than mineral spirits, but either will work. Put on a bright
light and get close to the surface to investigate where more sanding
is needed. ●
Start with 60 grit and concentrate on leveling out any deep
scratches that may have come up during the build. These first grits
are the most important as they take out the largest scratches. Some
scratches may not be immediately evident. Wiping on some naptha or
mineral spirits will darken the wood a little without raising the
grain like water will. I like to use naptha as it evaporates more
quickly than mineral spirits, but either will work. Put on a bright
light and get close to the surface to investigate where more sanding
is needed.
● Work through all these grits: 60, 100, 150, 220, 320, 400, and
600. Spend extra care on the first couple of grits as those will
level out the big scratches. You canít do any serious leveling with
the higher grits.
● When changing grits, blow off the surface of the guitar and wipe
off any residual dust. If you move up to 220 grit while 150 grit
sand is still on the surface, youíll do nothing but continue pushing
that 150 grit sand around.
● This takes some time, but be very picky and donít get lazy as this
will directly effect the final appearance of your guitar. People
will not see the hundred-plus hours of your wonderful woodworking
skills through a fucked up paint job. |