
| October 18, 2010 |
 Mark
is Building a Custom Guitar! Mark
is Building a Custom Guitar!It's going to be a lot of fun, but a lot of work, too, for both of us. Mark is currently shopping for all the wood, hardware, and electronics, which Mark has quickly discovered is hard work. If you buy a guitar from a music store, you get to select from only what they have hanging on the wall. Even when ordering through a large custom manufacturer like PRS, you are still limited to the items for which their machines have been previously set. A small custom builder does not have computer-controlled machines nor set templates from which to work. Everything is one-off and made to order. Rumors aside, Mark is in complete control! I'll update frequently, so please tag along for the ride. |
| October 24, 2010 |
 Mark has finished personally hand selecting his own wood (that's
only one adverb away from sounding naughty). Check out his
choices: Flamed maple for the front face,
mahogany for the back, and Bolivian rosewood for the neck.
Definitely some of nature's best. Beauty is in the details, so
please click on any of the thumbnails to see the images in their
full glory. Got wood ;)? Mark has finished personally hand selecting his own wood (that's
only one adverb away from sounding naughty). Check out his
choices: Flamed maple for the front face,
mahogany for the back, and Bolivian rosewood for the neck.
Definitely some of nature's best. Beauty is in the details, so
please click on any of the thumbnails to see the images in their
full glory. Got wood ;)? |
| November 15, 2010 |
 This guitar will be built especially for Mark to his exact
specifications, which opens it up to unlimited possibilities.
Considering pickups alone, Mark found that there are literally
hundreds of manufacturers from which to choose. It's a
daunting task, but certainly an enjoyable one. In the end he
will get exactly what he wants without compromise. This guitar will be built especially for Mark to his exact
specifications, which opens it up to unlimited possibilities.
Considering pickups alone, Mark found that there are literally
hundreds of manufacturers from which to choose. It's a
daunting task, but certainly an enjoyable one. In the end he
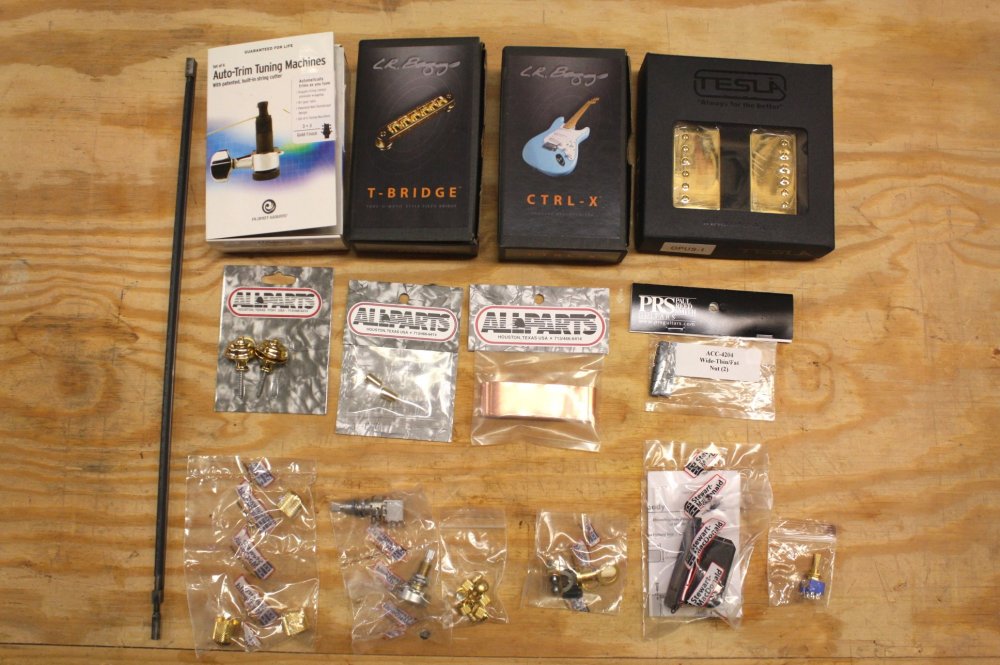
will get exactly what he wants without compromise.There's a lot of stuff to buy for a guitar; let's hit the highlights. Mark selected Planet Waves self-trimming tuners, an LR Baggs piezo bridge, and Tesla Opus-1 pickups. You can tell from the palette that there will be some gold on this axe. |
| January 31, 2011 |
 You can generalize and brainstorm some design elements beforehand,
but you can't really tie down the details until you have all the
parts in hand. Only then can you develop a precise layout of
the neck, arrange your knobs/switches, etc. I never make an
assumption on dimensions unless I put the calipers on it myself.
The price is too high for even being a millimeter off. You can generalize and brainstorm some design elements beforehand,
but you can't really tie down the details until you have all the
parts in hand. Only then can you develop a precise layout of
the neck, arrange your knobs/switches, etc. I never make an
assumption on dimensions unless I put the calipers on it myself.
The price is too high for even being a millimeter off.Here's a quick glimpse of Mark's dream: Megan Fox is reclining on the beach in a string bikini. The scent of freshly applied coconut oil permeates the air. Glints of the tropical sunset dance off the sweat drops which, like the morning dew, are randomly scattered across her beckoning brea ... whoa, um ... while Mark serenades her with his double-cutaway body, ruby red burst high gloss finish, 24 frets, and gold hardware. It'll be stunning (the guitar, that is)! |
| February 13, 2011 |
  Dammit,
let's start cutting some wood already! Dammit,
let's start cutting some wood already!Mark wanted a Bolivian rosewood neck, and for good reason. It's very dark and rich looking, it has a very tight grain making it great for a neck, it's stable and hard as a rock, and I'm allergic to it. Seriously, for me, I might as well be cutting poison ivy. I had to don a hazmat suit and a respirator. Rosewood is fairly difficult to come by. We couldn't find a single piece large enough to make the neck, so we glued up two pieces of rosewood with a thin pinstripe of maple between them. It'll be striking. And the person with the most clamps wins! The back body panel was glued up as well. It's African mahogany. Mark made me pull out every (100 pound) piece of wood in the bin to find the one with the most pleasing color and grain pattern. Again, 14" wide boards are tough to find, so we glued up a couple smaller pieces. The mahogany doesn't have a distinctive grain pattern and we'll be staining it very dark, so you'll never notice the seam ... unless you look closely behind the guitar while Mark's playing it and you put your nose directly at crotch level. By then, I believe something else might garner your attention. |
| February 16, 2011 |
  After
taking off the clamps and cleaning up the boards, I think it's time
for a little preview. As mentioned, the neck will have a thin
pinstripe running down the back of it. The contrast between
the rosewood and maple is quite dramatic. After
taking off the clamps and cleaning up the boards, I think it's time
for a little preview. As mentioned, the neck will have a thin
pinstripe running down the back of it. The contrast between
the rosewood and maple is quite dramatic.The pretty front wood is flamed maple which will be stained a deep red color, perhaps with a burst pattern. Those tiger stripes look three dimensional, holographic! And you're probably asking yourself, "Who would own a towel that particular shade of pink?" |
| February 20, 2011 |
  The
first temptation is to simply cut out the final shape of the body,
but it's a lot easier to take care of the inner channels and
chambers first while you still have some square edges to help your
layout and some extra wood to support the router. The
first temptation is to simply cut out the final shape of the body,
but it's a lot easier to take care of the inner channels and
chambers first while you still have some square edges to help your
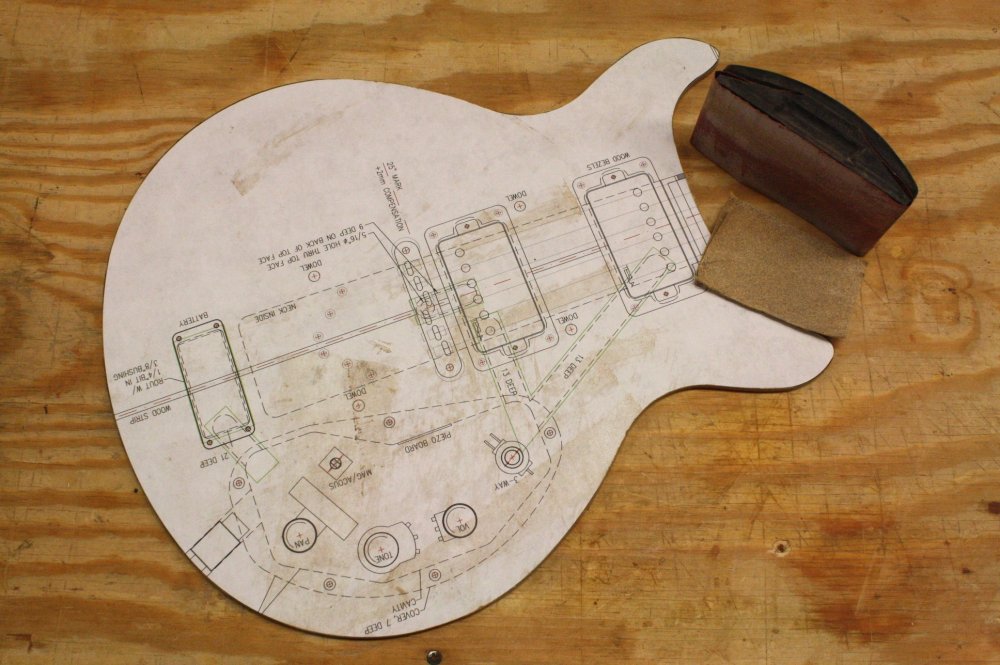
layout and some extra wood to support the router.I prefer to make
templates of all the various cutouts. That way, if I make a
mistake, I waste $2 worth of MDF, not $40 worth of mahogany.
Routing away the pretty wood can then be done confidently. |
| February 23, 2011 |
 Mark
personally selected his own chunk of curly maple from an internet
retailer. Shopping sounds like fun, but that one seller alone
had about 300 billets of maple from which to choose. I sliced
the block apart, folded it open like a book, and glued it back
together. It's always a little nerve racking taking the first
slice out of a really expensive block of wood. Mark went with
a thin rosewood accent stripe down the middle. Color-wise,
this will help tie the neck to the body. It's a simple yet
elegant detail. Mark
personally selected his own chunk of curly maple from an internet
retailer. Shopping sounds like fun, but that one seller alone
had about 300 billets of maple from which to choose. I sliced
the block apart, folded it open like a book, and glued it back
together. It's always a little nerve racking taking the first
slice out of a really expensive block of wood. Mark went with
a thin rosewood accent stripe down the middle. Color-wise,
this will help tie the neck to the body. It's a simple yet
elegant detail. |
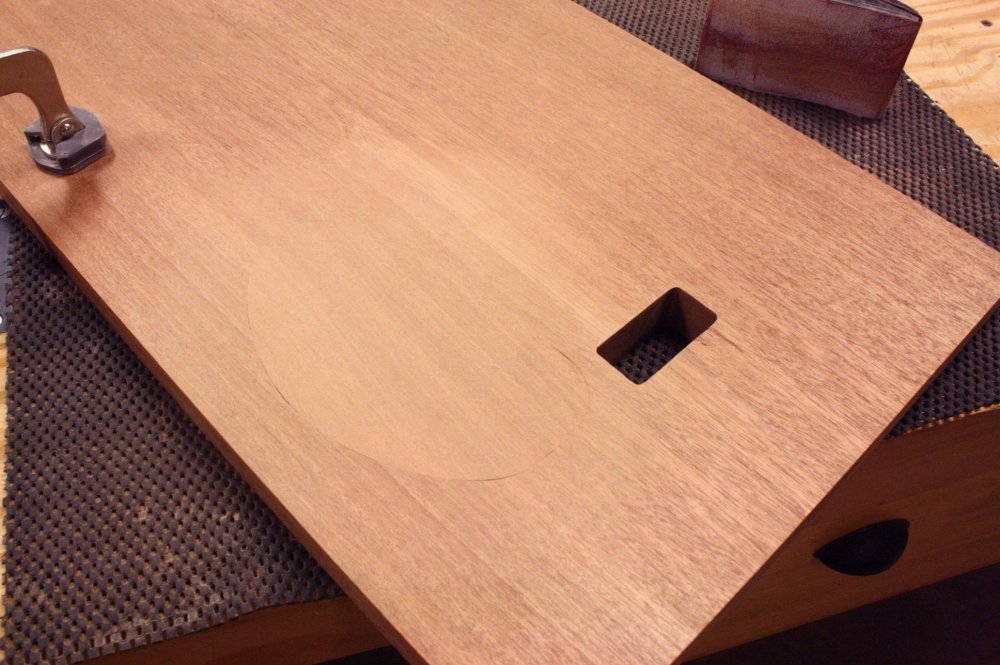  Now
you see it; now you don't. Ha; heard that on the honeymoon!
Guitar building exercises one's patience. Even though I make
templates to get things to fit generally, they still need a lot of
love to get them to fit perfectly. This is the control cover
on the back of the guitar which hides the electronics cavity.
Guitars you see in the store will punch this out of a sheet of
plastic. This is a one-off custom guitar, and it's really no
more or less work for me to make it out of the same piece of wood
that the body panel came from. Why not go for the seamless match?
It took close to an hour of careful sanding, but when it fits right,
you don't even see it. Now
you see it; now you don't. Ha; heard that on the honeymoon!
Guitar building exercises one's patience. Even though I make
templates to get things to fit generally, they still need a lot of
love to get them to fit perfectly. This is the control cover
on the back of the guitar which hides the electronics cavity.
Guitars you see in the store will punch this out of a sheet of
plastic. This is a one-off custom guitar, and it's really no
more or less work for me to make it out of the same piece of wood
that the body panel came from. Why not go for the seamless match?
It took close to an hour of careful sanding, but when it fits right,
you don't even see it. |
| February 27, 2011 |
  Ok,
it's time to get this thing looking like a guitar (no offense Bo)!
I made a template by gluing a pattern onto a piece of 1/4" MDF.
That will give something for the router to follow. Normally I like to work fairly clean, but Mark helped glue on the
pattern, and his grimy little mitts left smudge marks all over it!
Just for the record, I'll have you know that I do provide toilet
tissue to all of my guests. Apparently, the three square
allotment was not used effectively. Ok,
it's time to get this thing looking like a guitar (no offense Bo)!
I made a template by gluing a pattern onto a piece of 1/4" MDF.
That will give something for the router to follow. Normally I like to work fairly clean, but Mark helped glue on the
pattern, and his grimy little mitts left smudge marks all over it!
Just for the record, I'll have you know that I do provide toilet
tissue to all of my guests. Apparently, the three square
allotment was not used effectively.Ooo! Now check out that block of wood after the routing's done. The rosewood stripe is looking hot. Notice the neck pocket running behind the pickup cavities. And if you click on the thumbnail, you can see the pilot holes for the knobs and switches. |
| March 6, 2011 |
  Another
custom touch! Pickup bezels are usually these cheap,
rectangular blocks of plastic - not very elegant. And as you
can see in the body photos above, we have very smooth flowing lines
and a very round shape - not very rectangular. Another
custom touch! Pickup bezels are usually these cheap,
rectangular blocks of plastic - not very elegant. And as you
can see in the body photos above, we have very smooth flowing lines
and a very round shape - not very rectangular.We have plenty of rosewood leftover from the neck, let's use it to make something that will better compliment the guitar as a whole. That requires more routing templates. This time, one to properly size the center hole, a second for the outside shape, and a third (not shown) to plane the tops off 2.5 degrees, the angle the neck tilts back from the body. Big tools make working on small parts challenging. Thankfully, I still possess all my digits. The final product is a perfect fit! They're tight to the pickups, they have smooth rounded lines, and they're made from rosewood which picks up the tones of the neck and body stripe tying it all together. |
| March 14, 2011 |
 Before
we get too far along on the body, we should probably work on the
neck a little. These two things will have to intimately talk
to each other, so we better catch the neck up on the conversation.
If you recall, we have a longitudinal white stripe running down the
back of the neck. We've also added what will be a linear
stripe across the top. It looks like a large expanse of white
now, but only the thin edge will peek out from under the fretboard.
Layers of flavor! The truss rod trench has been routed, and
the tilt-back on the headstock was established. And there's a
lot of whittling yet to go. Before
we get too far along on the body, we should probably work on the
neck a little. These two things will have to intimately talk
to each other, so we better catch the neck up on the conversation.
If you recall, we have a longitudinal white stripe running down the
back of the neck. We've also added what will be a linear
stripe across the top. It looks like a large expanse of white
now, but only the thin edge will peek out from under the fretboard.
Layers of flavor! The truss rod trench has been routed, and
the tilt-back on the headstock was established. And there's a
lot of whittling yet to go. |
| March 18, 2011 |
 A
guitar's neck is skinnier at the headstock end and gets wider where
it meets the body of the guitar. We first had to take our
block of wood and taper each side down the full length. Then
we cut out the profile of the neck, which are all the ups and downs
and angles you see here. Without getting into a long
discussion of why, let's just say that there are a lot of cuts and a
lot of sanding to get everything smooth and true. And, yes,
that is a gas mask on the back of the workbench. I've found
that I have to keep one on hand since Mark's high roughage diet
tends to lead to a little gastrointestinal unpredictability. A
guitar's neck is skinnier at the headstock end and gets wider where
it meets the body of the guitar. We first had to take our
block of wood and taper each side down the full length. Then
we cut out the profile of the neck, which are all the ups and downs
and angles you see here. Without getting into a long
discussion of why, let's just say that there are a lot of cuts and a
lot of sanding to get everything smooth and true. And, yes,
that is a gas mask on the back of the workbench. I've found
that I have to keep one on hand since Mark's high roughage diet
tends to lead to a little gastrointestinal unpredictability. |
  There
are several different ways of attaching a neck to the body.
This guitar will use a "set-in" neck design. It has a much
longer pocket than typical guitars extending well past the bridge.
That lends a lot of surface area for a strong glue joint and it
helps establish accurate alignment. Again, sand, sand, sand
until they mate perfectly. Ultimately, we will add the top
layer of pretty wood and you won't see this joinery at all. There
are several different ways of attaching a neck to the body.
This guitar will use a "set-in" neck design. It has a much
longer pocket than typical guitars extending well past the bridge.
That lends a lot of surface area for a strong glue joint and it
helps establish accurate alignment. Again, sand, sand, sand
until they mate perfectly. Ultimately, we will add the top
layer of pretty wood and you won't see this joinery at all. |
| March 22, 2011 |
  We
went to a lot of trouble to taper the neck down, now we have to add
a little meat back on so we can make an attractive heastock.
First, a few side pieces to gain some width. Then a couple
thin layers on top to make it look cool. We
went to a lot of trouble to taper the neck down, now we have to add
a little meat back on so we can make an attractive heastock.
First, a few side pieces to gain some width. Then a couple
thin layers on top to make it look cool."Why so many clamps?" you say. I don't know. I suppose I could have tried two clamps first. Then when I don't get a tight glue joint, I could sand it all off and try it again with three clamps; and maybe again using four clamps. I just jumped straight to thirteen clamps and saved myself a lot of extra work. If I may be trite, better safe than sorry. The final result is a beautiful canoe paddle. |
| March 25, 2011 |
  For
you guitar novices, the string ferrules are just little cover plates
to dress up the holes where the strings pass through the body.
All these various bits of
hardware must be installed to make sure they fit and work right.
Then everything must be taken back off so the finish can be applied. For
you guitar novices, the string ferrules are just little cover plates
to dress up the holes where the strings pass through the body.
All these various bits of
hardware must be installed to make sure they fit and work right.
Then everything must be taken back off so the finish can be applied. |
| March 27, 2011 |
  The
boss came by to help today! We took that square canoe paddle
and put the sexy on it. Take a close look and see how that
thin strip of light colored veneer is working for us. The band
under the fretboard ties right into the band on the headstock, and
it's exposed to the front by the circular beveled feature.
Damn, that gold hardware is looking hawt!? The
boss came by to help today! We took that square canoe paddle
and put the sexy on it. Take a close look and see how that
thin strip of light colored veneer is working for us. The band
under the fretboard ties right into the band on the headstock, and
it's exposed to the front by the circular beveled feature.
Damn, that gold hardware is looking hawt!? |
| March 27, 2011 |
  Fretboard
time! After some careful measuring and marking, we cut the
fret slots. If you haven't noticed, everything on this build
is done by hand. Well, I did use a saw here, but I think you
know what I mean. Mark wasn't happy with the wood color so we
painted it white with some of this edible paint. Fretboard
time! After some careful measuring and marking, we cut the
fret slots. If you haven't noticed, everything on this build
is done by hand. Well, I did use a saw here, but I think you
know what I mean. Mark wasn't happy with the wood color so we
painted it white with some of this edible paint. |
| March 31, 2011 |
  Mark
found a cool lotus-dove graphic online and thought it would look
good as a fretboard inlay. The problem is that the graphic
looks awesome blown up on a computer screen, but this thing will
only be 1 1/2" wide on the fretboard. So it soon became my job
to just shut up, make it work, and get it on there. Mark
found a cool lotus-dove graphic online and thought it would look
good as a fretboard inlay. The problem is that the graphic
looks awesome blown up on a computer screen, but this thing will
only be 1 1/2" wide on the fretboard. So it soon became my job
to just shut up, make it work, and get it on there.I had to simplify the shapes a little so they could be cut successfully from the abalone shell material. Then I strapped on my magnifying visor and started in with my trusty saw (equipped with a blade about the width of a human hair). A few of those pieces are about the size of one of Roosevelt's boogers. |
| April 2, 2011 |
    |
| The term "inlay" is actually what it means: take the tiny pieces you just cut out, then rout tiny little cavities to lay them in. First, we laid out the pattern in the right spot on the fretboard, then traced around the pieces etching their outlines into that white paint (the eyes ain't what they used to be). Rout and test fit, rout and test fit, rout and test fit, in! Repeat twenty times. We made a paste from two-part epoxy and some rosewood dust, filled up the holes, and pressed in the pieces. We sanded off the epoxy ooze, template paper, the white paint, and voila! Easy peasy! 10 hours of "fun", but the result was worth it. |
| April 6, 2011 |
   Time
to glue on the fretboard. Repeat to oneself, "Do NOT forget to
put in the truss rod!" Pretty much impossible to do
afterwards. And I really do think it is all about the clamps.
There's probably some clamps on there that aren't really doing
anything and were added solely for visual impact. The next day
we crowned the fretboard and refined the fret slots. Time
to glue on the fretboard. Repeat to oneself, "Do NOT forget to
put in the truss rod!" Pretty much impossible to do
afterwards. And I really do think it is all about the clamps.
There's probably some clamps on there that aren't really doing
anything and were added solely for visual impact. The next day
we crowned the fretboard and refined the fret slots. |
| April 10, 2011 |
  Mark
is getting some unique fretboard banding. Instead of side dots
which are the norm, we're actually breaking the banding and putting
in full blocks of color. There is a good reason why side dots
are the norm, because this was maybe just a bit on the tedious side.
Tiny strips of wood, a tiny saw, and a tiny miter box make tiny
blocks of maple. My wife said that everything will come out
just fine since I should be used to handling the small wood; I have
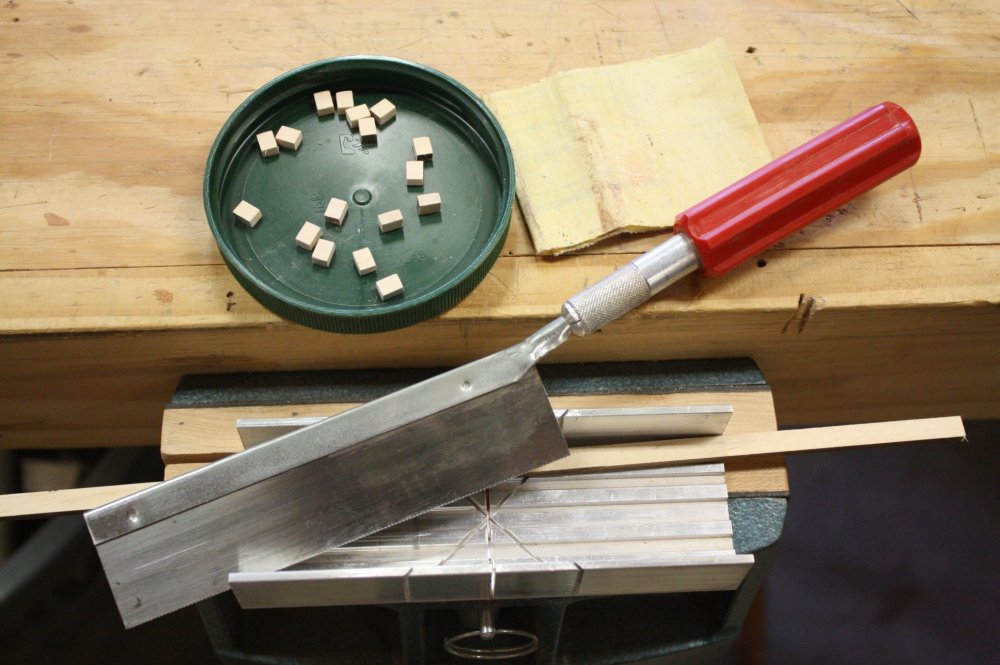
no idea what she meant. Mark
is getting some unique fretboard banding. Instead of side dots
which are the norm, we're actually breaking the banding and putting
in full blocks of color. There is a good reason why side dots
are the norm, because this was maybe just a bit on the tedious side.
Tiny strips of wood, a tiny saw, and a tiny miter box make tiny
blocks of maple. My wife said that everything will come out
just fine since I should be used to handling the small wood; I have
no idea what she meant. |
  Mark
stopped by the shop to supervise the color testing. That's
what building a custom is all about, getting it exactly the way you
want it without compromise. Mark was this symphony's conductor
and I was first chair piccolo (insert small flute joke here), but
the red wasn't coming out quite to his liking. The only way to
get that rich, blood red tone was to make a "personal investment" to
the composition. Anyone got a band-aid? The guitar will
also get a subtle, variegated fade to black around the edges.
Wow! Simply fuckin' WOW! The rabid tiger maple has been
unleased! Mark
stopped by the shop to supervise the color testing. That's
what building a custom is all about, getting it exactly the way you
want it without compromise. Mark was this symphony's conductor
and I was first chair piccolo (insert small flute joke here), but
the red wasn't coming out quite to his liking. The only way to
get that rich, blood red tone was to make a "personal investment" to
the composition. Anyone got a band-aid? The guitar will
also get a subtle, variegated fade to black around the edges.
Wow! Simply fuckin' WOW! The rabid tiger maple has been
unleased! |
| April 13, 2011 |
  Where
was my shop helper tonight? Sanding and buffing out the
fretboard is just a little bit labor intensive. Fifteen grits
and a Popeye forearm later and we have spectacular results; silky
smooth. Check out those fret marker blocks. I don't
think I've seen that approach before. And the bloodwood
banding offers just the right amount of contrast. Where
was my shop helper tonight? Sanding and buffing out the
fretboard is just a little bit labor intensive. Fifteen grits
and a Popeye forearm later and we have spectacular results; silky
smooth. Check out those fret marker blocks. I don't
think I've seen that approach before. And the bloodwood
banding offers just the right amount of contrast. |
| April 17, 2011 |
  After
a few final checks, we contoured the top. Sorry, no actions
shots here. It takes 100% concentration and a steady hand.
An angle grinder with a sanding disk is not what one would call a
delicate, precision tool. It's made for removing a lot of
material quickly. One mistimed blink or sneeze and that $150
piece of lumber suddenly becomes firewood. After
a few final checks, we contoured the top. Sorry, no actions
shots here. It takes 100% concentration and a steady hand.
An angle grinder with a sanding disk is not what one would call a
delicate, precision tool. It's made for removing a lot of
material quickly. One mistimed blink or sneeze and that $150
piece of lumber suddenly becomes firewood. |
| April 24, 2011 |
  Having
a custom guitar made just for you has its advantages, especially
with regard to personal preference and playing comfort. Today
Mark came to the shop for his fitting. No, not for those
wicked cool shades, but for guitar body and neck shaping. We
took precise measurements of Mark's boob and his nipple-to-nipple
dimensions. Seriously, playing comfort is important to all of
us. A little contouring and relief on the back of the guitar
goes a long way, and Mark was able to stop by to make sure it fit
perfectly. Having
a custom guitar made just for you has its advantages, especially
with regard to personal preference and playing comfort. Today
Mark came to the shop for his fitting. No, not for those
wicked cool shades, but for guitar body and neck shaping. We
took precise measurements of Mark's boob and his nipple-to-nipple
dimensions. Seriously, playing comfort is important to all of
us. A little contouring and relief on the back of the guitar
goes a long way, and Mark was able to stop by to make sure it fit
perfectly. |
 The
neck's profile is very important. It's the part of the guitar
your hand is on constantly, so it has to be comfortable. What,
do you think the trunk of a tree is round? Wait, I guess it
might be ... but not after they get done cutting into a square
stick. Then we have to make it round again. So Mark air-guitared,
then I carved a bit; Mark did some scissor kicks and windmills, and
I carved a bit more; Mark channeled some Santana and fingered some
Black Magic Woman, and we fine tuned the fit perfectly.
Everyone's hands and playing preferences are different, but there is
always one supreme constant: No matter the size or shape of your
fingers, you can always manage to fit one in your nose. The
neck's profile is very important. It's the part of the guitar
your hand is on constantly, so it has to be comfortable. What,
do you think the trunk of a tree is round? Wait, I guess it
might be ... but not after they get done cutting into a square
stick. Then we have to make it round again. So Mark air-guitared,
then I carved a bit; Mark did some scissor kicks and windmills, and
I carved a bit more; Mark channeled some Santana and fingered some
Black Magic Woman, and we fine tuned the fit perfectly.
Everyone's hands and playing preferences are different, but there is
always one supreme constant: No matter the size or shape of your
fingers, you can always manage to fit one in your nose. |
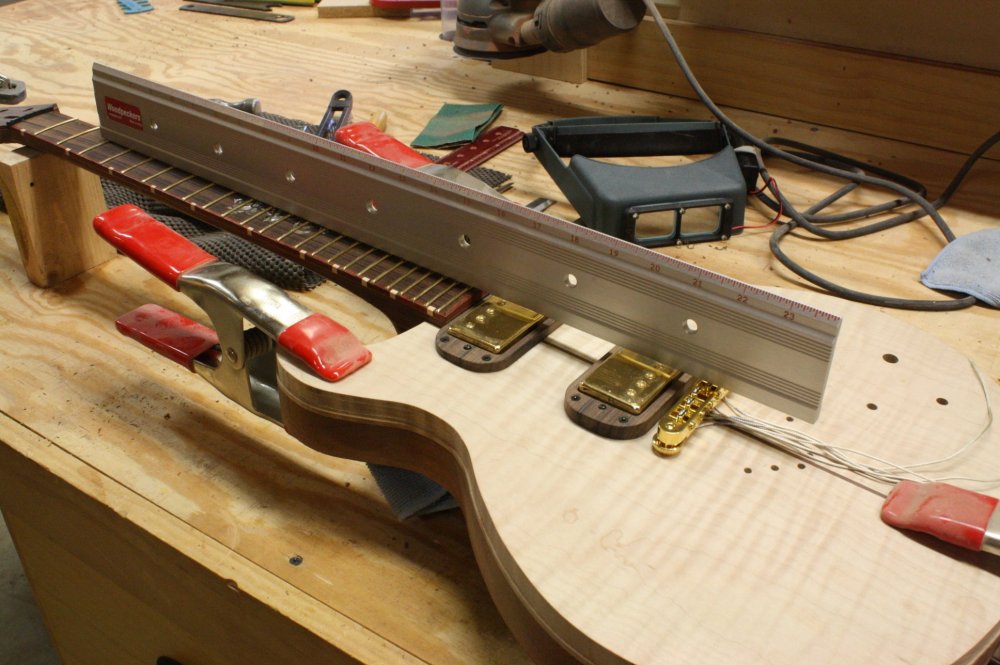
| April 28, 2011 |
  Before
we get too much farther along, we need to check that everything will
actually fit inside the control cavity. This guitar has a lot
of electronics! It's much easier to make any necessary
adjustments now rather than later. We did some fine tuning of
the knob and switch mounting depths and made some room for the
circuit boards. Then we installed the knobs on the front to
get a little pumped up. Look at that bling! Before
we get too much farther along, we need to check that everything will
actually fit inside the control cavity. This guitar has a lot
of electronics! It's much easier to make any necessary
adjustments now rather than later. We did some fine tuning of
the knob and switch mounting depths and made some room for the
circuit boards. Then we installed the knobs on the front to
get a little pumped up. Look at that bling! |
| May 1, 2011 |
  Today
was a moment of truth, a major milestone. Up until now the
guitar has been a jigsaw puzzle of separate pieces which we could
disassemble to make working on the various areas a bit easier.
But now the time has come to permanently mate those parts together.
Mark lent his savvy brush to the task. Today
was a moment of truth, a major milestone. Up until now the
guitar has been a jigsaw puzzle of separate pieces which we could
disassemble to make working on the various areas a bit easier.
But now the time has come to permanently mate those parts together.
Mark lent his savvy brush to the task. |
| May 4, 2011 |
 I
think I need more clamps! The top was glued on! There's
no turning back now! I
think I need more clamps! The top was glued on! There's
no turning back now! |
| May 8, 2011 |
  The
next week or so will be mostly be spent in preparation for finishing
where we'll be adding the color and clear coats. All the
remaining hardware needs to be installed, including these strap
locks. Once the strap locks are installed, it is imperative
that a proper and professional test drive be conducted - after
making sure the neighbors aren't watching, of course. The
next week or so will be mostly be spent in preparation for finishing
where we'll be adding the color and clear coats. All the
remaining hardware needs to be installed, including these strap
locks. Once the strap locks are installed, it is imperative
that a proper and professional test drive be conducted - after
making sure the neighbors aren't watching, of course. |
  Mark
requested that the jack plate be recessed. It's a gratuitous
finishing touch, but it's a custom guitar and anything is possible.
No, the eyes aren't quite what they used to be. Mark
requested that the jack plate be recessed. It's a gratuitous
finishing touch, but it's a custom guitar and anything is possible.
No, the eyes aren't quite what they used to be. |
| May 15, 2011 |
  Sand,
sand, sand. One can't fathom the amount of sanding it takes to
make it perfect. This is a very important step since even the
smallest scratch will be visually amplified once the stain soaks
into it. Sand,
sand, sand. One can't fathom the amount of sanding it takes to
make it perfect. This is a very important step since even the
smallest scratch will be visually amplified once the stain soaks
into it.This guitar will have a two color scheme: red on the front and black on the back. So to the back first. Mahogany has open pores in the grain, little craters. Filling the pores makes it easier to flatten the clear coat later on. Don't ask me why, but the filler for mahogany is Pepto-Bismol pink. Putty knife it on and force it into the pores, then yes, more sanding! We followed that up with a couple coats of black dye. It's enough black to make the statement, but you're still able to appreciate some of that wood grain texture. This will richen up even more after the clear coats go on. |
| May 22, 2011 |
    |
| Putting the finish on this guitar is a multi-step process. That fancy piece of wood on the top cost a lot of money and we really want to show off that awesome grain pattern. First, we dyed the top black. The idea is to get the black dye into those tiger stripes. Then we sand most of it off leaving those stripes black. Now we hit it with the red dye. To pop it even more, we left a band of unfinished wood between the front and back. Then finally, a coat of linseed oil to bring out the grain a bit more and give it some sheen and that wet look. Oh, but we're not done yet. Stay tuned! |
| May 29, 2011 |
  We'll
be spraying chemicals for awhile now. This week we hit it with
some blonde shellac to act as a sealer. Then we squirted some
black dye into the shellac and variegated the edges for a black
burst effect. Stunning! We'll
be spraying chemicals for awhile now. This week we hit it with
some blonde shellac to act as a sealer. Then we squirted some
black dye into the shellac and variegated the edges for a black
burst effect. Stunning! |
| June 20, 2011 |
| There was a delay in posting not because I didn't do anything, but it's really not that exciting watching paint dry (or lacquer in this case). This is the point where we spray on numerous coats of finish to build up a thick layer of clear stuff to protect the guitar and give us something to buff out. This is a tedious task. Spray on a few coats, sand it a little, spray on a few coats, sand it a little, and so on. Then you let it completely dry and cure for a week. |
   |
| After spraying on 24 coats, you end up with a pretty shiny guitar, but it's just not smooth enough. It kinda looks like an orange peel at this point. The next step is to sand through 11 grits of sandpaper where forearms of steel are a prerequisite. This is when all those years of vigorous masturbation pay off. The first couple grits level the finish, but leave it dull. Then you step through the polishing grits until you're left with a glossy, silky, smooth, liquid, mirror-like surface. Finally, a coat of automotive swirl remover followed by a coat of paste wax give it the ultimate pop. |
| June 26, 2011 |
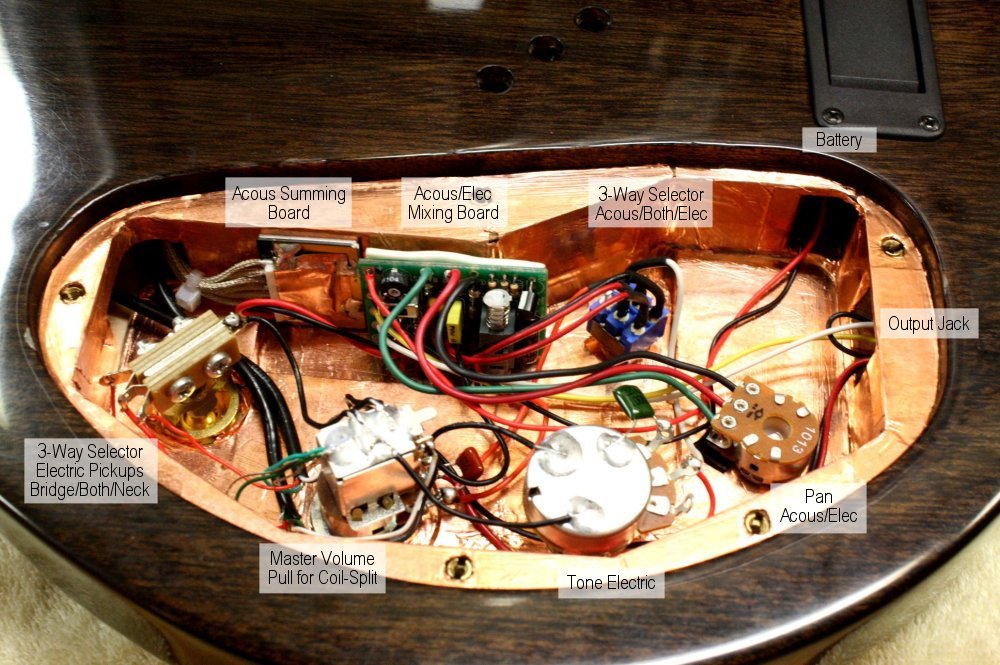 This
week we put the engine in this car. First off, we glued in
some copper foil shielding. If you think about it, the only
fuel this car runs on is a vibrating string. The wires inside
are pretty sensitive and you can pick up some unwanted hum or your
least favorite local radio station. You need to try to block
any errant signals from getting into your mix. This
week we put the engine in this car. First off, we glued in
some copper foil shielding. If you think about it, the only
fuel this car runs on is a vibrating string. The wires inside
are pretty sensitive and you can pick up some unwanted hum or your
least favorite local radio station. You need to try to block
any errant signals from getting into your mix.The piezo bridge Mark picked out will make this electric guitar sound like an acoustic. Pretty cool! However, that translates into many, many ... many more wires. Click on the thumbnail to see what everything does. |
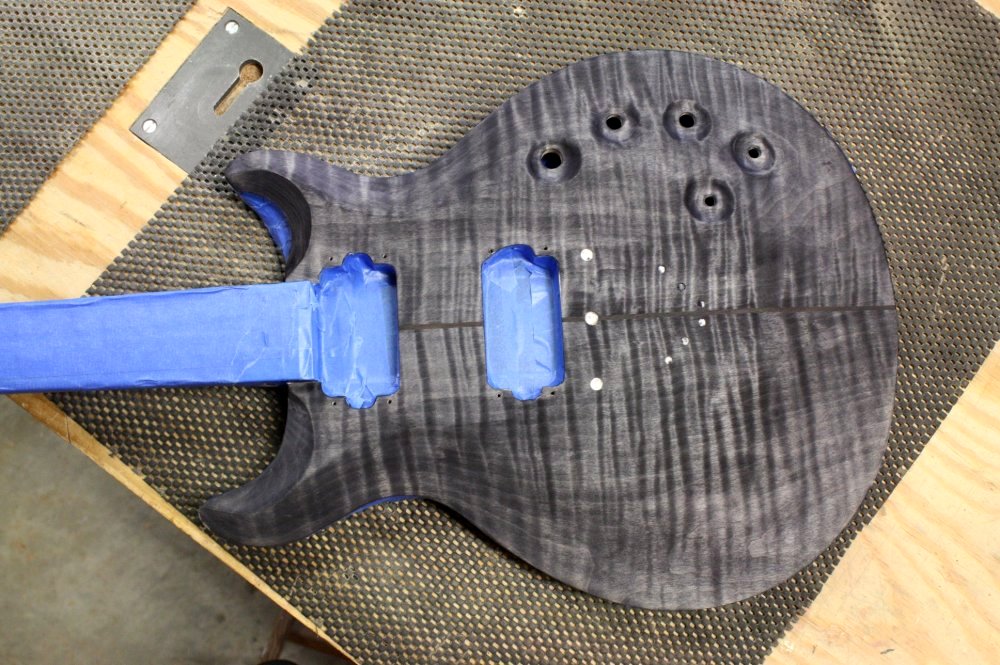
| July 4, 2011 |
  The
frets received their final tweakings. Everything has to be
dead flat for the guitar to play correctly. We hit the whole
neck with some sandpaper on a block first. Then we made passes
up and down the neck several times checking that each fret was level
with its two neighbors. Some careful filing, some clean up
with 600 grit sandpaper, then a final buffing with the Dremel.
Damn, that blue neck rocks! The
frets received their final tweakings. Everything has to be
dead flat for the guitar to play correctly. We hit the whole
neck with some sandpaper on a block first. Then we made passes
up and down the neck several times checking that each fret was level
with its two neighbors. Some careful filing, some clean up
with 600 grit sandpaper, then a final buffing with the Dremel.
Damn, that blue neck rocks!All the hardware went on. The pickups, the bridge, the knobs, the switches, and the tuners all were installed. But this photo is all I'll give you until the final reveal; Mark hasn't seen it yet. Talk about major bling factor; that gold is hot! And this is as close to a self-portrait as you'll see from me. That cranium is quite distinctive. |
| July 9, 2011 |
  This past week the guitar received a little more fine tuning getting the string action low and maximizing the playability. The neck received a coat of tung oil and a quick buff. Then the instrument got a final and thorough cleaning and polishing in preparation for the unveiling. Finally Delivery Day! I think Mark's smile tells it all.
|
| July 23, 2011 |
  A
project of this magnitude calls for a commensurate level of
documentation. Will Jackson, professional photographer, was
called in to do an on-site "sitting" with the guitar. The
photos will look outstanding, but I found the methods incongruous
and a bit humorous that you can get such great pictures from such a
low-tech setup. I guess it doesn't matter how the light gets
on the subject, just as long as the light gets on the subject. A
project of this magnitude calls for a commensurate level of
documentation. Will Jackson, professional photographer, was
called in to do an on-site "sitting" with the guitar. The
photos will look outstanding, but I found the methods incongruous
and a bit humorous that you can get such great pictures from such a
low-tech setup. I guess it doesn't matter how the light gets
on the subject, just as long as the light gets on the subject. |
| August 10, 2011 |
| The photos are in and they look fabulous. I really think they capture the essence of the instrument and the great amount of love that went into making it. Please credit Will Jackson, professional photographer, for taking these stunning photographs. Beauty is in the details. Click on the photos to see them in a larger size. |
 |
    |
| Specifications | ||
| Style | Electric, 6-String, Double Cutaway, Drop-Top, with Set-Thru Neck | |
| Dimensions | 13" wide x 1 7/8” body thickness x 39 1/2” overall length | |
| Weight | 9.4 pounds | |
| Wood | Body Front Panel | Book-Matched Flamed Maple with Bolivian Rosewood Center Stripe |
| Body Back Panel | African Mahogany | |
| Neck | Bolivian Rosewood with Maple Pinstripes | |
| Fretboard | Bolivian Rosewood with Bloodwood Banding & Maple Block Side Markers | |
| Fretboard | Frets |
25" Scale Length with 24 frets Crown Height=0.057", Width=0.110", Gold Finish |
| Fretboard Radius | 12" | |
| Inlay | The “Lotus & Dove” in Green Abalone Abalam | |
| Truss Rod Cover | “Om” in Green Abalone Abalam | |
| Finish | Body Front Panel | Blood Red Dye to Black Burst |
| Body Back Panel | Black Dye | |
| Top Coat | Nitrocellulose Lacquer | |
| Neck | Tung Oil | |
| Electronics | Pickups |
Tesla “Opus-1" for Neck & Bridge, Gold Finish, with Custom Bezels in Bolivian Rosewood 3-way Pickup Selector & Coil Splitting |
| Piezo Bridge | LR Baggs with Ctrl-X Mixer, Gold Finish | |
| Tuners | Planet Waves Auto-Trim Tuning Machines, 3+3, Gold Finish | |