
| May 5, 2013 |
 Aaron's
Getting a New Guitar Stand! Aaron's
Getting a New Guitar Stand!This is not your stamped-out, pot-metal stand from Guitar Center. This is a custom work of art. Aaron picked out all the options: what kind of wood, what color velvet, what types of unique storage, what size to accommodate his guitars. He even chose to add a matching foot stool for his classical playing. I appreciate the irony in having an ultra-modern, high-tech foot stool for playing music that's 100 years old. This will be a fun one. All projects made from wood start off with ... well ... a chunk of wood. Hopefully I can get enough bits and pieces out of this stick of cherry to make both the stand and the foot stool. If not, I've got some left over from the last project to pitch in if needed. |
| May 10, 2013 |
  The
first step in making a stand is to glue up some short pieces of wood
to make a blank which is as wide as the stand. It's hard to
find a single piece of lumber the appropriate width, and if you do,
it is usually warped or twisted. All the wood I use on a stand
is 1" thick to give it significant mass, but also to add some visual
weight. Aaron chose cherry wood. It looks a little bland
now, but when you oil it up it will turn out a very rich brown color
with some attractive grain. The
first step in making a stand is to glue up some short pieces of wood
to make a blank which is as wide as the stand. It's hard to
find a single piece of lumber the appropriate width, and if you do,
it is usually warped or twisted. All the wood I use on a stand
is 1" thick to give it significant mass, but also to add some visual
weight. Aaron chose cherry wood. It looks a little bland
now, but when you oil it up it will turn out a very rich brown color
with some attractive grain. |
| May 13, 2013 |
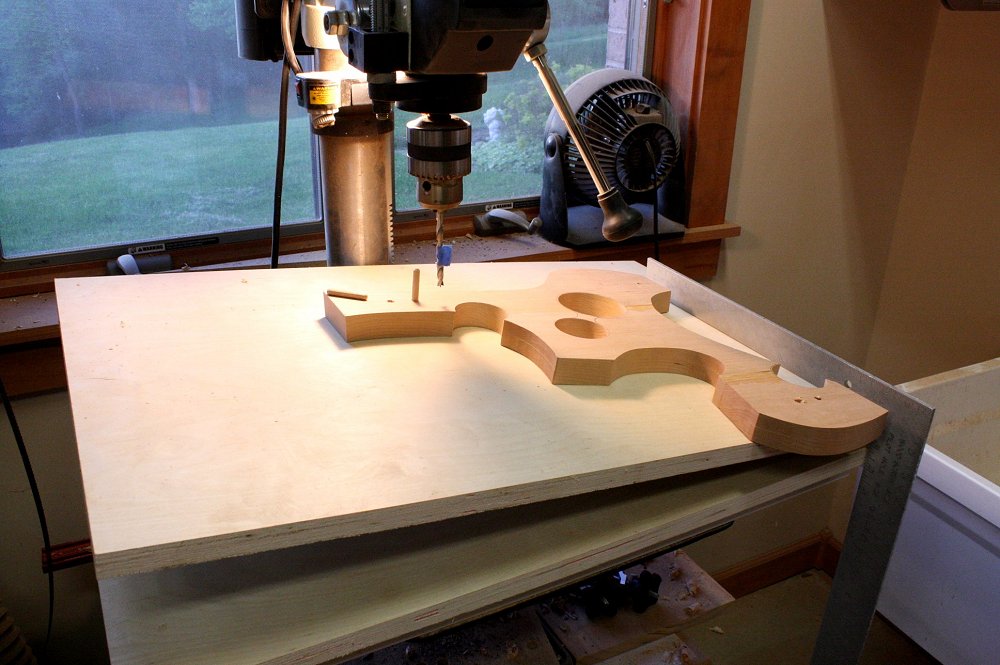
  These
stands are pretty crazy looking. To get all the angles to work
out, I had to lay out the geometry on the computer. The
templates I made help me get the important stuff laid out accurately
and consistently. It would not be cool to get to the end of
the project and find out the guitar won't sit on there right. These
stands are pretty crazy looking. To get all the angles to work
out, I had to lay out the geometry on the computer. The
templates I made help me get the important stuff laid out accurately
and consistently. It would not be cool to get to the end of
the project and find out the guitar won't sit on there right.I use the templates as a start, but I still leave myself some room for the "art" to happen. All the cross members are unique to each stand so no two are the same. I'll also play around with the design of the various cut-outs. I let the wood speak to me. I know that sounds pretty corny, but I'll look at what the grain is doing and respond to it. Sometimes there's a knot in the wood, and I can either cut it out or celebrate it. Aaron liked the guitar pick cut-out I did for the last stand, so I incorporated it into his design. I traced the pattern from the templates onto the wood, rough-cut the pieces out on the band saw, then I clean up the edges using the templates and a pattern routing bit. Then it's off to the drum sander to smooth out any rough edges. Aaron chose not to include any custom inlays, but if he did they would go in at this point while I've still got a nice flat surface on which to work. |
| May 16, 2013 |
|
Now that the side uprights are roughed out, it's time to add some
cross members. I can either screw these in or glue everything
together. Screwing things together allows the stands to be
broken down and take up less space in the shipping box. This
means less money for shipping, but some assembly required on the
client's end. If I glue everything up, you won't see any screw
heads, but it will require a bigger box for shipping. Aaron
preferred the cleaner look without visible screw heads. Since
I make everything to order, no problem. |
   Adding
dowels to the connection will strengthen the joint. The
uprights are at angle, so I need to angle the dowel holes at the
drill press. I transfer the dowel locations to the block of
wood which will become a cross member. Then I drill the
matching dowel holes in the cross member and hope everything slides
together when I assemble it. Adding
dowels to the connection will strengthen the joint. The
uprights are at angle, so I need to angle the dowel holes at the
drill press. I transfer the dowel locations to the block of
wood which will become a cross member. Then I drill the
matching dowel holes in the cross member and hope everything slides
together when I assemble it. |
   This
is when some of the 'art' happens. I select a cut-off of wood
and sketch on a design. I work with the grain or around any
blemishes or knots in the wood. It's off to the bandsaw to
rough out the shape, over to the drum sander to smooth things out,
then test fit it to the uprights to make sure it fits nice.
Repeat for the other cross members. This
is when some of the 'art' happens. I select a cut-off of wood
and sketch on a design. I work with the grain or around any
blemishes or knots in the wood. It's off to the bandsaw to
rough out the shape, over to the drum sander to smooth things out,
then test fit it to the uprights to make sure it fits nice.
Repeat for the other cross members. |
| May 18, 2013 |
   I
call the little round elements "pods." I guess if the stand
looks organic, then these round things would be like little growths
or blooms. I draw all the components on a block of wood and
drill out the recesses which will hold the foam padding. Then
it's just a matter of cutting out the shapes and smoothing out the
sides. I round over all the sharp corners to give things a
softer appearance. I
call the little round elements "pods." I guess if the stand
looks organic, then these round things would be like little growths
or blooms. I draw all the components on a block of wood and
drill out the recesses which will hold the foam padding. Then
it's just a matter of cutting out the shapes and smoothing out the
sides. I round over all the sharp corners to give things a
softer appearance. |
| May 20, 2013 |
  Playing
classical guitar requires a foot stool. Aaron came up with the
brilliant idea for making a matching stool. I appreciate the
irony of a modern-looking, organic foot stool when playing music
that's a hundred years old. The process for making the stool
is pretty much the same as that of the stand. The design
feature here is that the stool will nestle perfectly inside the
stand for storage. Playing
classical guitar requires a foot stool. Aaron came up with the
brilliant idea for making a matching stool. I appreciate the
irony of a modern-looking, organic foot stool when playing music
that's a hundred years old. The process for making the stool
is pretty much the same as that of the stand. The design
feature here is that the stool will nestle perfectly inside the
stand for storage. |
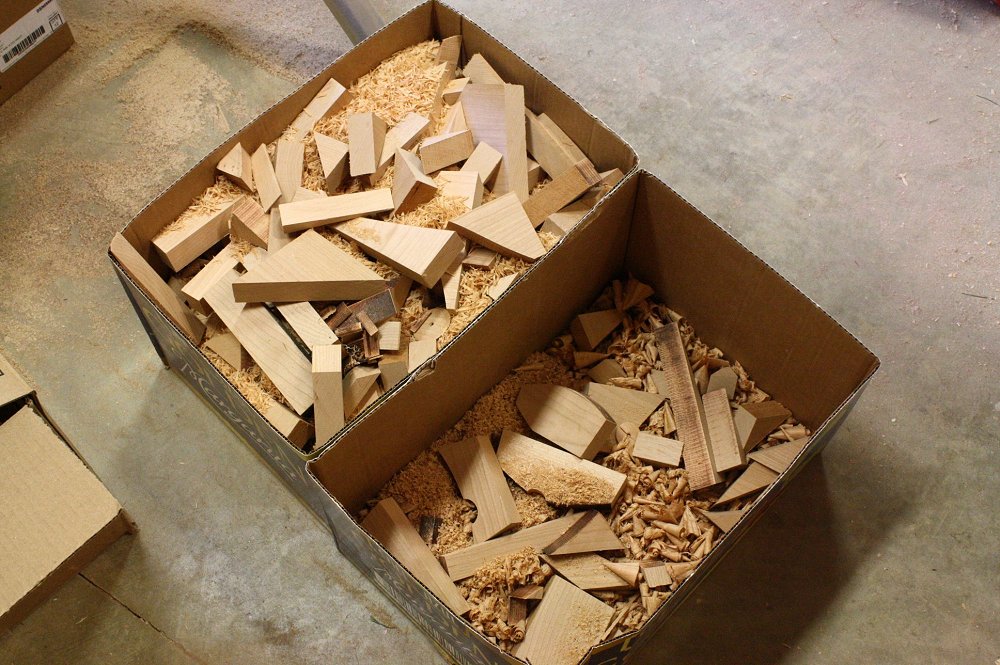 I
use a subtractive method of construction when making these stands in
that I start off with a big block of wood and cut away the excess
until I'm left with the final shape I'm after. This method
results in a lot of off-cuts and shavings. This stand is made
entirely from cherry wood, which also happens to be a great flavor
enhancer for smoking meat. Needless to say, I segregated all
those cherry wood scraps and they will not end up in the land fill. I
use a subtractive method of construction when making these stands in
that I start off with a big block of wood and cut away the excess
until I'm left with the final shape I'm after. This method
results in a lot of off-cuts and shavings. This stand is made
entirely from cherry wood, which also happens to be a great flavor
enhancer for smoking meat. Needless to say, I segregated all
those cherry wood scraps and they will not end up in the land fill. |
| May 23, 2013 |
  It
doesn't look like there should be 24 pieces making up this simple
yet elegant guitar stand, but there they are. And all of them
had to be sanded first with 120 grit to get rid of any burn marks
and level things out, then up to 220 grit to make them silky smooth
and ready for finish. Since this stand was going out
pre-assembled, I performed all the glue-ups. It
doesn't look like there should be 24 pieces making up this simple
yet elegant guitar stand, but there they are. And all of them
had to be sanded first with 120 grit to get rid of any burn marks
and level things out, then up to 220 grit to make them silky smooth
and ready for finish. Since this stand was going out
pre-assembled, I performed all the glue-ups. |
| May 26, 2013 |
  Let's
see if I can show you just enough and not give the surprise away.
I installed the wood cups which will hold the foam pads. Once
I ensured everything lined up right, I took them off and started
applying linseed oil to everything. Any wood just comes alive
when it soaks up some oil, and this cherry was no exception.
It really wakes up the grain. Let's
see if I can show you just enough and not give the surprise away.
I installed the wood cups which will hold the foam pads. Once
I ensured everything lined up right, I took them off and started
applying linseed oil to everything. Any wood just comes alive
when it soaks up some oil, and this cherry was no exception.
It really wakes up the grain. |
  After
the oil dried for a day, it was off to the spray booth to apply some
protective clear coats and give it some shine. This will
require several days to get all the coats on. While waiting
for the polyurethane to dry, I made the pads which will support the
guitar. Basically, you cut out a foam puck, set it on a round
piece of wood, then wrap it with velvet. Aaron went with the
olive green which will look great against the cherry wood. After
the oil dried for a day, it was off to the spray booth to apply some
protective clear coats and give it some shine. This will
require several days to get all the coats on. While waiting
for the polyurethane to dry, I made the pads which will support the
guitar. Basically, you cut out a foam puck, set it on a round
piece of wood, then wrap it with velvet. Aaron went with the
olive green which will look great against the cherry wood. |
| May 30, 2013 |
  I
put on a final coat of paste wax. It's hard to describe what
the wax actually does. It takes off the brash, glary, edge
that comes straight from the finish. One could say it gives it
a warm glow. It also makes it feel and smell new. Also,
the foam/velvet pads were screwed into their cups. That's when
the magic happens, when the piece takes on the color. I
put on a final coat of paste wax. It's hard to describe what
the wax actually does. It takes off the brash, glary, edge
that comes straight from the finish. One could say it gives it
a warm glow. It also makes it feel and smell new. Also,
the foam/velvet pads were screwed into their cups. That's when
the magic happens, when the piece takes on the color. |
| June 3, 2013 |
  Here's
another guitar stand for the record books! Here's
another guitar stand for the record books!Here's a quick recap: ● Aaron got to pick the wood. He went with cherry. ● Aaron got to pick the velvet color. He chose an olive green, which is an awesome compliment to the cherry. ● Aaron desired a fully assembled stand so there would be no screw heads showing and no assembly on his end. Look at that! ● Aaron liked the guitar pick cut-out. He got it. ● Aaron wanted a larger tray for strings, capo, clippers and such. I made it happen. ● Aaron thought it would be cool to have a matching foot stool for his classical musings. Boom, it's there! Sure, I know one of these stands will set you back, but you get exactly what you want and I hand make everything to order. To put things in perspective, it took close to $100 in material and about 26 hours of time to craft this one of a kind work of art. I hope one can see some value there. Aaron will every time he smiles when he goes to pick up his guitar. |