
| April 9, 2018 | |||
 Michael's
Getting a New Guitar Stand! Michael's
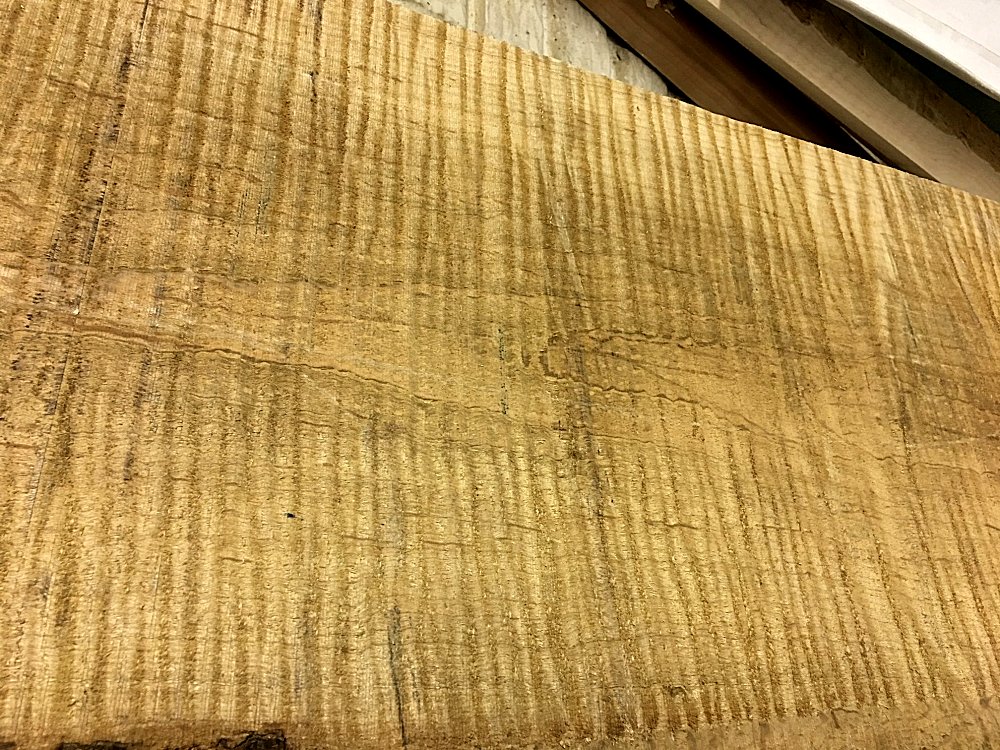
Getting a New Guitar Stand!This is not your stamped-out, pot-metal stand from Guitar Center. This is a custom work of art. Michael picked out all the options: what kind of wood, what color velvet, what types of unique storage, what size to accommodate his guitars, and even the screws that will hold it together. Even though he is in Portland and I'm in St. Louis, he'll get to enjoy the fabrication process right here on this page. All projects made from wood start off with ... well ... a chunk of wood. Michael has an eye for exceptional, highly figured maple. It's a good thing that I know a guy. Ironically, Michael lives in Oregon, the home of quilted maple. But Michael wants curly maple (or sometimes called tiger maple for the stripes); it comes from Pennsylvania. I called my supplier and had him dig into his private stock for just the right piece. This is a photo of the actual slab in his lumber yard. You'll see some more photos once it arrives in my wood shop - in Missouri. This slab o' wood is going cross-country. |
|||
| April 13, 2018 | |||
 Michael's
going for a sleek, monochromatic look to let the quality wood shine.
He requested gold toned screws. Normally I use zinc screws
which are silver, so I had to hit the streets to find the perfect
screw (ha, not those kinda streets). Home Depot happened to
have these furniture screws. Firstly they're gold, but they
also have a washer head with a hex key. I like these since
they look less like screws and will compliment the wood color.
This is a one-off piece of art, and it's all about the details.
I am happy to make sure all the details meet Michael's vision. Michael's
going for a sleek, monochromatic look to let the quality wood shine.
He requested gold toned screws. Normally I use zinc screws
which are silver, so I had to hit the streets to find the perfect
screw (ha, not those kinda streets). Home Depot happened to
have these furniture screws. Firstly they're gold, but they
also have a washer head with a hex key. I like these since
they look less like screws and will compliment the wood color.
This is a one-off piece of art, and it's all about the details.
I am happy to make sure all the details meet Michael's vision. |
|||
| April 17, 2018 | |||
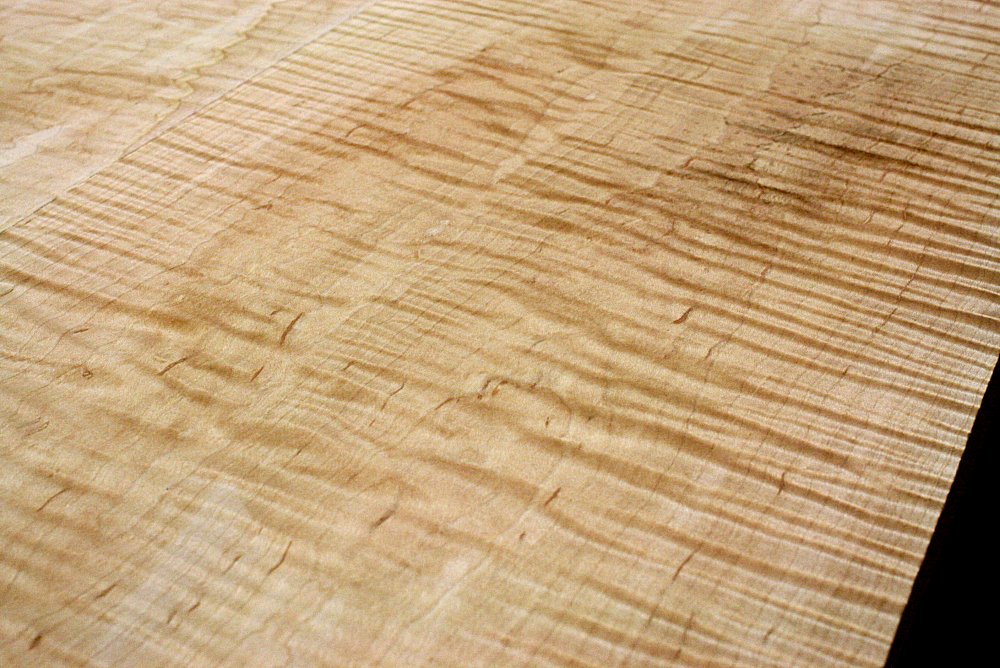  Michael's
got wood! That joke never gets old. The wood arrived at
my house today! After some surface planing to smooth things
out, we get a really good look at things. These planks look
especially attractive. As with all these photos, you can click
the thumbnails to get a higher res view. There's a lot of
figure here, and it will only get better once the finish goes on.
But there are quite a few steps to go before we get to that point. Michael's
got wood! That joke never gets old. The wood arrived at
my house today! After some surface planing to smooth things
out, we get a really good look at things. These planks look
especially attractive. As with all these photos, you can click
the thumbnails to get a higher res view. There's a lot of
figure here, and it will only get better once the finish goes on.
But there are quite a few steps to go before we get to that point.I've got a couple other projects in the shop that are in line before Michael, but stay tuned here. I might try to fit a few tasks in here and there. Once Michael's number comes up, things will move more quickly. |
|||
| April 28, 2018 | |||
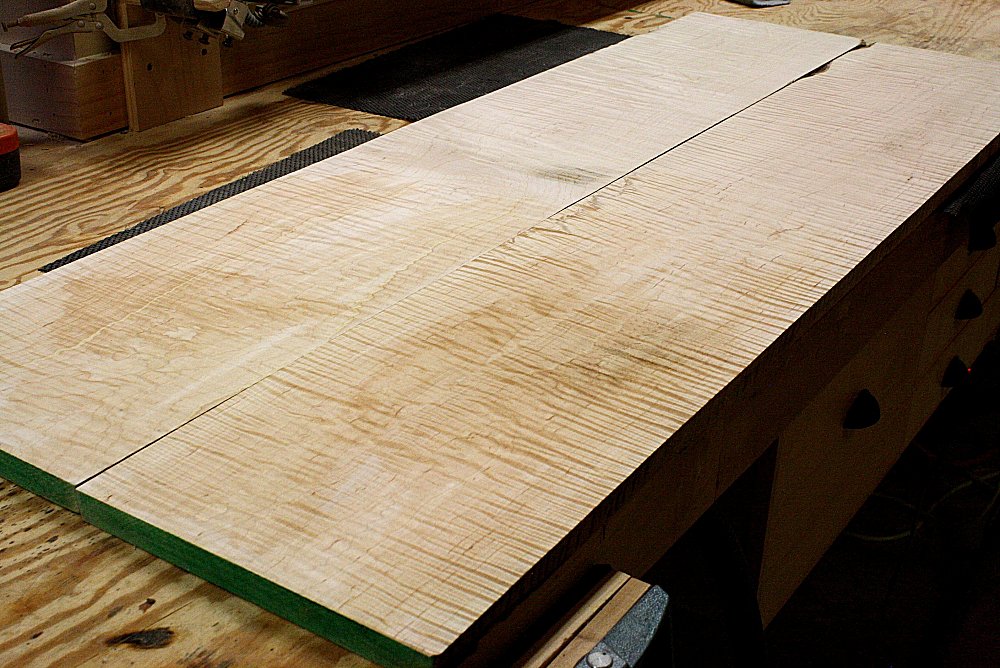
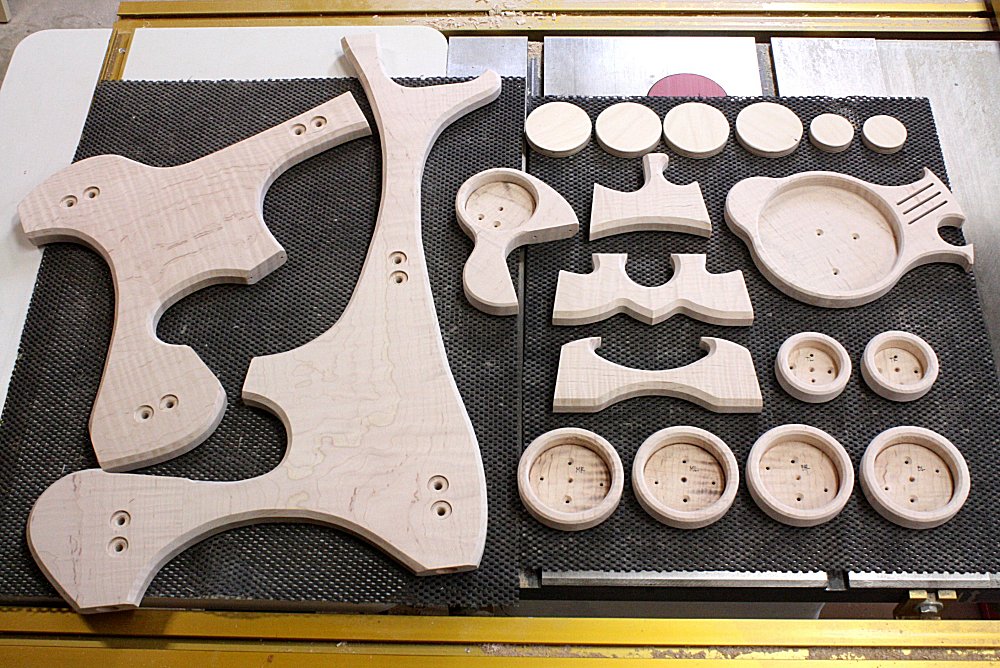
 Now
it's time to take those big chunks of wood and cut them up.
It's very hard to find planks of wood that are 18" wide, so we have
to glue up a couple smaller pieces. You can see the templates
behind showing what those squared off blanks will become. Now
it's time to take those big chunks of wood and cut them up.
It's very hard to find planks of wood that are 18" wide, so we have
to glue up a couple smaller pieces. You can see the templates
behind showing what those squared off blanks will become. |
|||
| April 29, 2018 | |||
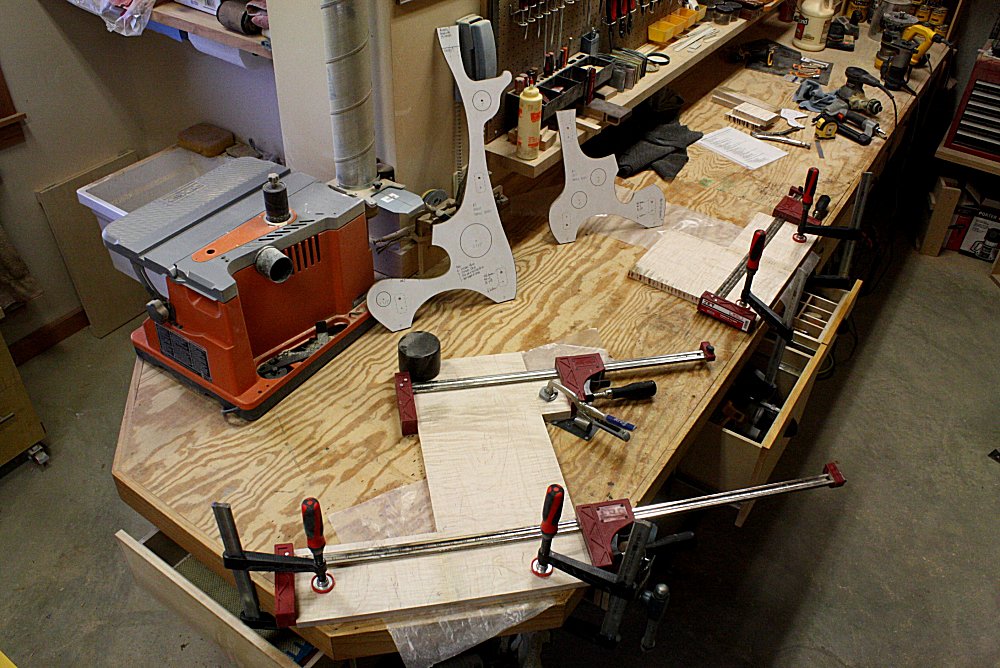
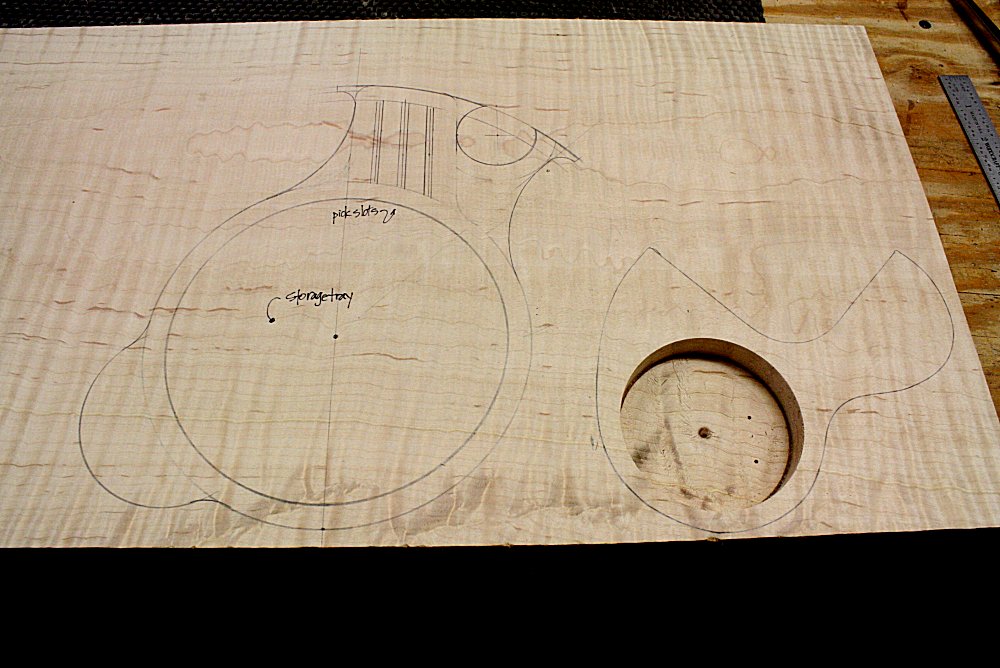
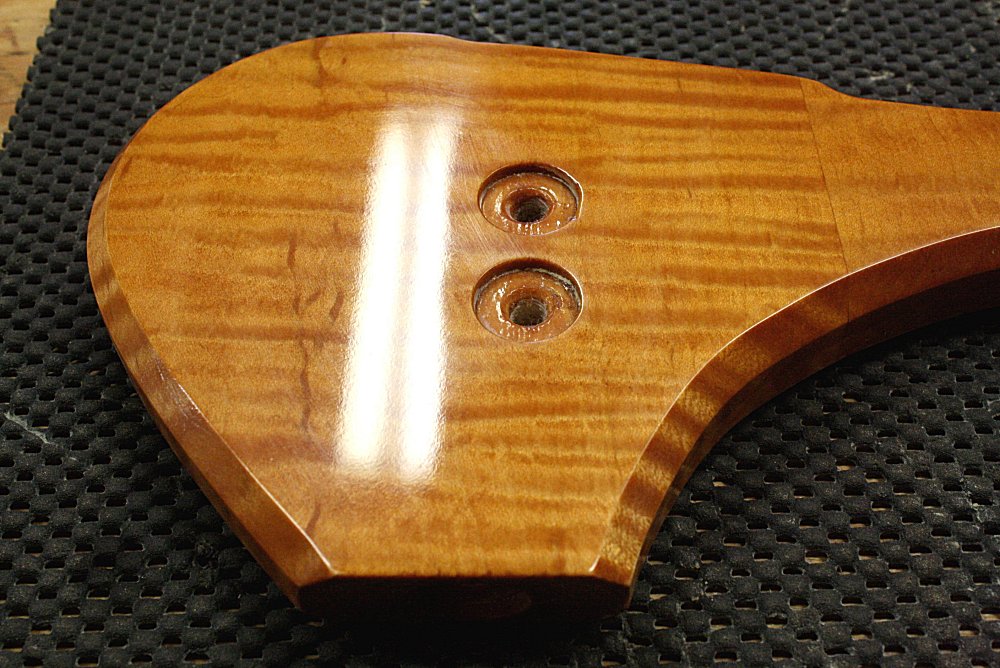
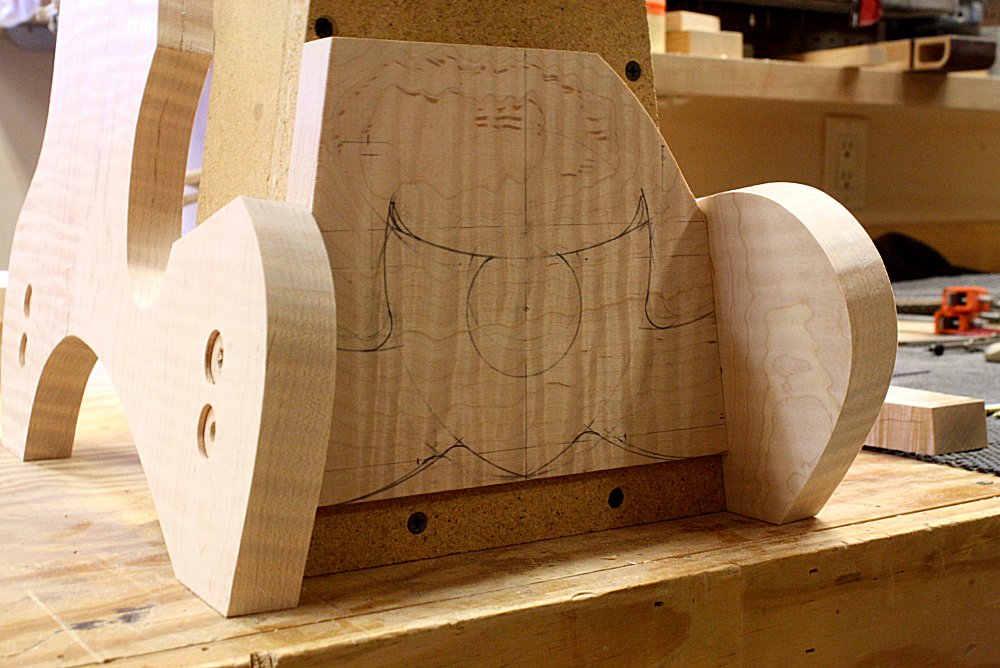 This
is a custom, one-off stand. Michael doesn't live close by, so
I'll post a few selections here so he can approve or request
changes. It's much easier to change things now when it's just
pencil on wood. Once the wood is cut, it don't go back
together so easy. This
is a custom, one-off stand. Michael doesn't live close by, so
I'll post a few selections here so he can approve or request
changes. It's much easier to change things now when it's just
pencil on wood. Once the wood is cut, it don't go back
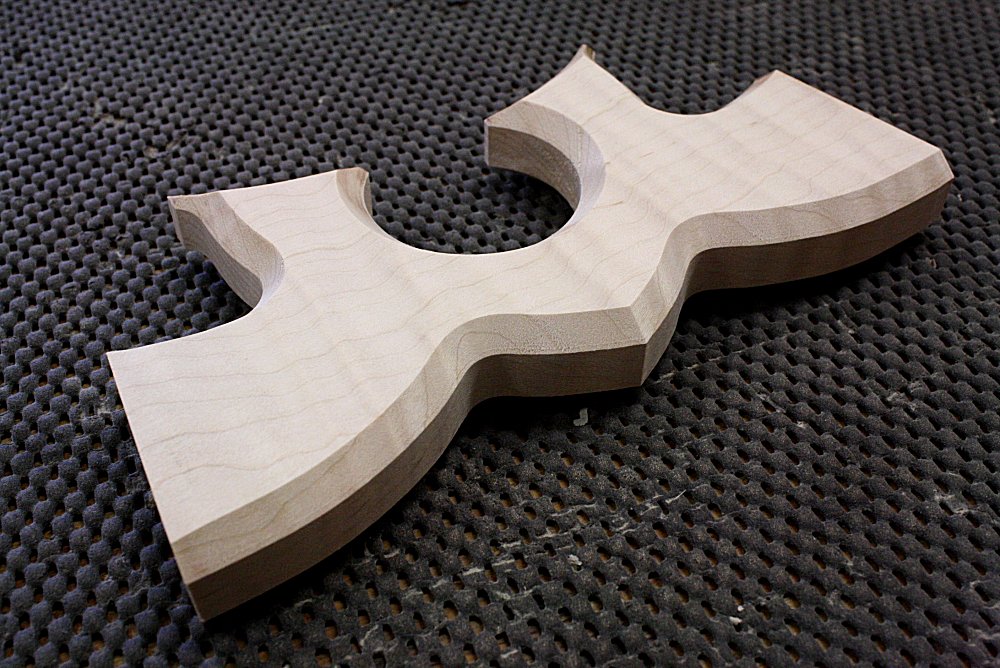
together so easy.Michael, this is the front stretcher that hold the two sides together. Click on the thumbnails here for the hi-res view. Don't be distracted by that awesome wood grain. I went with a more symmetrical, emblem-like shape. I will cut out the shape on the pencil lines. It looks like maybe a plaque with a circle in it. If you don't want it symmetrical, I can change it up, no problem. If you have a personal logo, insignia, or something you'd want to see here, let me know. I might be able to work it in for that personal touch. |
|||
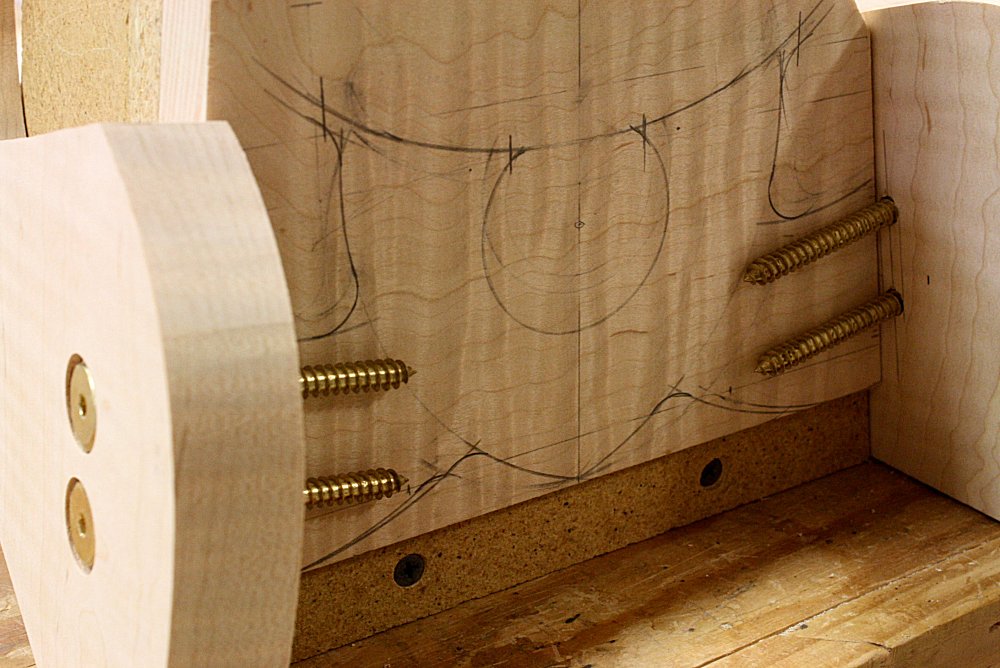
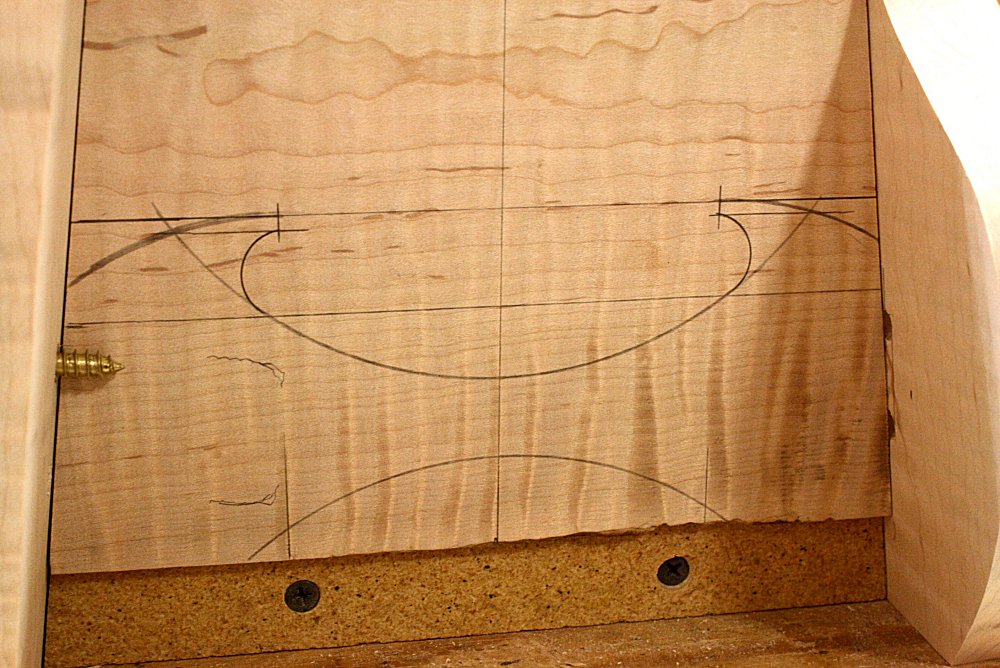  These
are the two back stretchers sitting on my assembly jig. These
are the two back stretchers sitting on my assembly jig.The second photo to the right is, again, simple and symmetrical, but has an offset post to help support the storage tray which will sit on top. The third photo is the lower stretcher for your consideration. After re-looking at this one, I might want to stay with the same concept, but maybe make one side a little higher than the other. Pull it a little out of balance a little, give it some dynamic here. |
|||
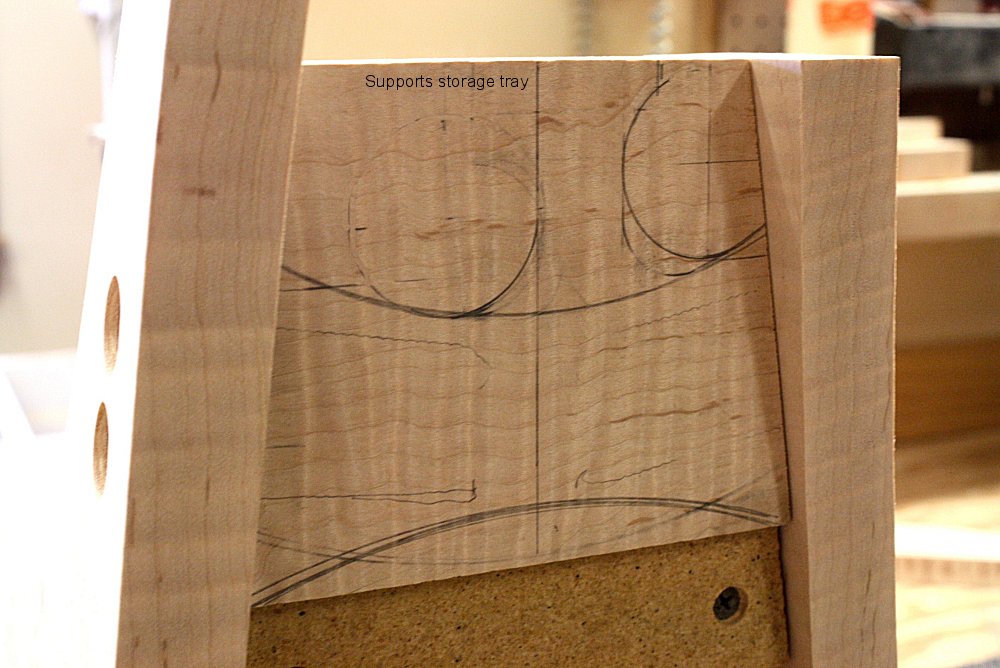
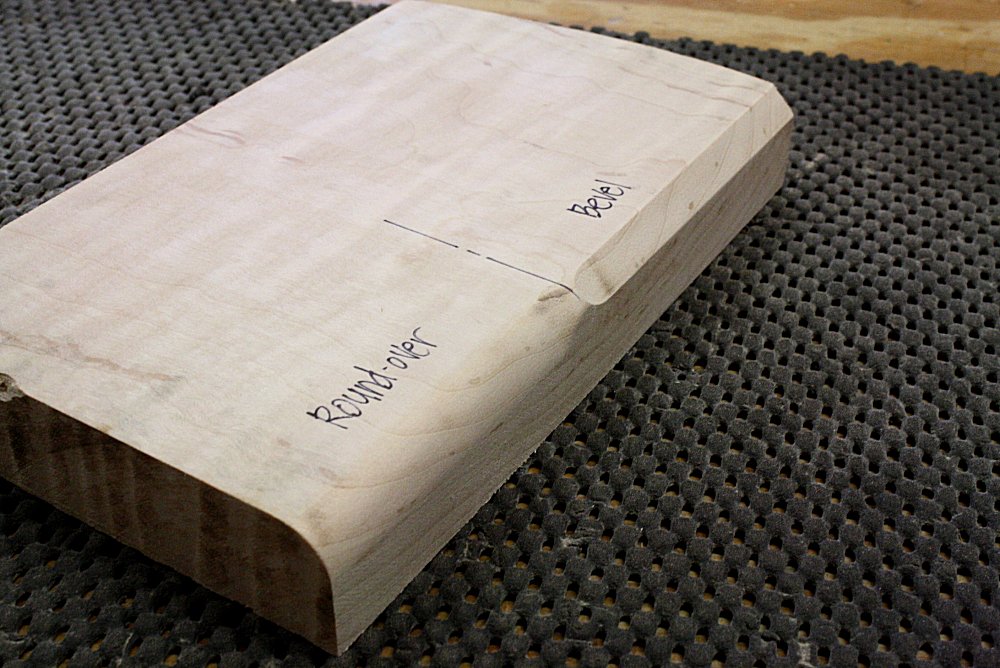  The
first photo to the right shows the storage tray and the upper neck
support. Just working with some shapes here, trying to keep
the balance while still looking a little random and organic. The
first photo to the right shows the storage tray and the upper neck
support. Just working with some shapes here, trying to keep
the balance while still looking a little random and organic.The second photo are a couple examples of the edge treatment. I can do a simple round-over, or a can do a 45 degree bevel. The round-over softens the look, but I think I'm feeling the bevel on this stand. It gives it a facet to reflect light and will give a definition while it runs around those smooth curves. But I work for you, so you have the final say on everything. Just let me know your thoughts on the sketches. |
|||
| May 5, 2018 | |||
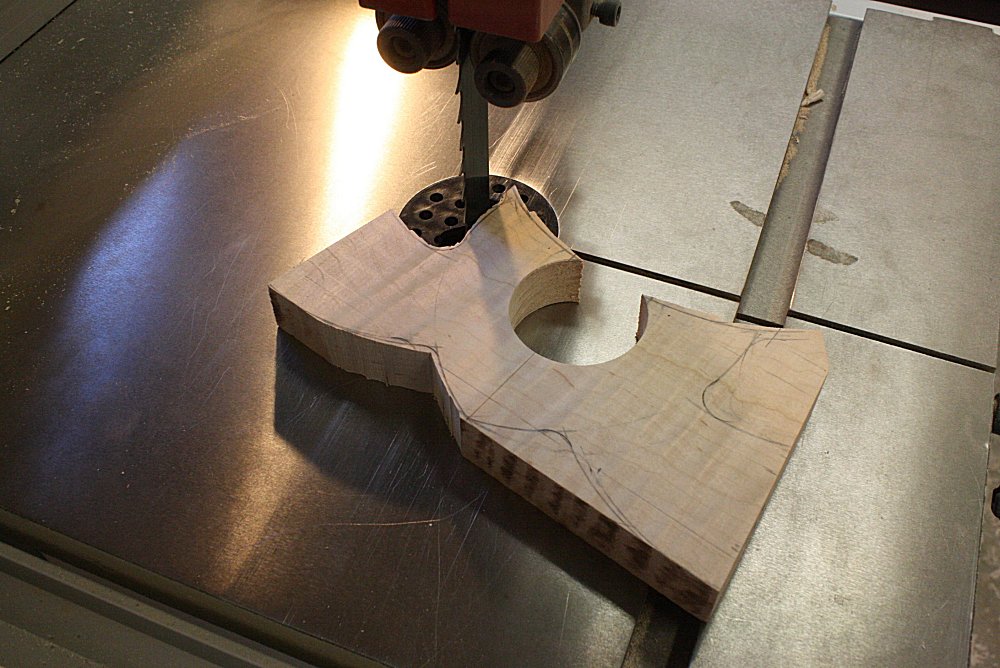   After
Michael made his choices (see previous blog entry), now it's time
for me to make it happen. Let's take a quick tour to shaping
one of the stretchers. After
Michael made his choices (see previous blog entry), now it's time
for me to make it happen. Let's take a quick tour to shaping
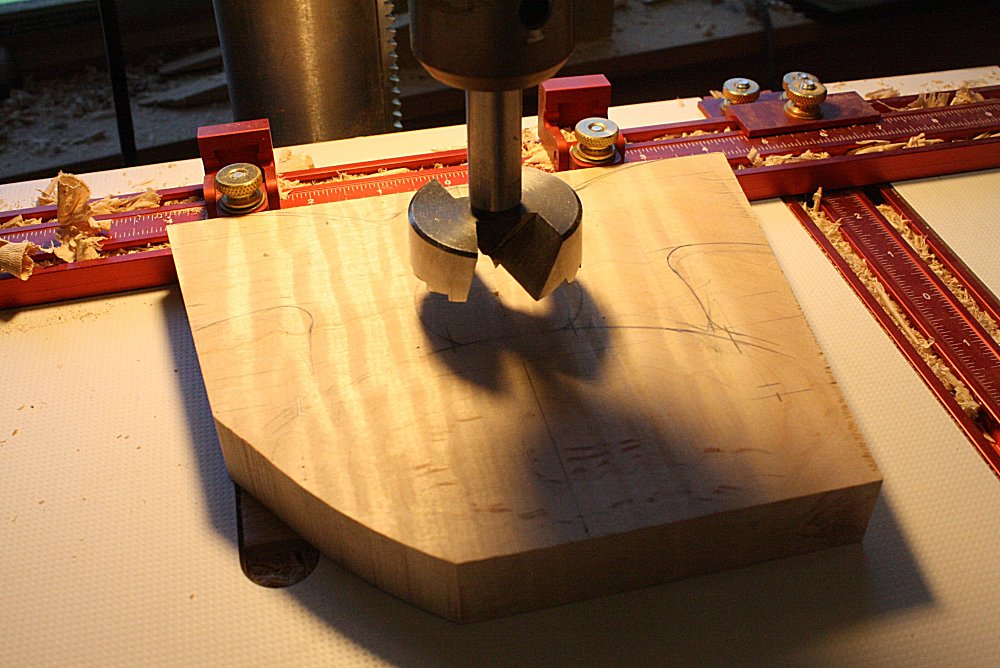
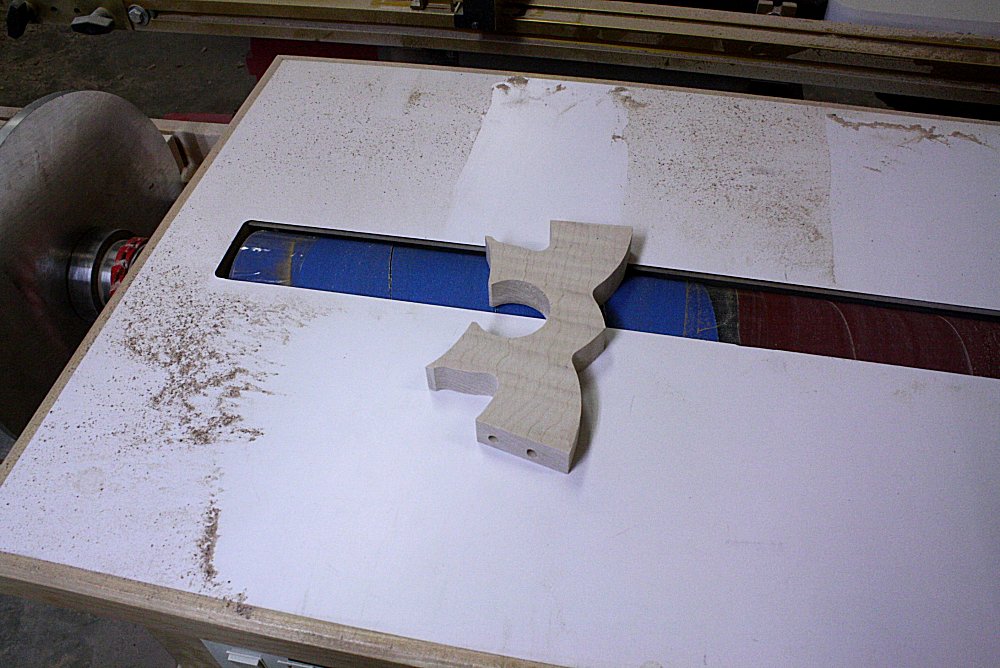
one of the stretchers.First, cut a blank to width, locate the screws, then refine the design making sure the screws won't poke out. This one looks like a shield or an emblem, but it's just a non-descript, organic shape. The top will follow the contours of the guitar that will eventually sit above it. This shape has a circle cut out from the middle. So off to the drill press to cut out a perfect circle. The bandsaw works the best for removing the wood from the rest of the shape. |
|||
  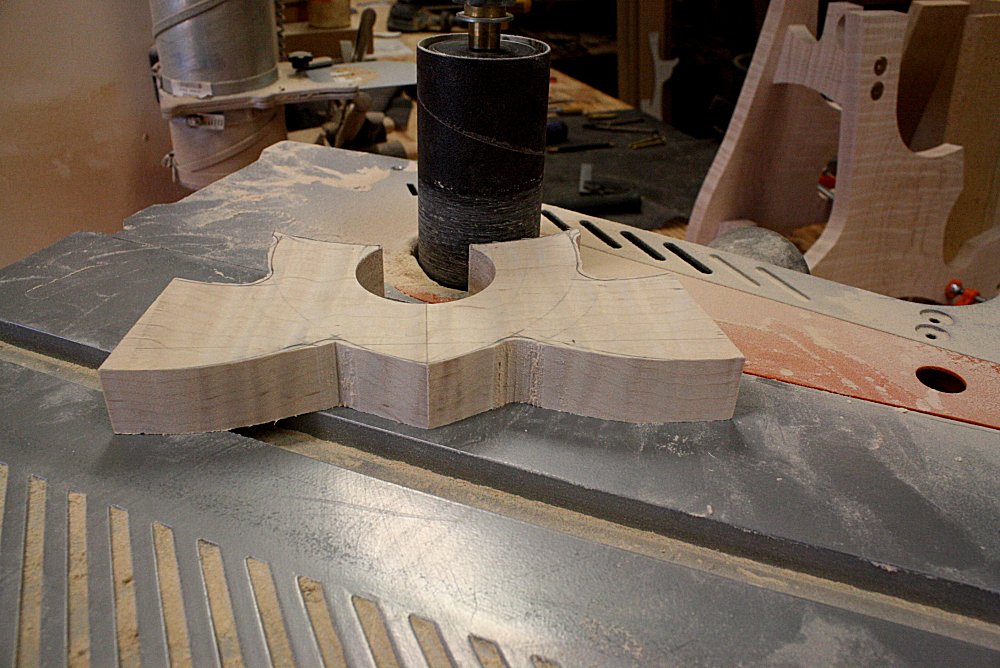 The
edges are really rough at this point. An oscillating drum
sander smooths out all the jaggedness and refines the shape right up
to the original layout lines. The
edges are really rough at this point. An oscillating drum
sander smooths out all the jaggedness and refines the shape right up
to the original layout lines.A couple passes over the drum sander smooths the two faces. A router with an angled bit adds the bevels to the corners for the finished product. Check out how the light reflects differently off all the facets. Each piece takes about an hour to run through all these steps. There are three stretchers on this guitar stand plus a neck support bracket and a storage tray that need the same treatment. Each piece gets the same kind of love, and each piece is its own little work of art. |
|||
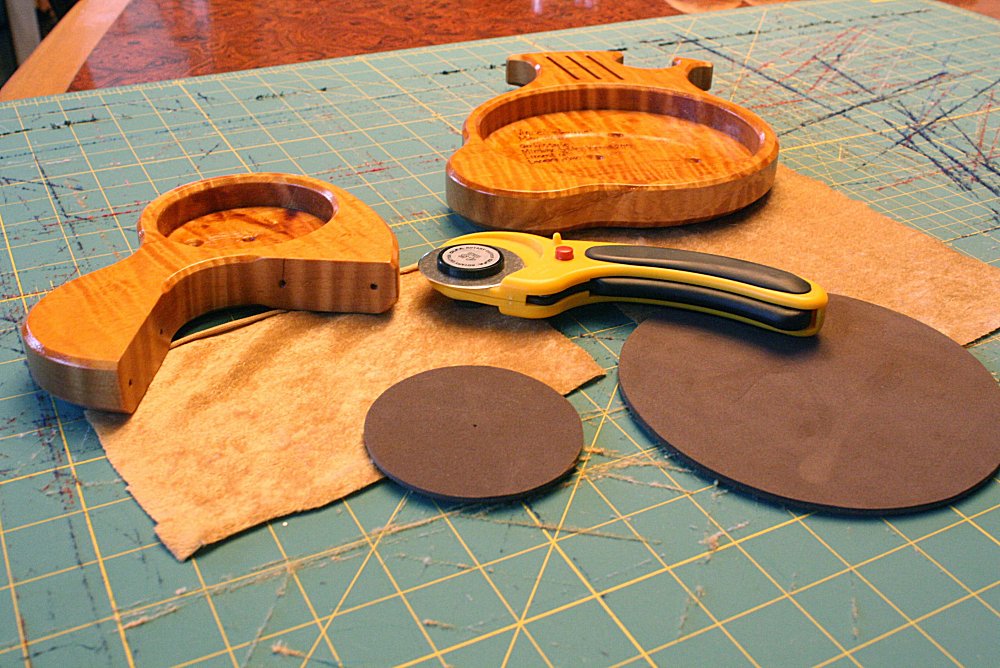
| May 7, 2018 | |||
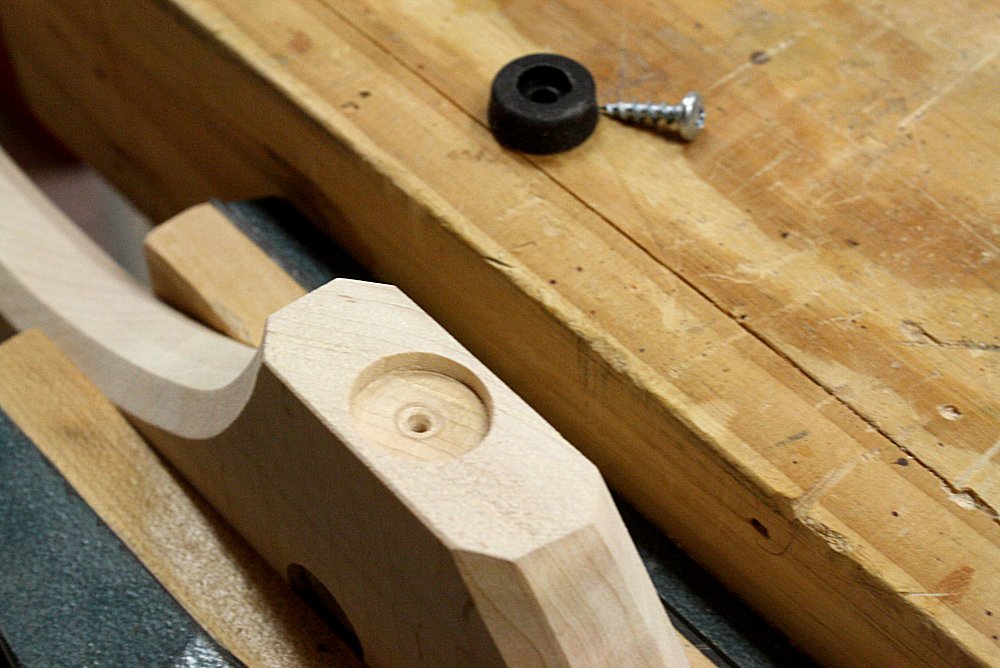 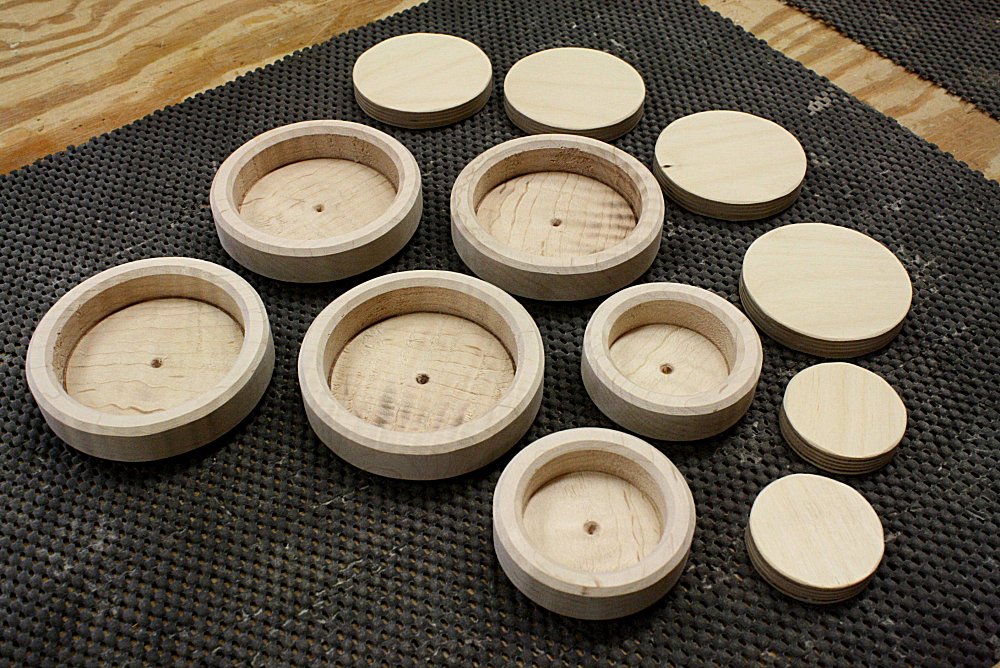 If
you put your guitar on a plain wood stand, you might scratch the
finish. This stand will have some foam padding that will look
like it's a blooming alien plant. These discs will hold the
foam. If
you put your guitar on a plain wood stand, you might scratch the
finish. This stand will have some foam padding that will look
like it's a blooming alien plant. These discs will hold the
foam.You don't want to scratch your floor either. So this finishing touch will add little rubber feet recessed nicely into the bottom of the feet. It'll keep the stand from sliding around, too. |
|||
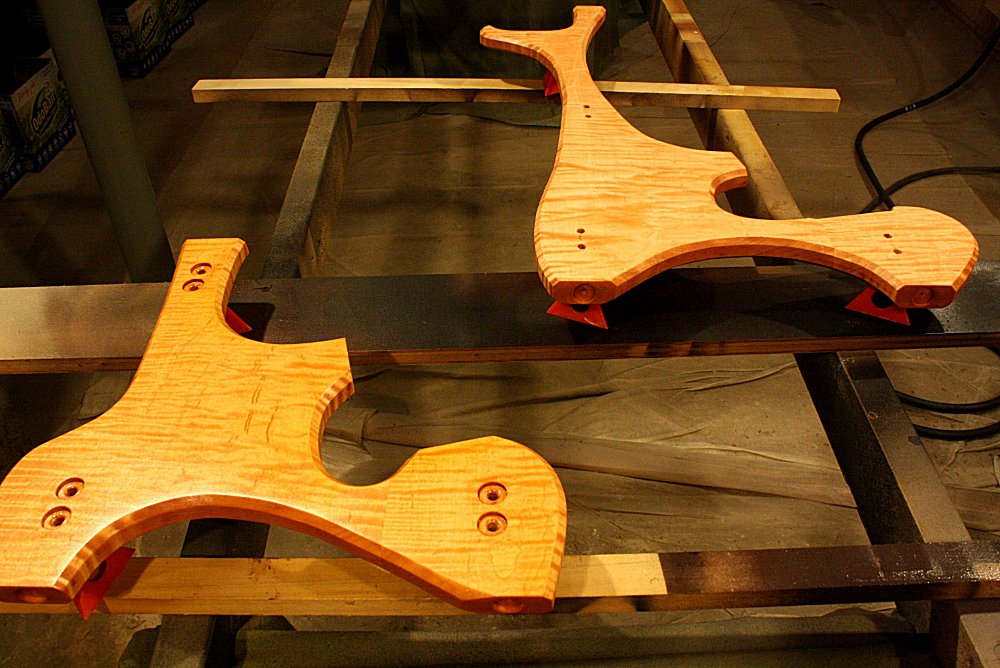
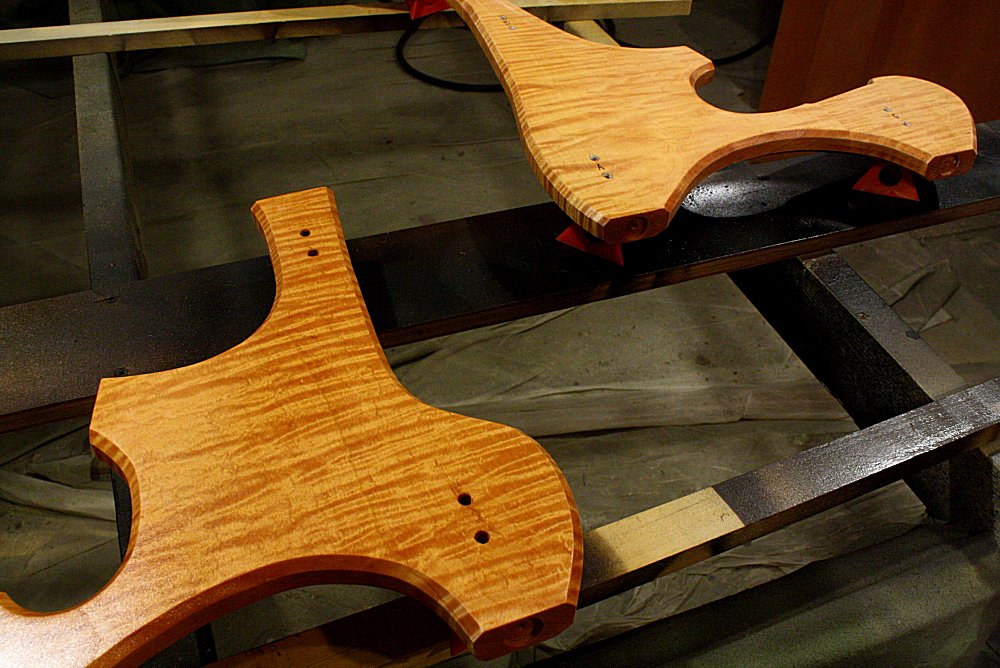
| May 10, 2018 | |||
 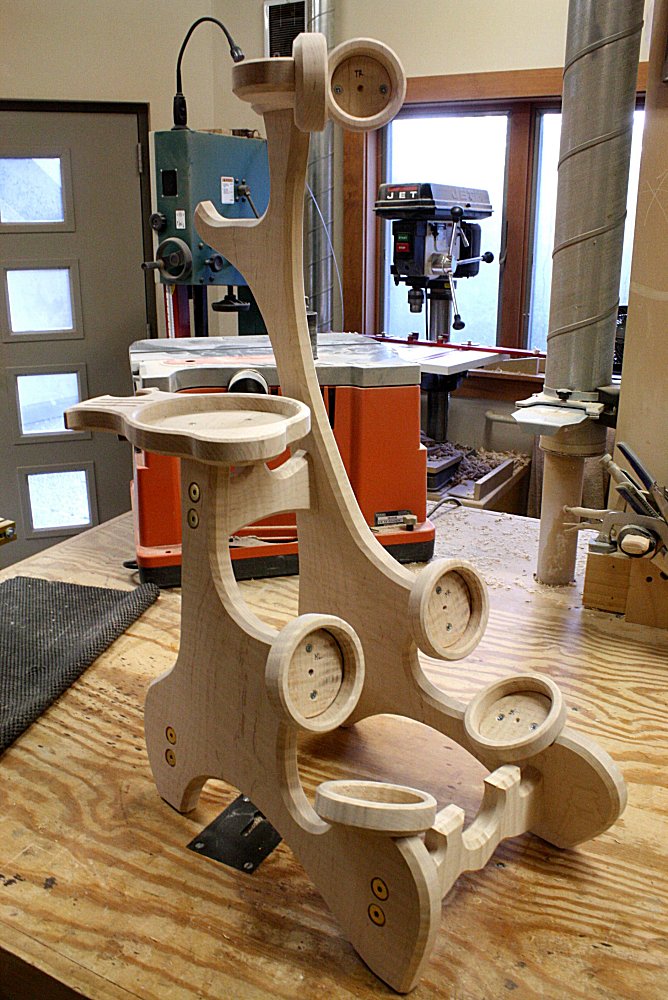 I
think I got all the parts designed and shaped. Time for dress
rehearsal! I put the whole thing together so I know it works.
Then I take the whole thing apart to sand all 19 pieces. I
think I got all the parts designed and shaped. Time for dress
rehearsal! I put the whole thing together so I know it works.
Then I take the whole thing apart to sand all 19 pieces.We're getting to the home stretch now, the finishing process. Stay tuned for the cool multi-step process, the combination of dyes, oil, and lacquer that will make this piece of art come alive. |
|||
| May 12, 2018 | |||
   Michael
sent me over a photo of the finish he was looking for. Now
it's just a matter of layering up the tones to get there. This
will take a few coats over a few days, but I should be able to get
pretty close. Michael
sent me over a photo of the finish he was looking for. Now
it's just a matter of layering up the tones to get there. This
will take a few coats over a few days, but I should be able to get
pretty close.I started with a coat of golden pecan stain. Just the one coat and you can already see that awesome grain come alive. That wood is perfectly flat, but the surface is almost holographic, three-dimensional. Chatoyance is the technical term. The tiger's eyes follow you when you walk by. |
|||
| May 13, 2018 | |||
 High
end wood demands a high end finish. Usually I'll do a coat of
oil and jump straight to the clear coats. With this expensive
wood, it really deserves to be finished just like a guitar top.
Fortunately I make guitars, too, so I know how to put the love into
a project. High
end wood demands a high end finish. Usually I'll do a coat of
oil and jump straight to the clear coats. With this expensive
wood, it really deserves to be finished just like a guitar top.
Fortunately I make guitars, too, so I know how to put the love into
a project.Stain is nice, but if you really want to pop that grain, you have to add apply some linseed oil. Linseed oil has an amber color and really soaks into the wood. Curly maple has a rolling grain pattern; it's like a repeating "S" shape down the board. The oil soaks into the end grain more than into the flat grain, so that end grain darkens more. That's exactly what we want; tiger stripes! |
|||
| May 14, 2018 | |||
 One
day at a time here. If one coat of linseed does good, a second
coat will be great. Compare the change from yesterday's photo
to today. This is all about slowly building layers of color,
tone, and hue for the light to reflect through, around, and back
off. The change is subtle, but noticeable. When I get
done, that flat piece of wood will look like a rippling sheet of
satin fabric. When you walk by it, it will appear to move. One
day at a time here. If one coat of linseed does good, a second
coat will be great. Compare the change from yesterday's photo
to today. This is all about slowly building layers of color,
tone, and hue for the light to reflect through, around, and back
off. The change is subtle, but noticeable. When I get
done, that flat piece of wood will look like a rippling sheet of
satin fabric. When you walk by it, it will appear to move. |
|||
| May 15, 2018 | |||
 The
piece on the right is untouched from yesterday. The piece on
the left just received a spray coat of amber colored shellac.
Remember, slowly build layer after layer until you get where you're
going. The
piece on the right is untouched from yesterday. The piece on
the left just received a spray coat of amber colored shellac.
Remember, slowly build layer after layer until you get where you're
going.Shellac is a resin secreted by the female lac bug found on trees in India and Thailand. It's scraped from the bark and produced into a colorant and sealer. The lacquer which will go on next is some pretty toxic shit. Shellac (oddly enough a "shit" in its own right) will act as a sealer and keep the lacquer from reacting with the stain and linseed oil keeping the grain crisp and clear so one can really appreciate that undulating grain pattern - all thanks to "shit." An awesome finish will take a few days, but the final product will be spectacular. Stay tuned. |
|||
| May 16, 2018 | |||
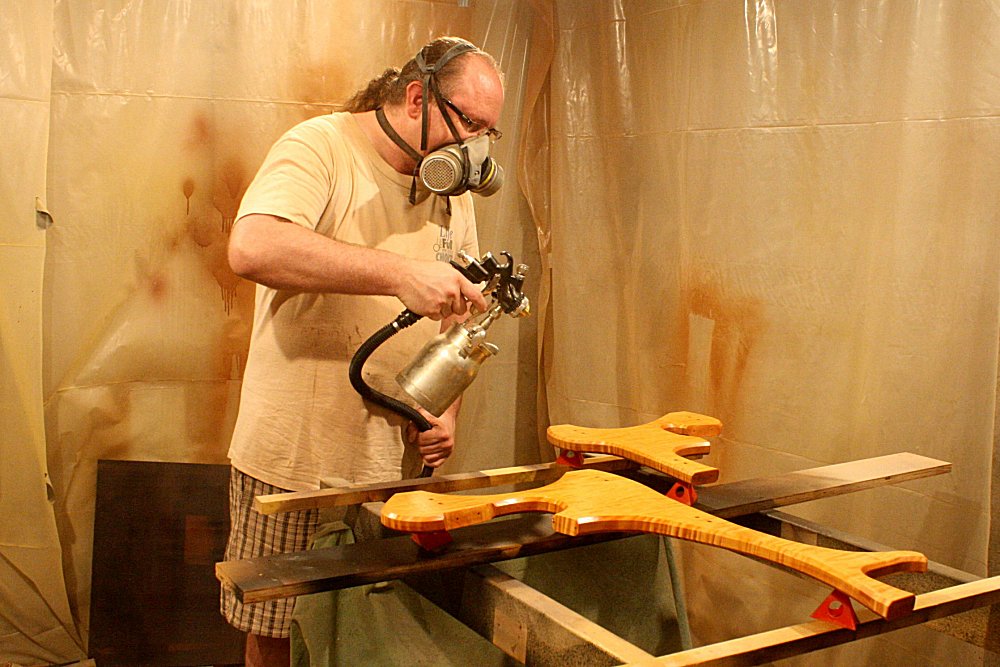 Now
it's time to lay on a few lacquer clear coats. I put on 3
coats so it's thick enough to fill in any little dimples in the wood
and leave enough to sand a bit off to level the surface. We're
on our way to a guitar-like finish, rich, deep, glossy. I
usually don't put this much time into a guitar stand finish, but the
wood Michael selected is truly spectacular and deserves it. Now
it's time to lay on a few lacquer clear coats. I put on 3
coats so it's thick enough to fill in any little dimples in the wood
and leave enough to sand a bit off to level the surface. We're
on our way to a guitar-like finish, rich, deep, glossy. I
usually don't put this much time into a guitar stand finish, but the
wood Michael selected is truly spectacular and deserves it. |
|||
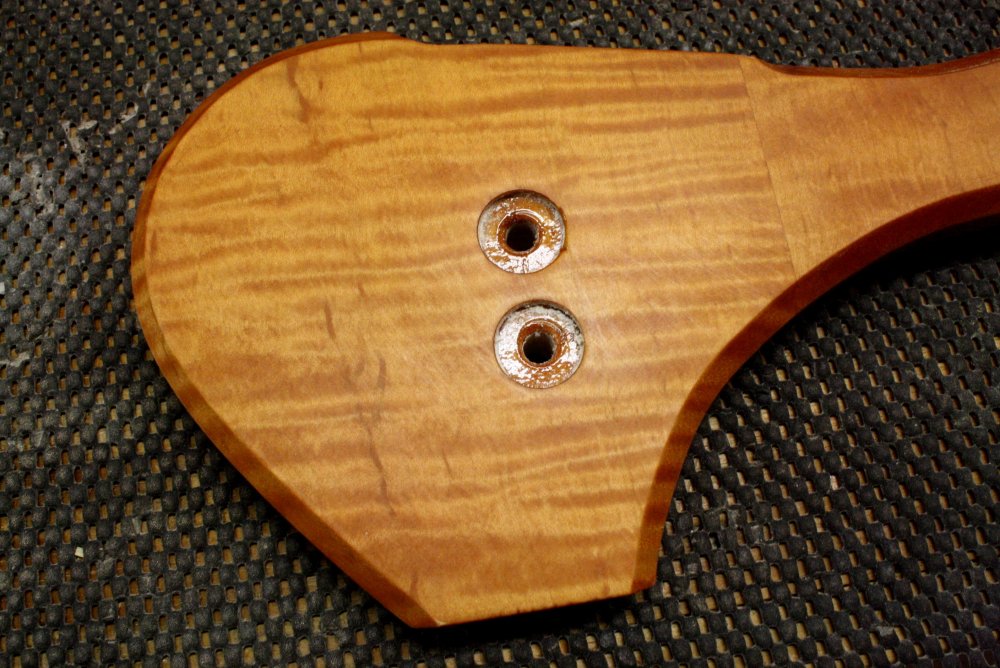
| May 17, 2018 | |||
 After
laying on the lacquer yesterday, it's time to sand about half of it
off. One would think that's counterproductive, but you have to
knock down all the high spots before you put the next coats on.
Think of it as comparing a mirror to a sheet of aluminum foil.
There both pretty much the same except that the foil has a lot of
irregularities. When I get done with everything, the surface
will shimmer like glass. Trust me. After
laying on the lacquer yesterday, it's time to sand about half of it
off. One would think that's counterproductive, but you have to
knock down all the high spots before you put the next coats on.
Think of it as comparing a mirror to a sheet of aluminum foil.
There both pretty much the same except that the foil has a lot of
irregularities. When I get done with everything, the surface
will shimmer like glass. Trust me. |
|||
| May 18, 2018 | |||
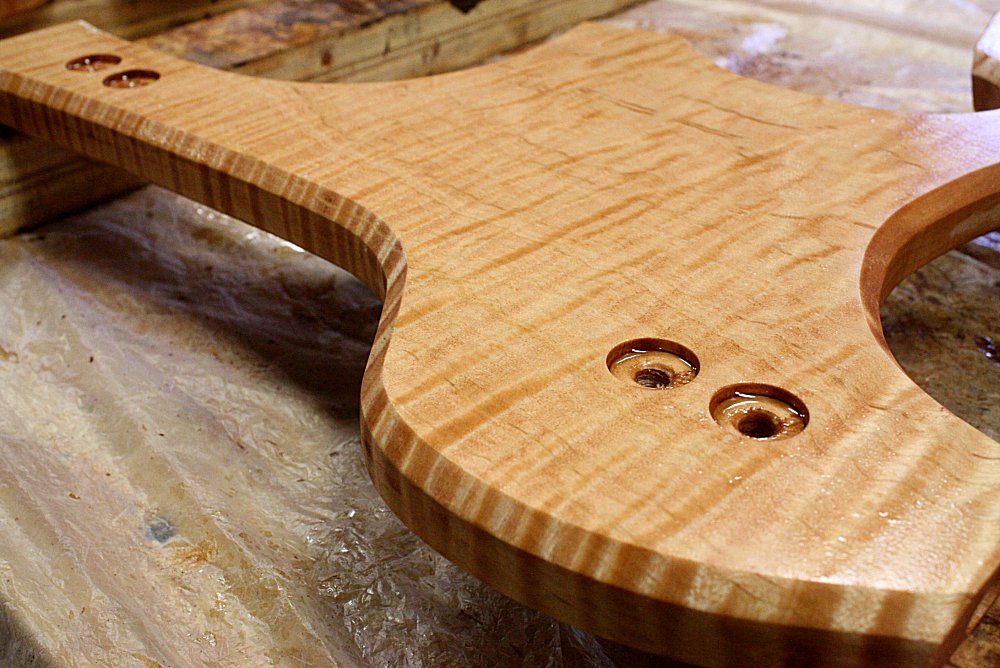
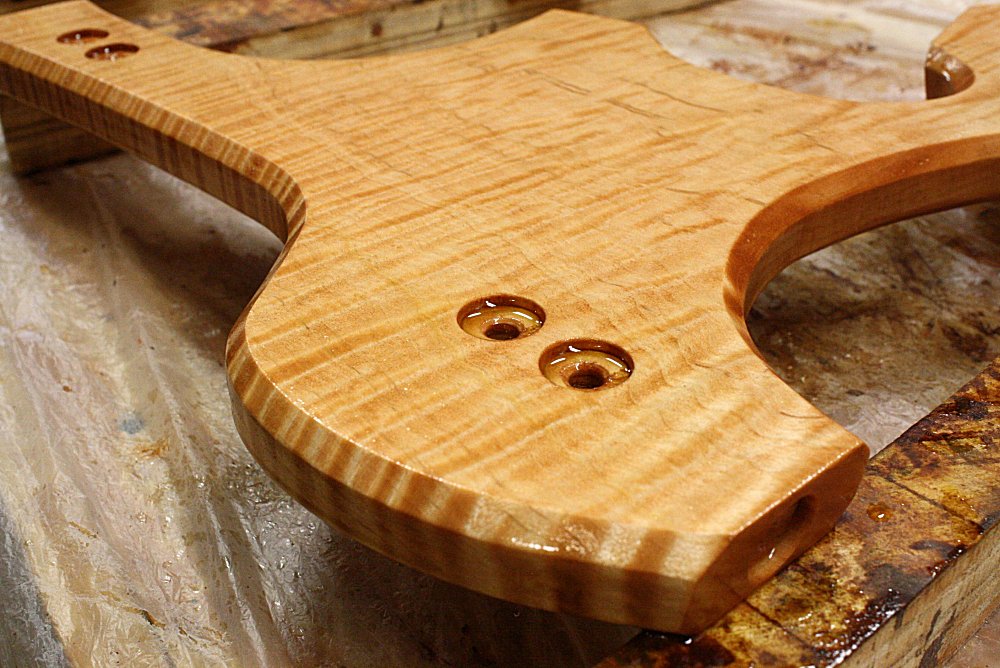
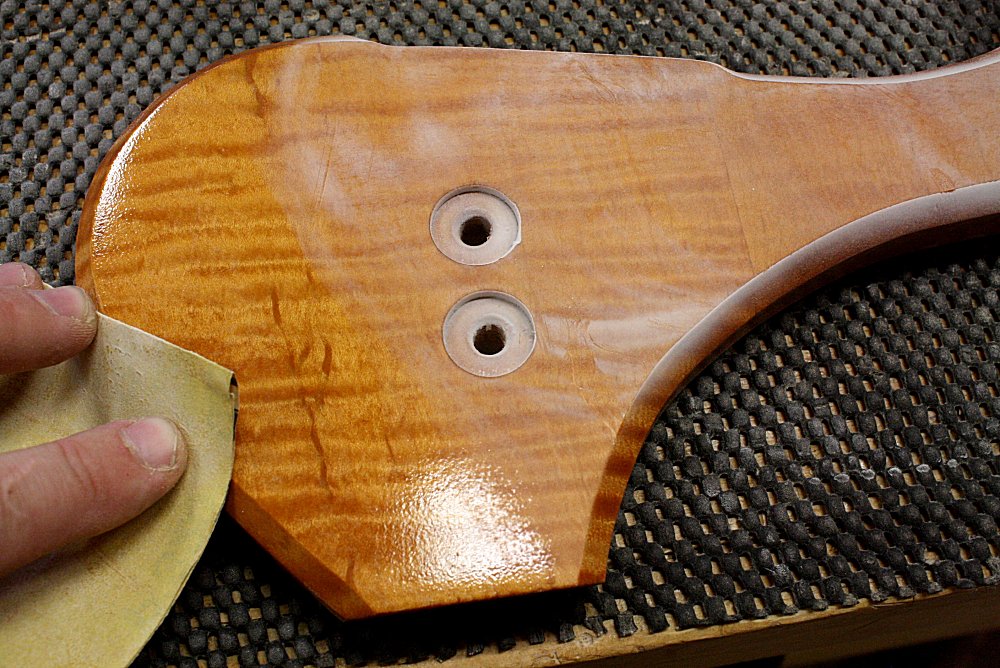
 For
the next couple coats of lacquer, I added a little brown dye to the
mix. This is called toning, spraying some color on top.
The initial stain gave it a light tan base coat. The linseed
oil popped the grain and gave it a more brown color. The amber
shellac pushed it over to a strong yellow tone. Michael
mentioned that he would like to see 24k gold. So I applied a
few thin coats of the colored lacquer to tweak it back down and
creep up on just the right look. Adding the colors in layers
like this will lend more depth to the finish and each layer will
reflect the light a little differently. For
the next couple coats of lacquer, I added a little brown dye to the
mix. This is called toning, spraying some color on top.
The initial stain gave it a light tan base coat. The linseed
oil popped the grain and gave it a more brown color. The amber
shellac pushed it over to a strong yellow tone. Michael
mentioned that he would like to see 24k gold. So I applied a
few thin coats of the colored lacquer to tweak it back down and
creep up on just the right look. Adding the colors in layers
like this will lend more depth to the finish and each layer will
reflect the light a little differently.The side panel in front has been toned; the one in back is waiting its turn. You can see the subtle change in hue. Now scroll back up and look at the very first stain coat last week and see the difference. |
|||
| May 20, 2018 | |||
| Time for some fun! Michael wanted to go for a 24k gold color for the wood, but he still needs to pick a color for the velvet which will wrap the foam pads. |
 ▲Black |
 ▲Hunter Green |
 ▲Olive Green |
|
I narrowed it down to the colors that I thought would work.
Orange or pink probably wouldn't be contenders. Now Michael
gets the joy of selecting his favorite, or the curse if he can't
decide. |
 ▲Gold |
 ▲Purple |
 ▲Red |
|
Michael, if you think you want to see a few more samples, just let
me know. We're only limited by what they sell. Remember
you can always click on the thumbnail to get the high-res photo. |
|||
| May 25, 2018 | |||
 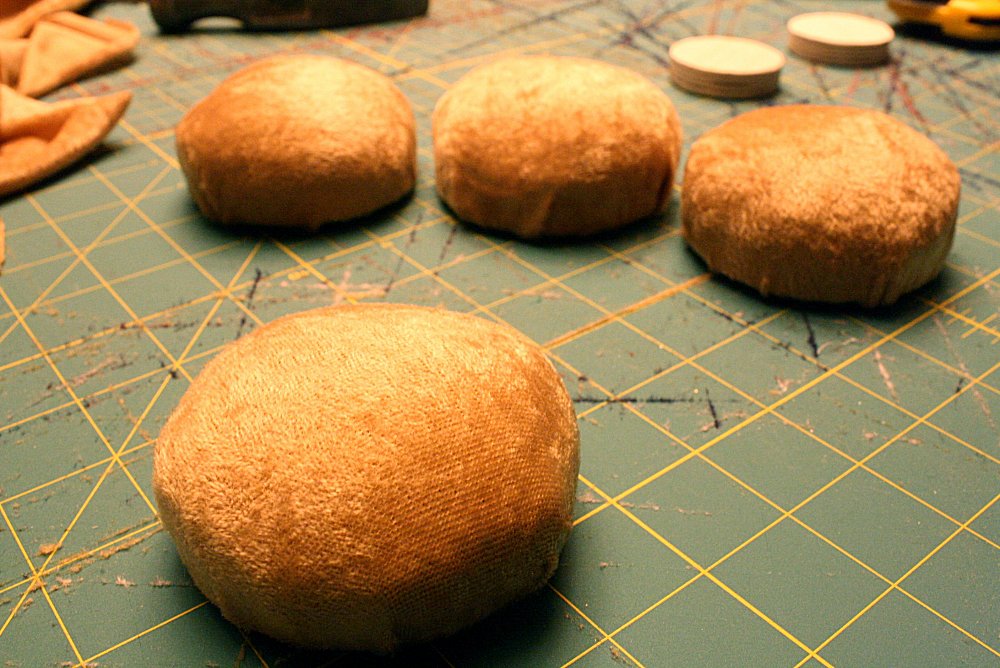 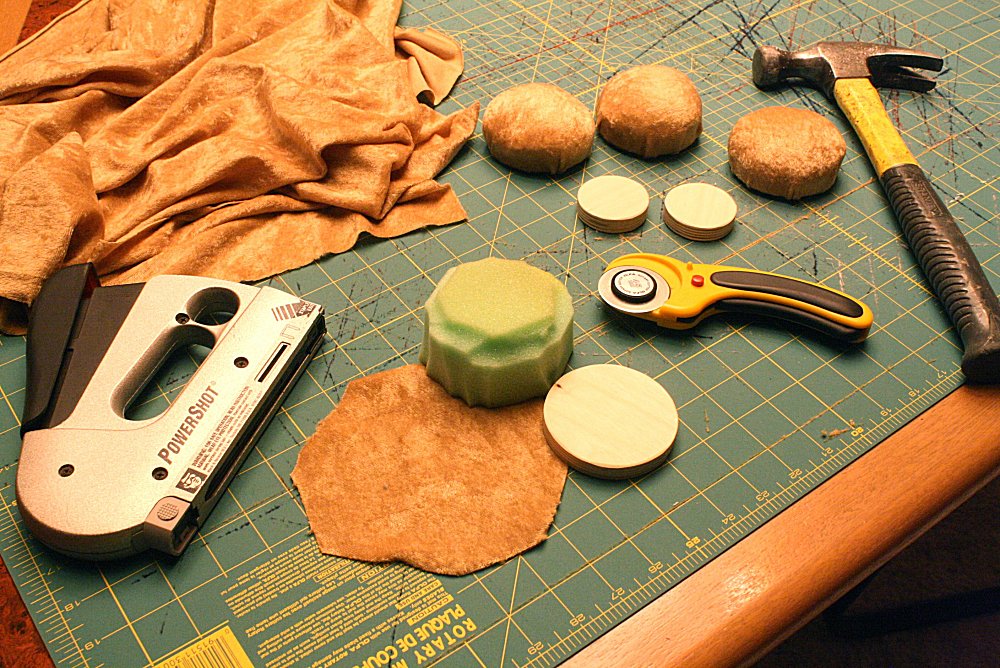 Michael
is going for the Gold! Michael
is going for the Gold!You don't want to rest your guitar on something hard that will scratch it. These foam pads will cushion the support and protect the guitar's finish. It starts off with a big chunk of foam from which I cut a smaller one of the appropriate size. Then I cut the velvet just large enough to cover it. I wrap and stretch the velvet around the foam and staple it to a disc of wood, which will later be secured onto the stand in what I call "pods". Look at a previous post above to see what these will neatly nest into. There are also a couple storage trays incorporated into the stand. These will also get thin cushions of foam lined with velvet. |
|||
| May 26, 2018 | |||
  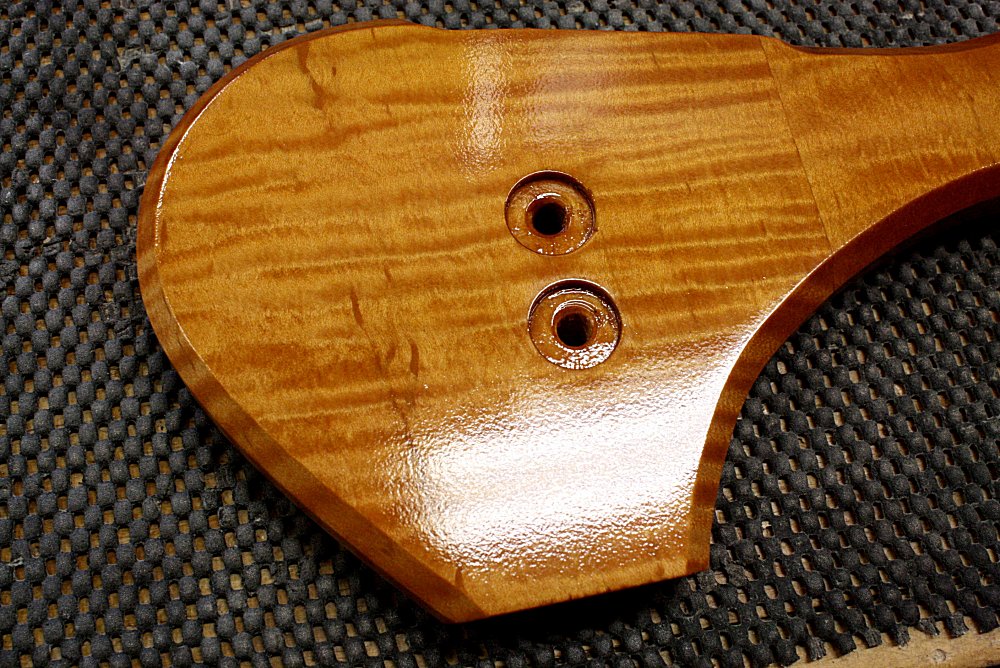 After
a few days to let the lacquer cure and harden, it's now time to
finish the finish. After
a few days to let the lacquer cure and harden, it's now time to
finish the finish.The result of lacquer straight out of the gun is shiny, but it's still a little rough like an orange peel. I'm going to put in a few extra steps to get that slick sheen just like a guitar finish. Fortunately I know someone who makes guitars and has the knowledge, experience, and equipment to make it happen ... haha, me =) The first thing to do is more sanding. I'm flattening out that orange peel to a very level and even surface. But taking sandpaper to it also dulls that sheen. But, dammit, we want that sheen! |
|||
 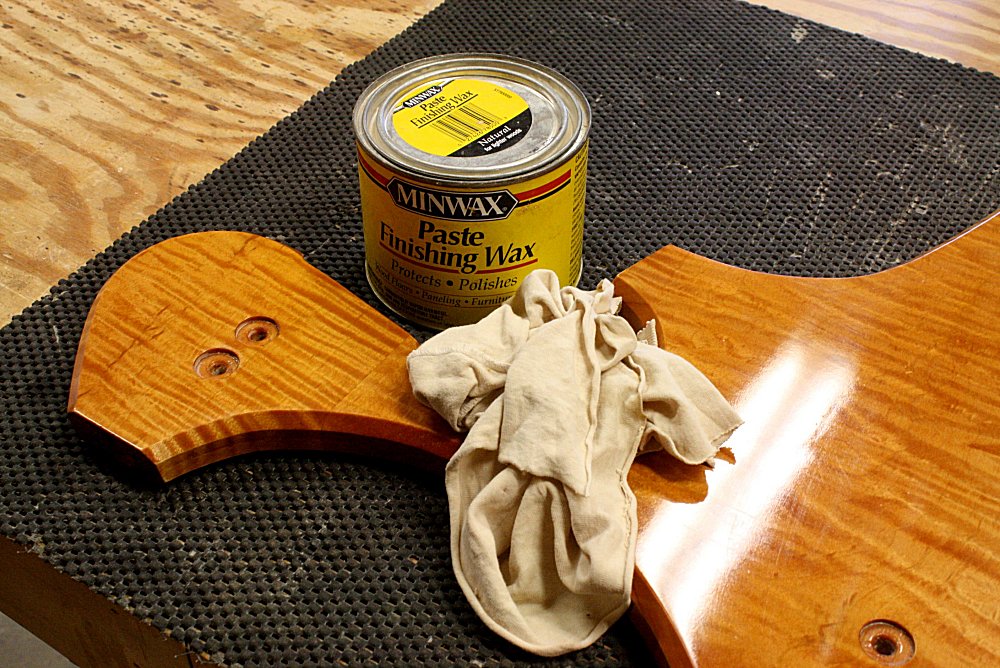 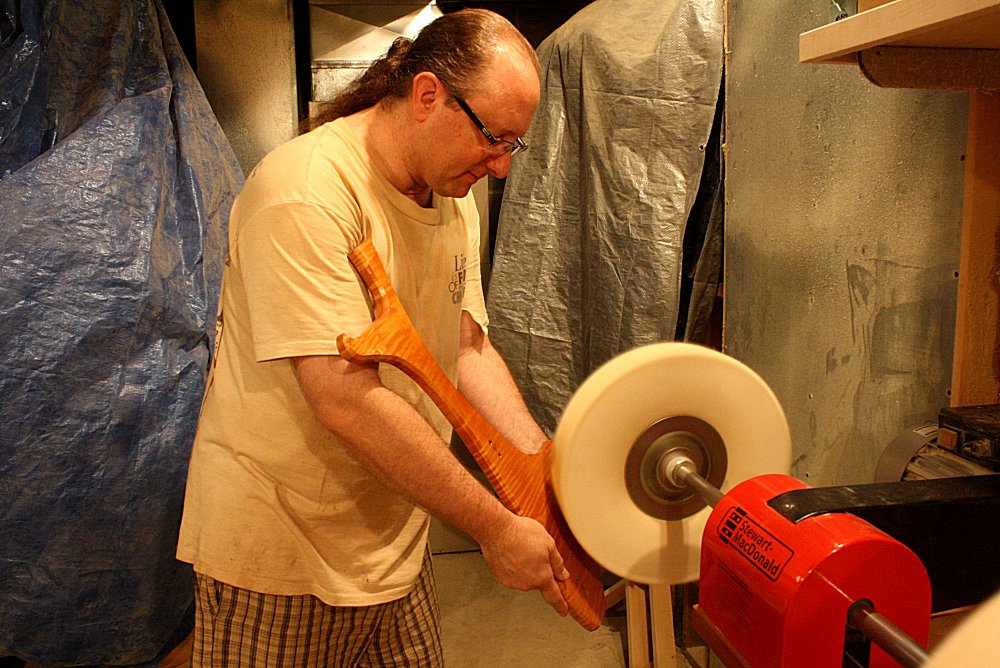 Over
to the buffer to make the magic happen. The buffer spins at
about 700 rpm's. Load it up with a little compound and put
some love into each of the pieces to bring out that highly
reflective, gloss finish. Over
to the buffer to make the magic happen. The buffer spins at
about 700 rpm's. Load it up with a little compound and put
some love into each of the pieces to bring out that highly
reflective, gloss finish.Next, I hit it with a coat of wax. Wax fills in any slight imperfections in the finish and it gives it an indescribable tactile quality that you have to experience before and after to feel what it does. It just makes it feel better to the touch. The final product is a surface that looks like liquid glass. I hope this doesn't outshine Michael's guitar. |
|||
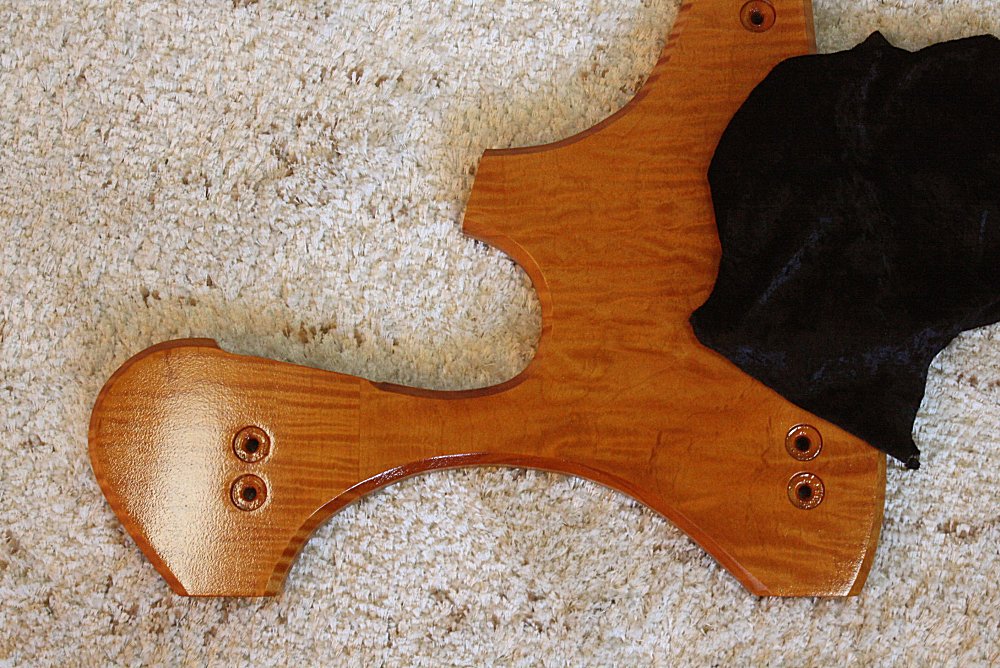
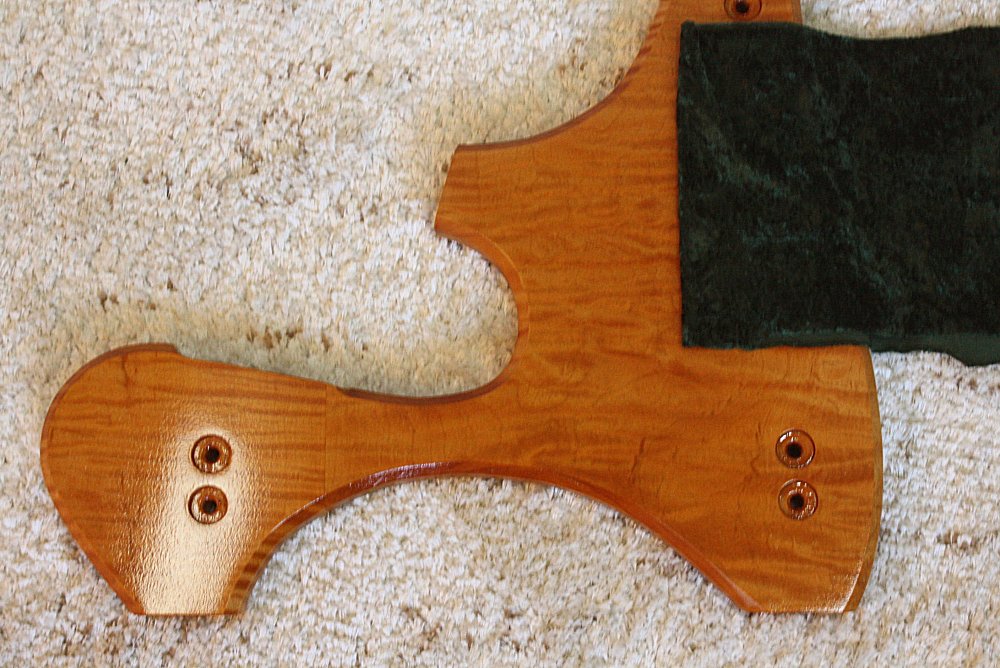
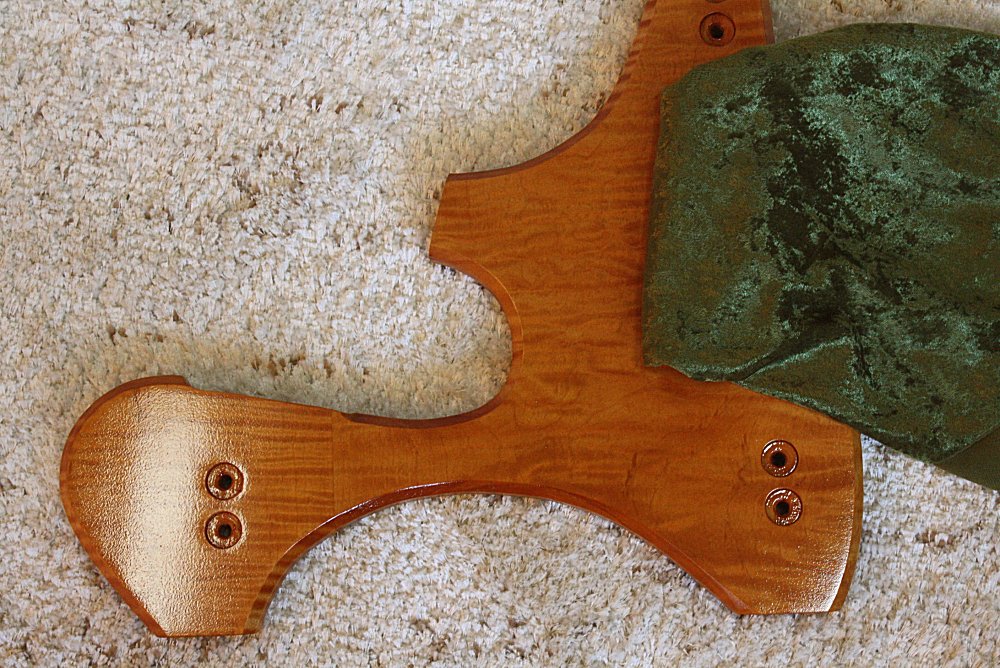
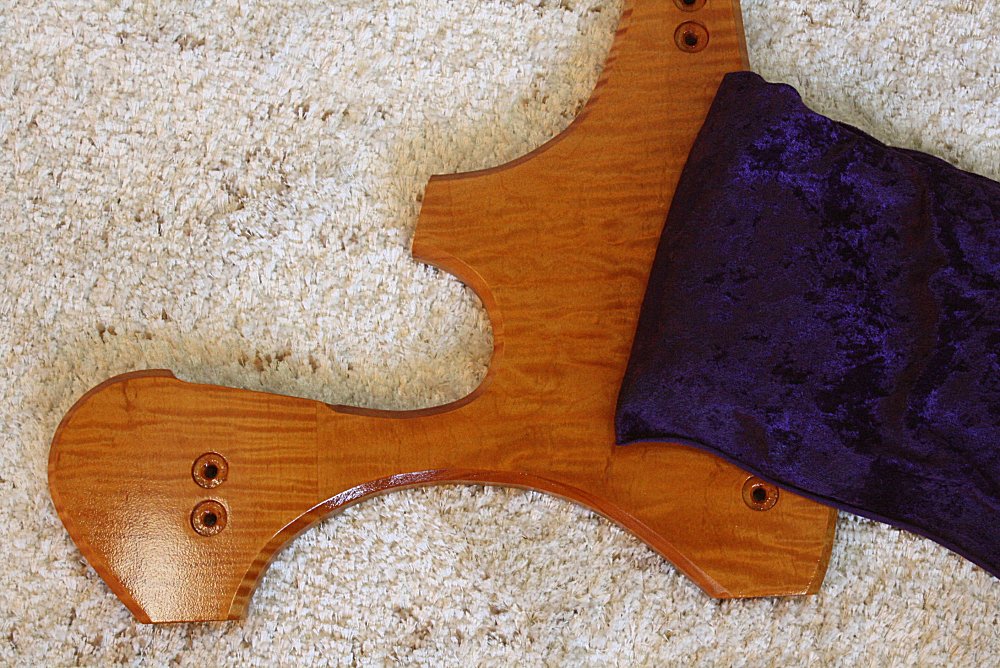
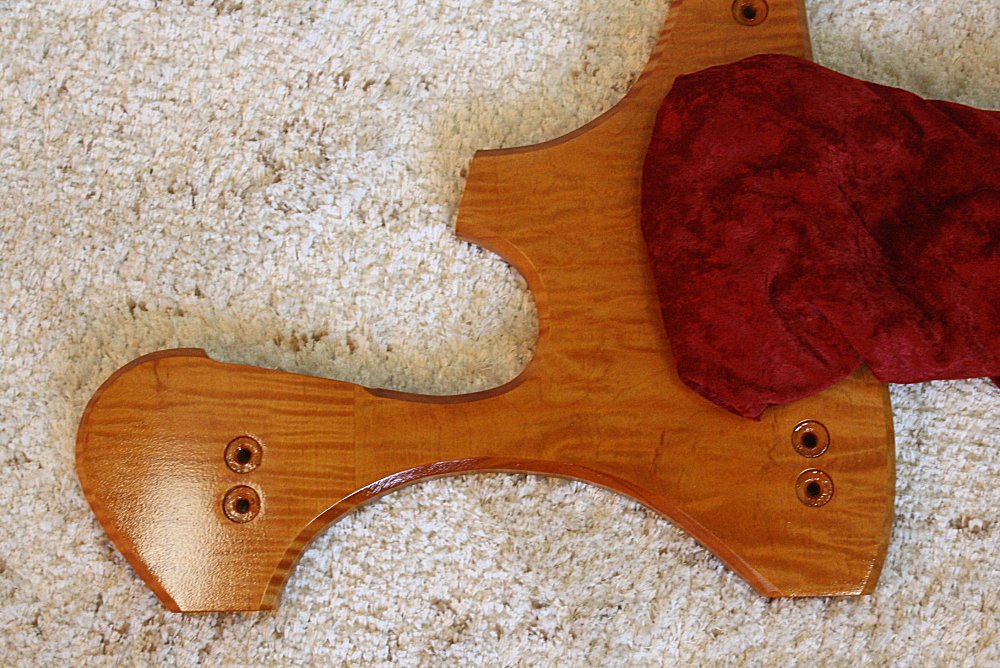
| May 28, 2018 | |||
 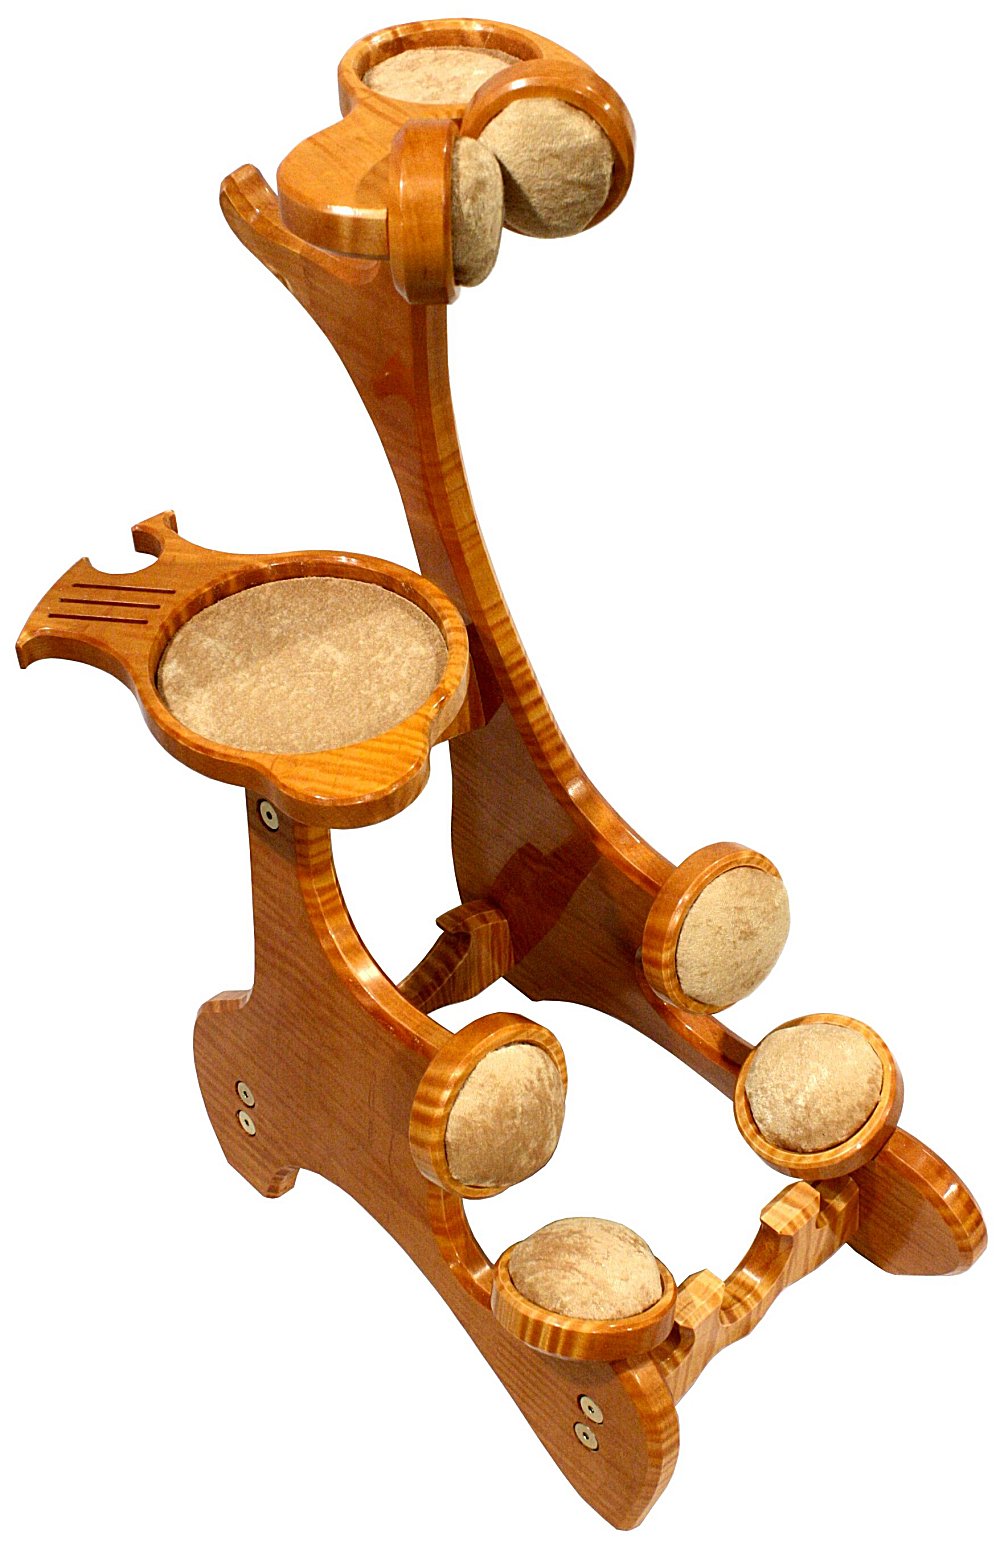 All
done and ready to ship! All
done and ready to ship!Here's a quick recap: ● Michael got to pick the wood - literally the exact piece of wood. I sent him photos from my curly maple supplier so we could narrow down the particular slab of lumber that would work for this project. He went with guitar-quality, highly figured maple. And with wood of this quality, I provide a guitar-like finish of lacquer buffed to a high gloss! ● Michael got to pick the velvet color. He chose gold. ● Michael even requested gold screws, which I accommodated. ● Michael didn't want any cut-outs in the side so the wood grain could be better appreciated. He got it. ● Michael wanted a couple storage trays for strings, capo, clippers and such. I made it happen. Even though Michael doesn't live close to me, he could participate in the build right here on this blog. He got to make choices along the way so he could be assured that he got exactly what he envisioned. My other guarantee: a LIFETIME guarantee - with no fine print. I build things to last, and the quality is noticeable Sure, I know one of these stands will set you back, but you get exactly what you want and I hand make everything to order. To put things in perspective, it took over $300 in material and about 28 hours of time to craft this one of a kind work of art. I hope one can see some value there. Michael will every time he smiles when he goes to pick up his guitar. |
|||