
| October 27, 2018 | ||||
|
Timothy's
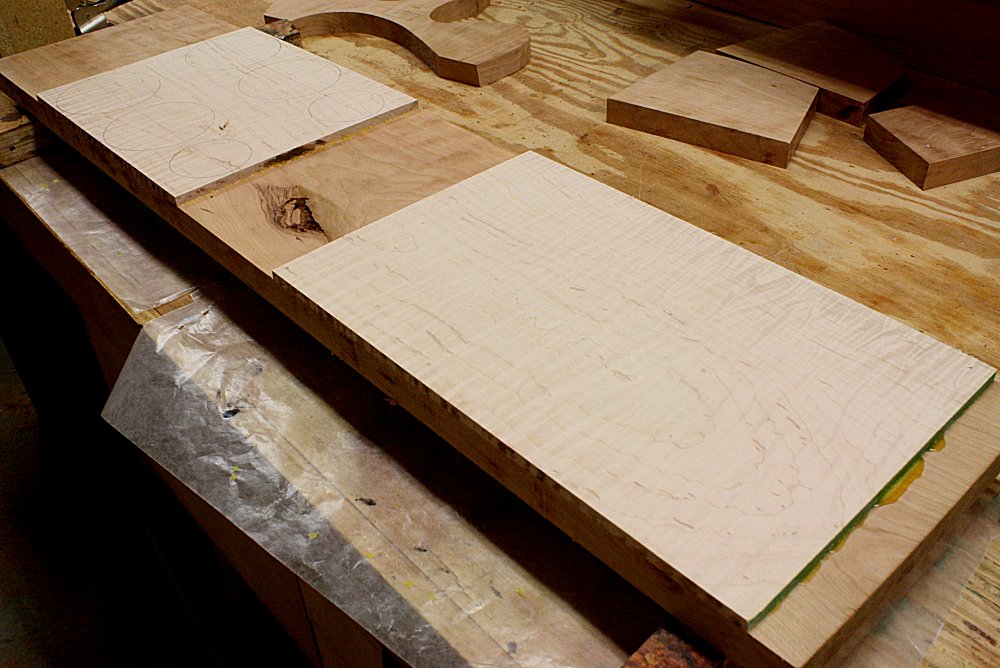
Getting a New Guitar Stand! Timothy's got some nice guitars, and they deserve an appropriate throne. As with all my stands, they are made to order. This gives Tim the opportunity to pick out all of the options. He picked out cherry wood with some curly maple accents and red velvet trim. Sounds like a great combination. Timothy lives in Philadelphia, so it's a little difficult to drop by and watch his new work of art come together. So I'll post updates here so he and his friends can watch the build from afar. 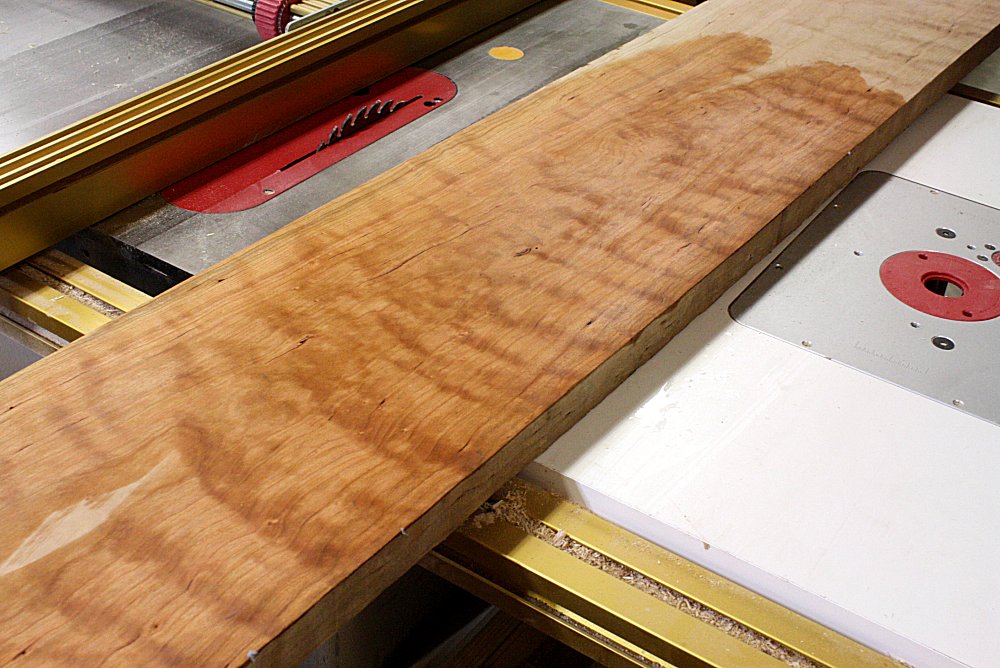 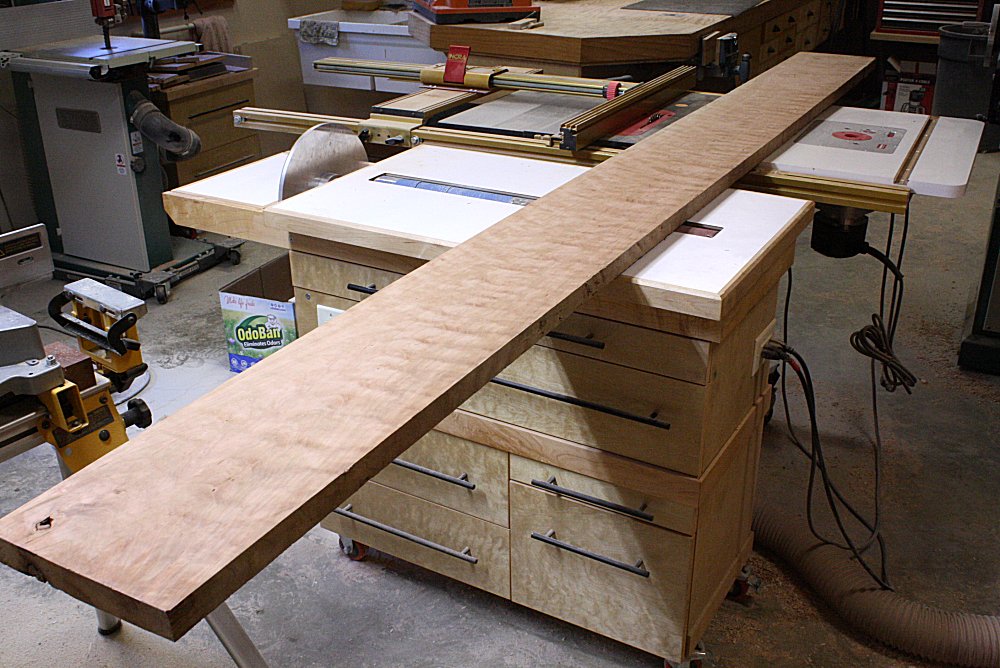 I always like to post a photo of the raw material. You can see
this slab of cherry wood before I start chopping it up. While
hand selecting just the right piece of wood, I came across a little
surprise, some rare curly cherry. You see this figuring a lot
with maple, but not so much with cherry, and this one has some
exceptional grain. Home builders will reject this piece
because it is not homogenous and won't go with the rest of the home.
This is a prize for woodworkers! I always like to post a photo of the raw material. You can see
this slab of cherry wood before I start chopping it up. While
hand selecting just the right piece of wood, I came across a little
surprise, some rare curly cherry. You see this figuring a lot
with maple, but not so much with cherry, and this one has some
exceptional grain. Home builders will reject this piece
because it is not homogenous and won't go with the rest of the home.
This is a prize for woodworkers!Stay tuned for more photos.
I'll post here once or twice a week as things progress. |
||||
| October 28, 2018 | ||||
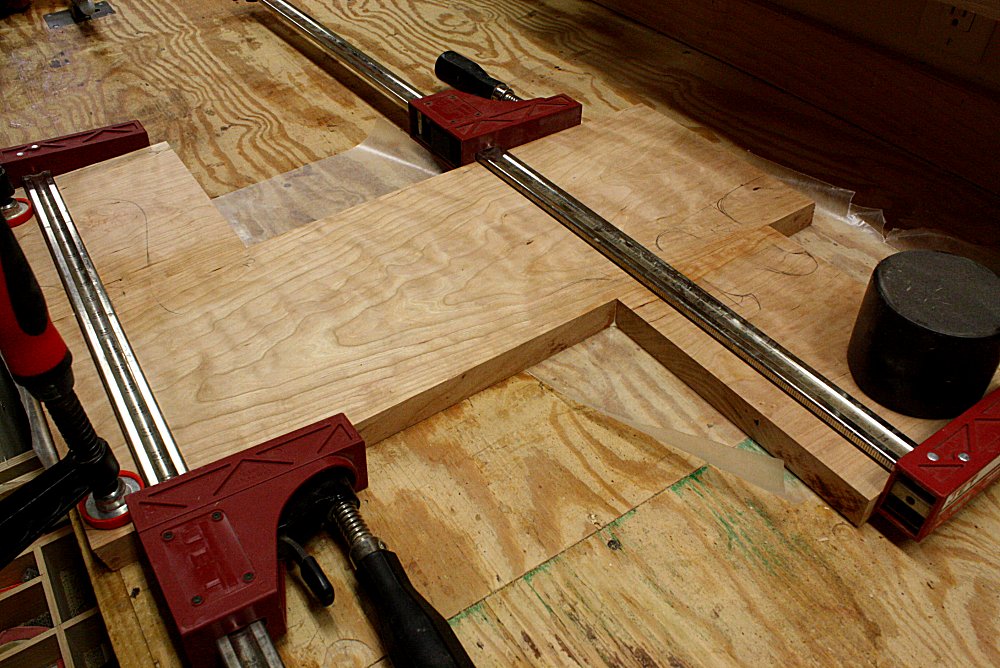 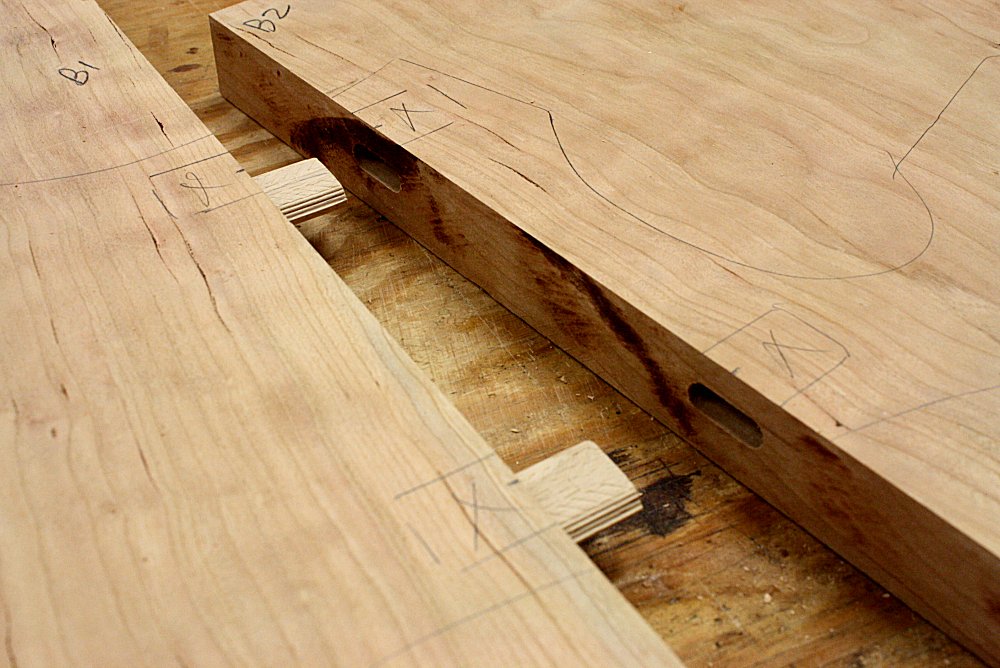 So I started chopping of that slab of cherry. It's hard to
find a single stick of wood that is wide enough to make the stand,
so I have to glue up a couple-three pieces to attain that width.
The stand has a very curvy, organic shape, so I have to lay it all
out carefully so the transition between the pieces is less
noticeable. So I started chopping of that slab of cherry. It's hard to
find a single stick of wood that is wide enough to make the stand,
so I have to glue up a couple-three pieces to attain that width.
The stand has a very curvy, organic shape, so I have to lay it all
out carefully so the transition between the pieces is less
noticeable.Wood glue is pretty strong, but I'll add slip tenons between the joints to make it bulletproof. It's a quick and simple additional that will make the stand stronger and allow me to provide a LIFETIME GUARANTEE (with no fine print ... except this fine print). I build things to last and the way you'd expect them to be built. No compromise on quality. |
||||
| October 29, 2018 | ||||
  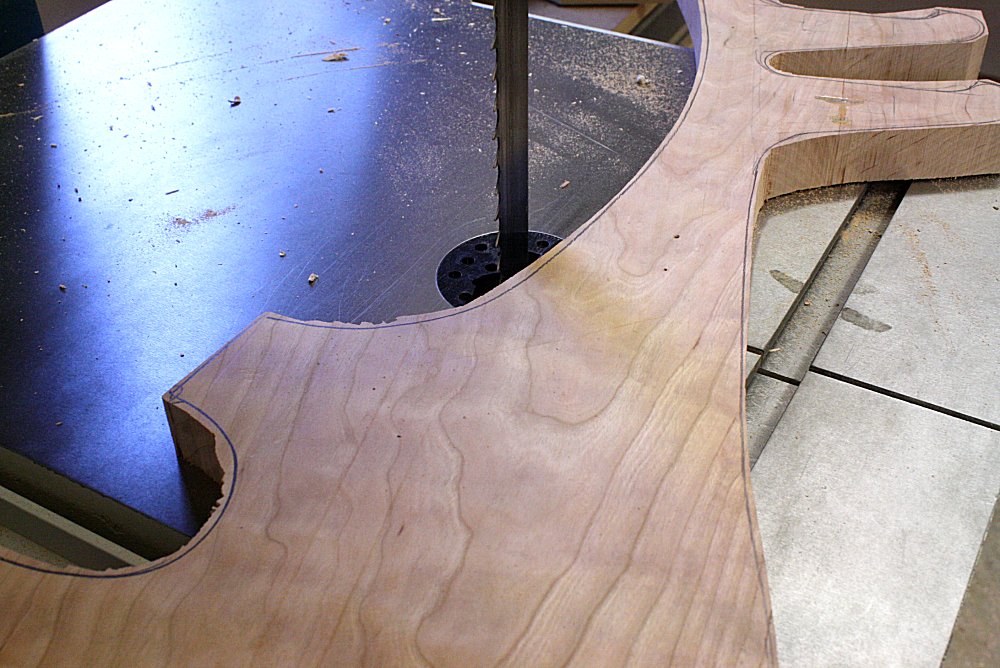 The
side panels are first. These panels lean in and the support
pads have to be perfectly coplanar. I laid this out on the
computer and printed out full size templates to guide the basic
shapes. It would suck to run these all the way through the
process and at the end the guitar won't sit on there right.
Even though the basic shapes are defined, I always leave room to
make some art happen. The cut-outs and cross braces will be
unique to every stand; no two are alike. Timothy likes The
Who, so I'm sure there will be some allusions to the band - and at
the end of the show I will completely destroy this stand with the
guitar that's sitting on it. The
side panels are first. These panels lean in and the support
pads have to be perfectly coplanar. I laid this out on the
computer and printed out full size templates to guide the basic
shapes. It would suck to run these all the way through the
process and at the end the guitar won't sit on there right.
Even though the basic shapes are defined, I always leave room to
make some art happen. The cut-outs and cross braces will be
unique to every stand; no two are alike. Timothy likes The
Who, so I'm sure there will be some allusions to the band - and at
the end of the show I will completely destroy this stand with the
guitar that's sitting on it.The first step is to trace the template onto the side blank. At the band saw, I cut close to the line. That makes pattern routing to the template a snap. Then it's over to the drum sander to smooth out the edges and remove any burn marks from the router. |
||||
| November 2, 2018 | ||||
 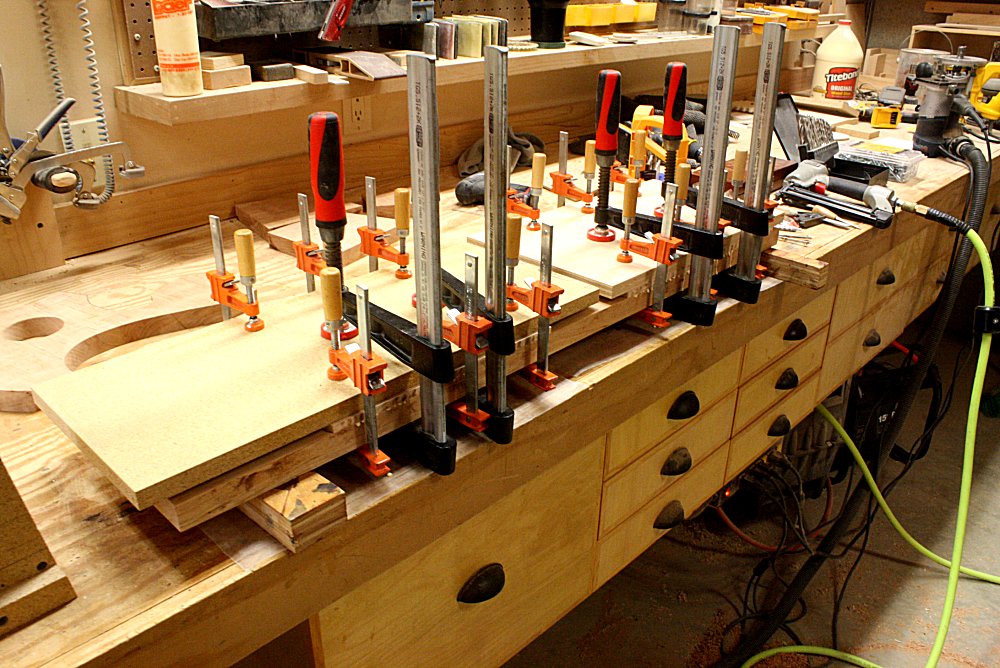 Time
to make some "pods". These are the little cups that hold the
foam padding so the guitar has something soft to rest on.
We're going for a two-tone look with some premium curly maple over
the cherry. Smear on a layer of glue, stack up the pieces, and
use every clamp I own to ensure good contact. The next day we
have a monolithic slab with two colors and textures. Send it
through the planer to smooth it out to the exact thickness. Time
to make some "pods". These are the little cups that hold the
foam padding so the guitar has something soft to rest on.
We're going for a two-tone look with some premium curly maple over
the cherry. Smear on a layer of glue, stack up the pieces, and
use every clamp I own to ensure good contact. The next day we
have a monolithic slab with two colors and textures. Send it
through the planer to smooth it out to the exact thickness. |
||||
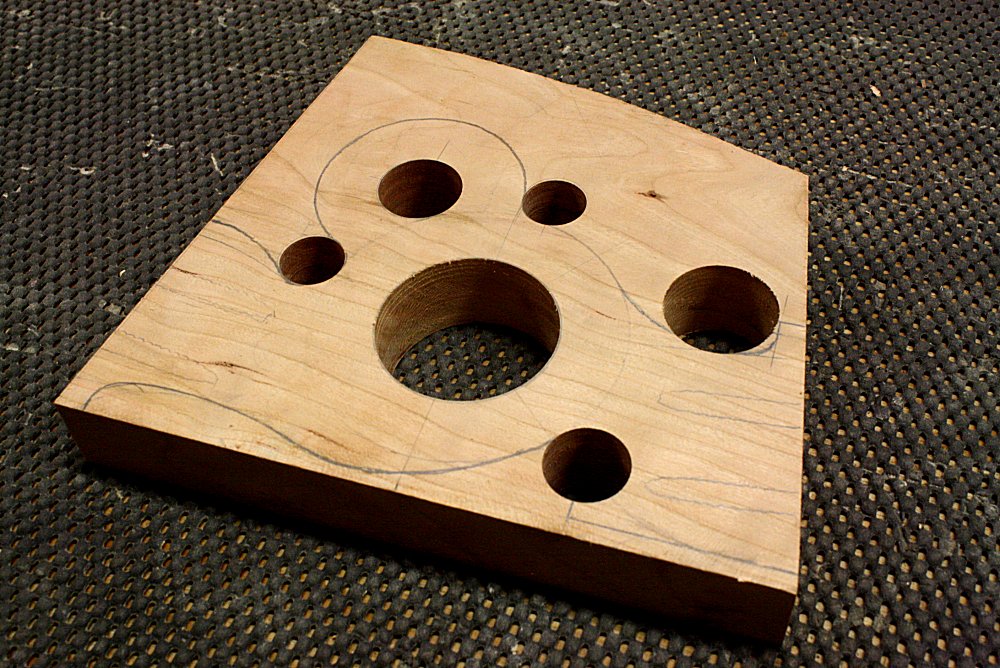
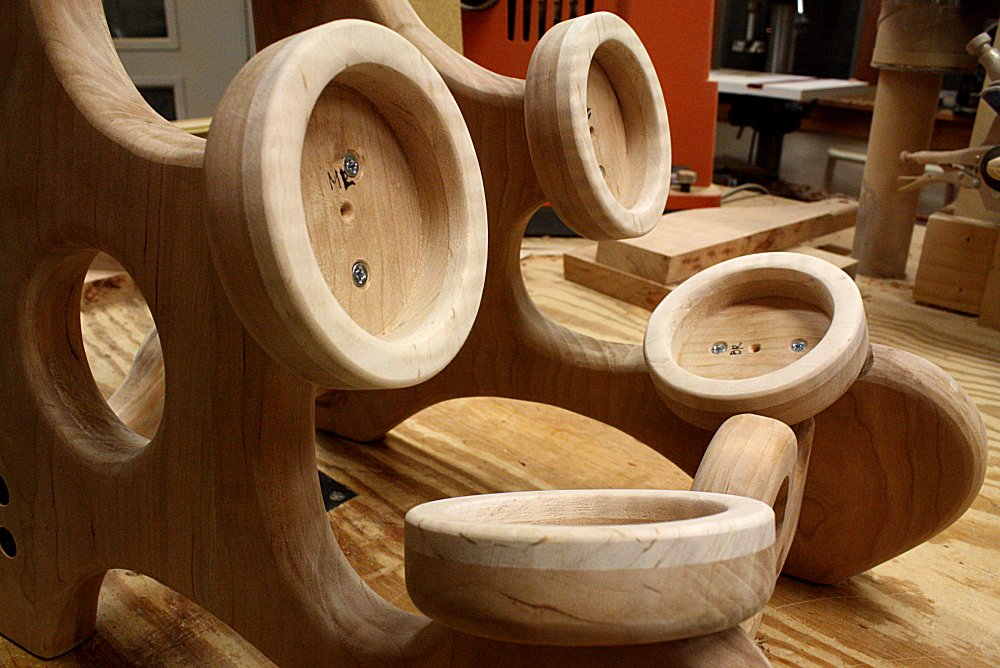
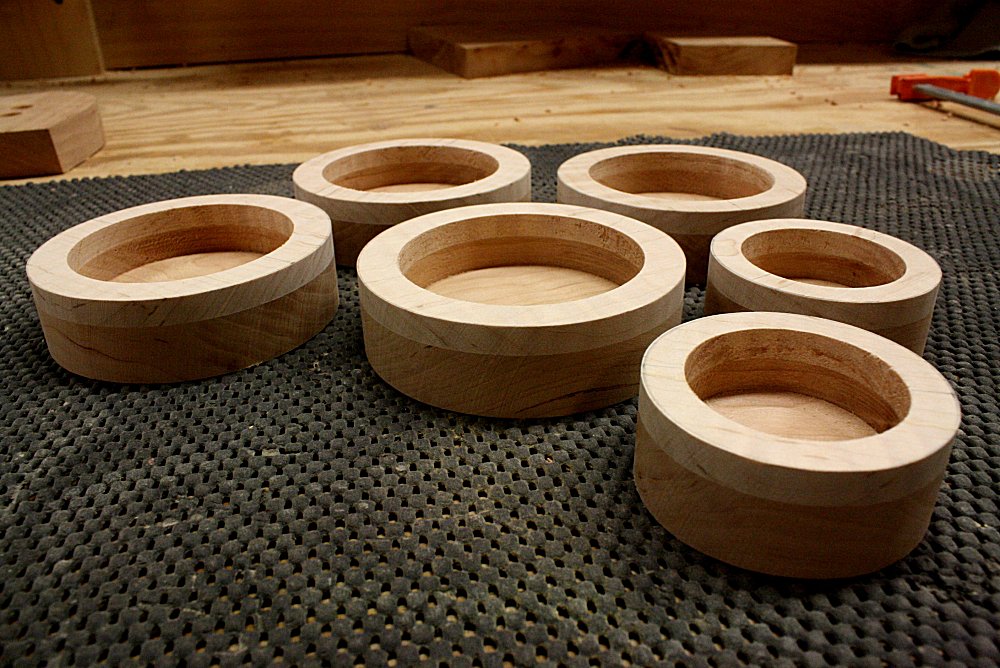 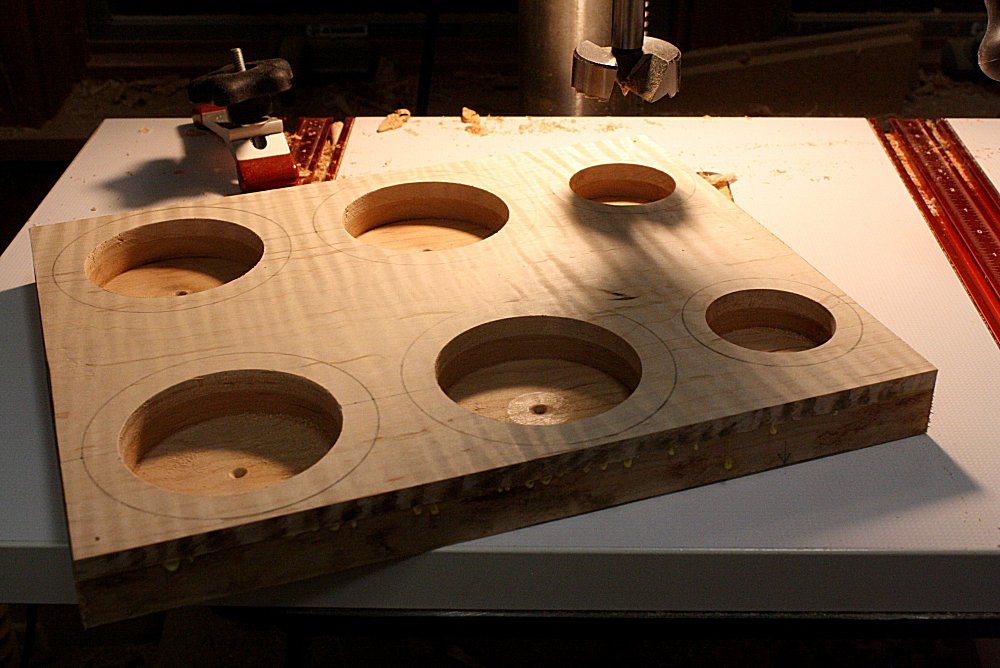 At
the drill press I removed the wood from the middle. The
temptation is to cut the pucks out first, but it's easier to clamp
to the table to drill when it's still a single slab. At
the drill press I removed the wood from the middle. The
temptation is to cut the pucks out first, but it's easier to clamp
to the table to drill when it's still a single slab.Then I cut the rough shape out with the miter saw and cleaned up the edges on the disk sander. We're not quite done shaping them yet, but we'll leave that for later. Yeah, it takes just a few big power tools to get the job done. |
||||
| November 4, 2018 | ||||
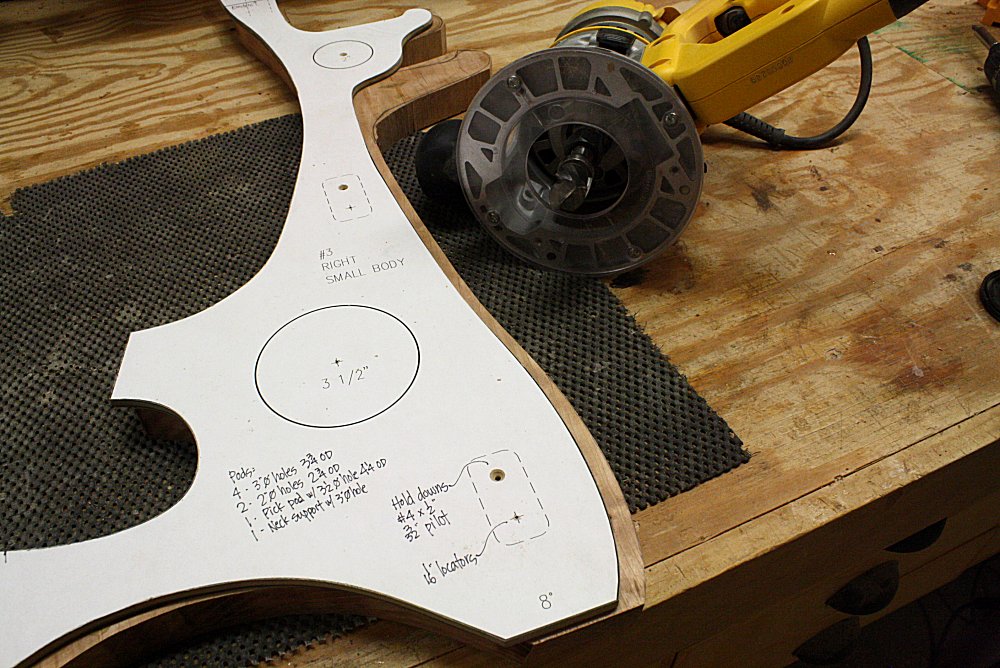
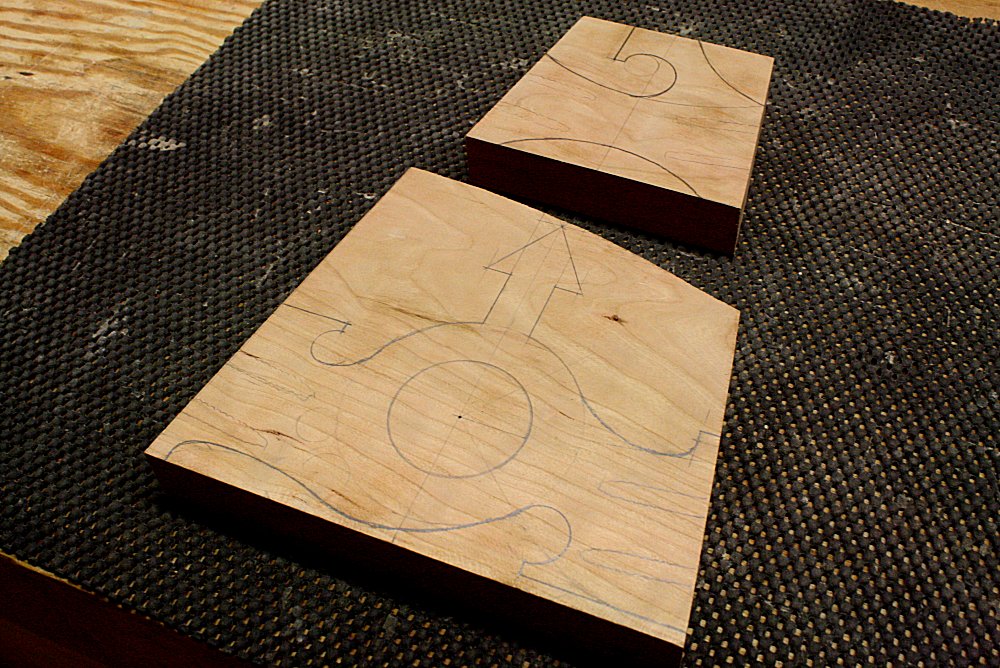  Since
Timothy lives halfway across the country and can't visit the shop in
person, he'll have to make a couple design decisions from the
comfort of home. There are three cross pieces which hold the
two side panels together (refer back to the
Stands
page to help visualize). As long as we don't cut into where
the screws will go, we can pretty much make any shape we want. Since
Timothy lives halfway across the country and can't visit the shop in
person, he'll have to make a couple design decisions from the
comfort of home. There are three cross pieces which hold the
two side panels together (refer back to the
Stands
page to help visualize). As long as we don't cut into where
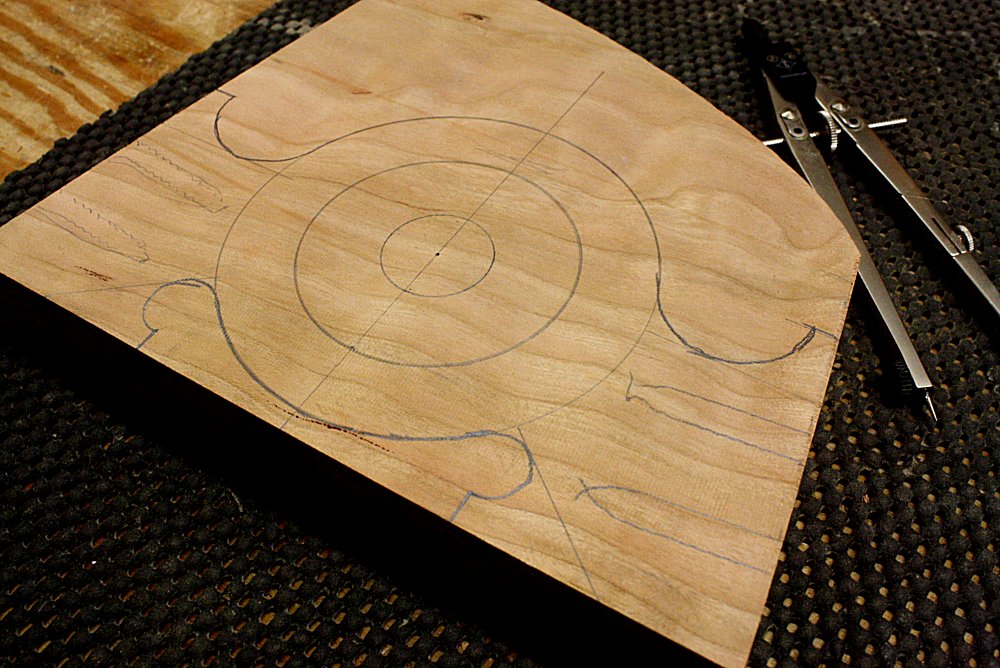
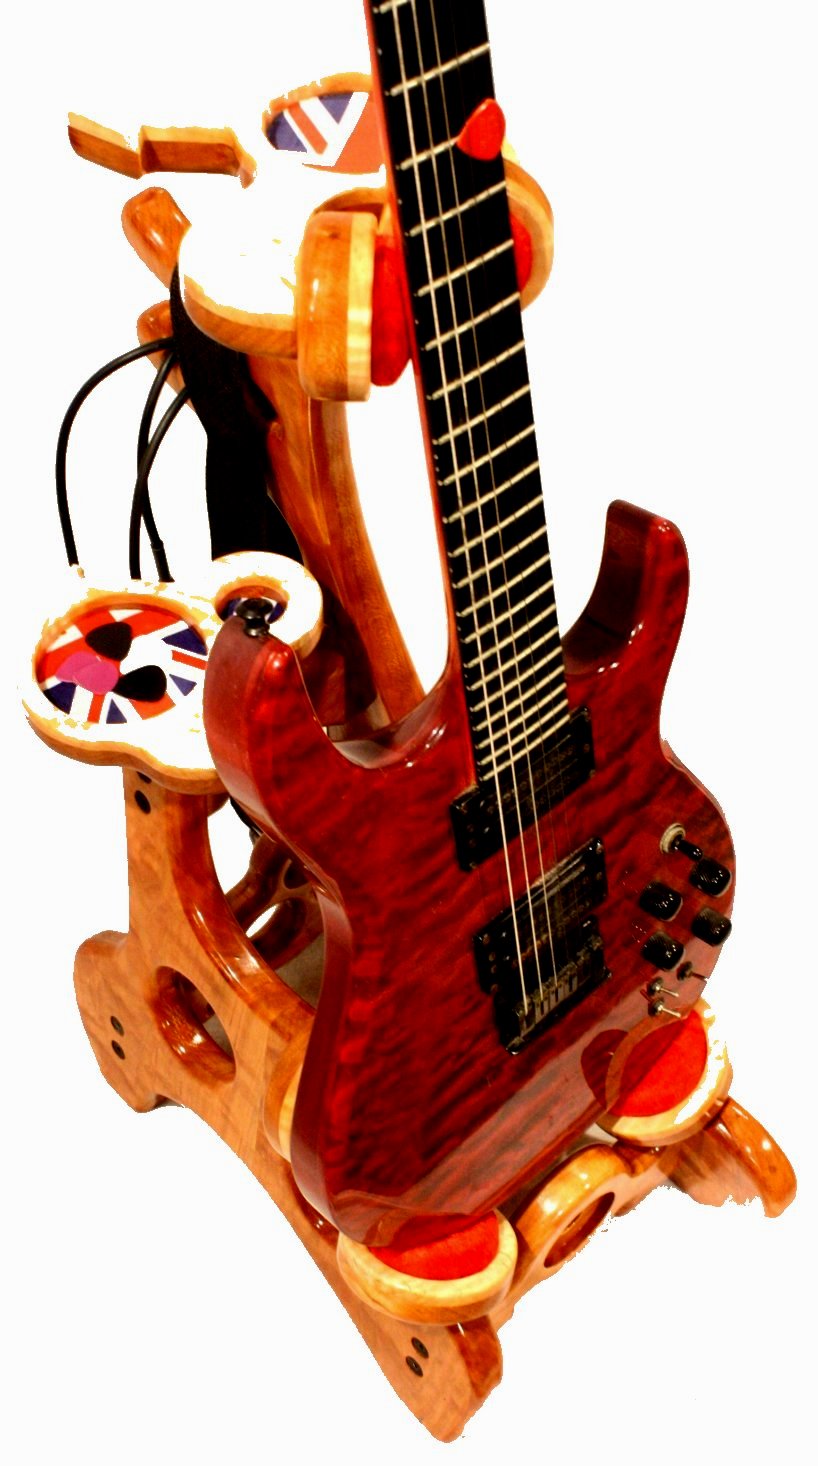
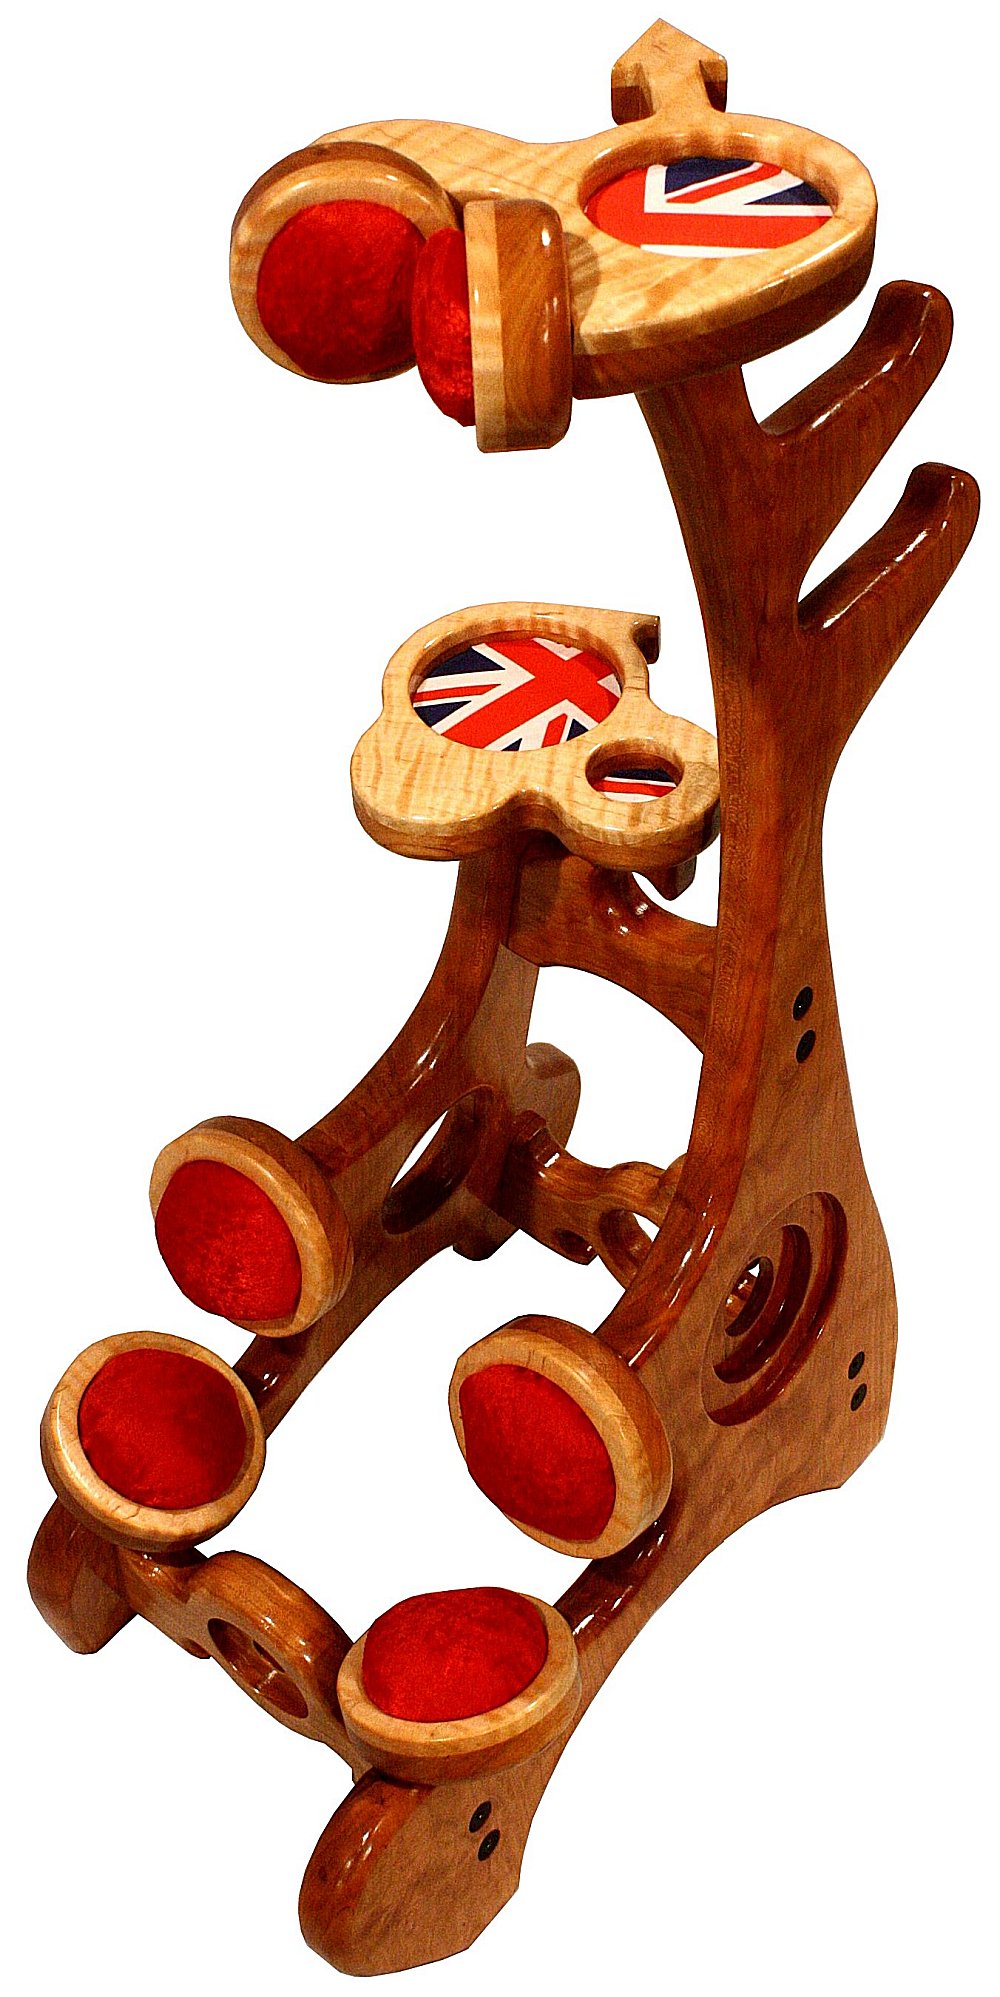
the screws will go, we can pretty much make any shape we want.For the front panel (left photo, click on it for a hi-res version), I did a riff on The Who's simple yet iconic logo of concentric circles. There are two braces on the back. The lower one shows a single circle, but adds the vertical arrow which appears on the font of that logo. The upper brace is just a simple, fluid compliment which will help support the storage tray above it. Let me know what you think, Tim. It's easier to make tweaks now rather than after the wood is cut. |
||||
| November 5, 2018 | ||||
 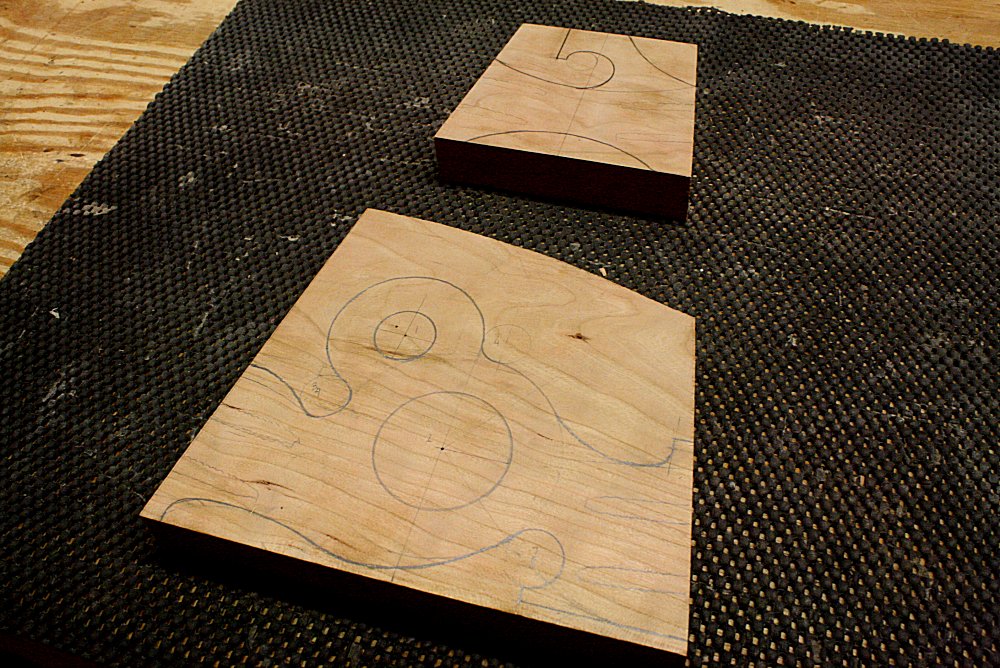 Timothy
got back quickly with a couple requested tweaks. He asked that
the arrow logo The Who used be taken off the back cross member and
displayed in a more visible location. Now it will be on the
top tray which supports the neck of the guitar. See the right
photo on the left of the block (please click on it for the hi-res
version). Check out that f'ing grain on that curly maple.
That's gonna pop when the finish goes on. Ironically, curly
maple predominantly comes from the East coast. This particular
slab came from a mill in Pennsylvania, not too far from where Tim
lives. So ship it to me and I'll turn it around and ship it
right back - after a little magic happens, of course. Timothy
got back quickly with a couple requested tweaks. He asked that
the arrow logo The Who used be taken off the back cross member and
displayed in a more visible location. Now it will be on the
top tray which supports the neck of the guitar. See the right
photo on the left of the block (please click on it for the hi-res
version). Check out that f'ing grain on that curly maple.
That's gonna pop when the finish goes on. Ironically, curly
maple predominantly comes from the East coast. This particular
slab came from a mill in Pennsylvania, not too far from where Tim
lives. So ship it to me and I'll turn it around and ship it
right back - after a little magic happens, of course.The back cross member changed to a couple organic rings that look like they're maybe trying to drift together into the classic concentric circle logo. See the left photo above. The whole concept for this line of guitar stands is that they look like they are some strange, alien plant. I try to inject them with a little DNA from Tim's concept of honoring his #1 band, The Who, and then we see what grows. Finally, the lower tray features large and a small storage areas and an extra little bump just because that f'ing awesome grain (to which I previously alluded) on the lower edge of that block demands to be seen. These trays will all have padded bottoms and I'll crop out a Union Jack flag for the lining. I haven't done that before. Super cool! Just enough to keep it classy without going over the top. |
||||
| November 8, 2018 | ||||
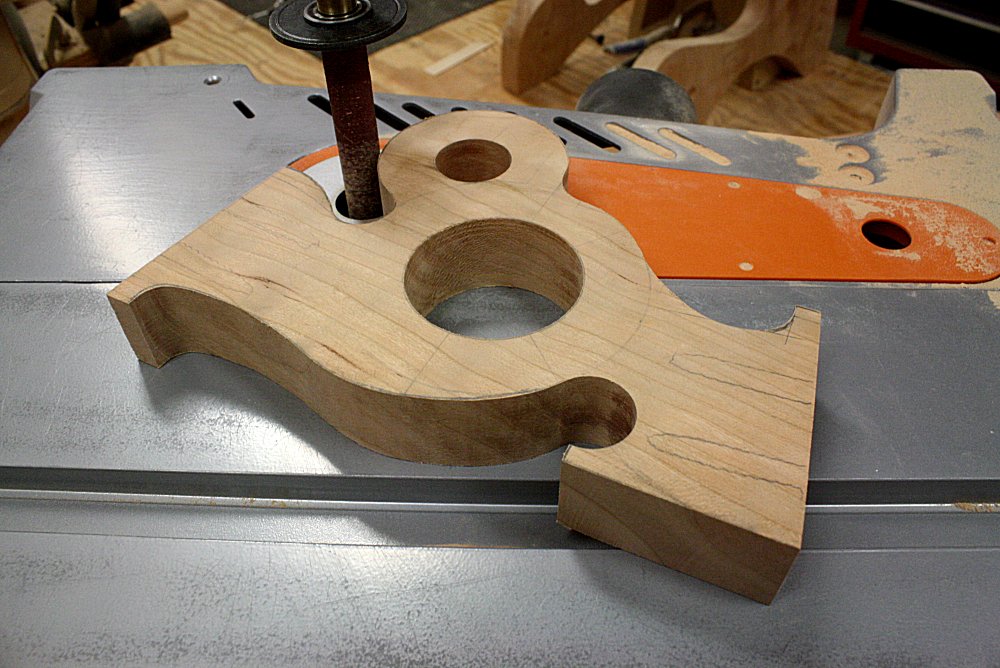 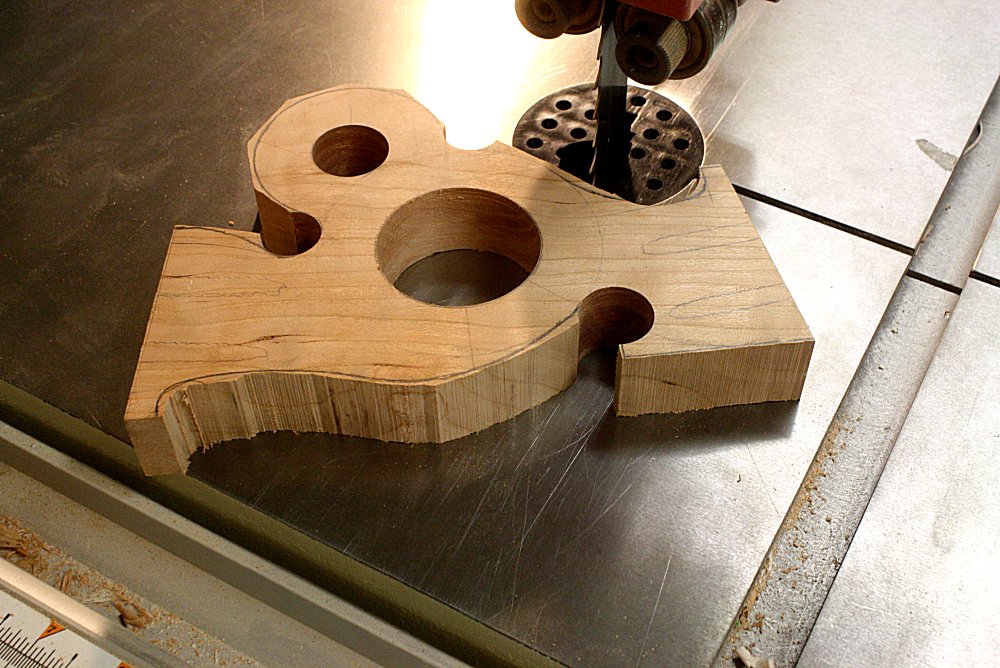  After
working with Timothy to sort out the details on the final shapes of
the cross members, we're a thumbs up to continue progress!
Here's a peek at the process. After
working with Timothy to sort out the details on the final shapes of
the cross members, we're a thumbs up to continue progress!
Here's a peek at the process.Some of these shapes have some pretty tight curves. I drill out the inside curves at the drill press. That will save a little time on the sanding later. Then it's off to the band saw to rough out the shape close to the lines. To finish it off I use a combination of a disc sander for the outside curves and a spindle sander for the inside curves. It takes about a half hour a piece to get it fine tuned and smooth, and we still have a little shaping to come later on. |
||||
| November 10, 2018 | ||||
   I
got all the cross members and storage trays shaped. Time for a
dress rehearsal. Woohoo! Everything has to fit tight and
the stand has to sit flat. Then take it all apart again. I
got all the cross members and storage trays shaped. Time for a
dress rehearsal. Woohoo! Everything has to fit tight and
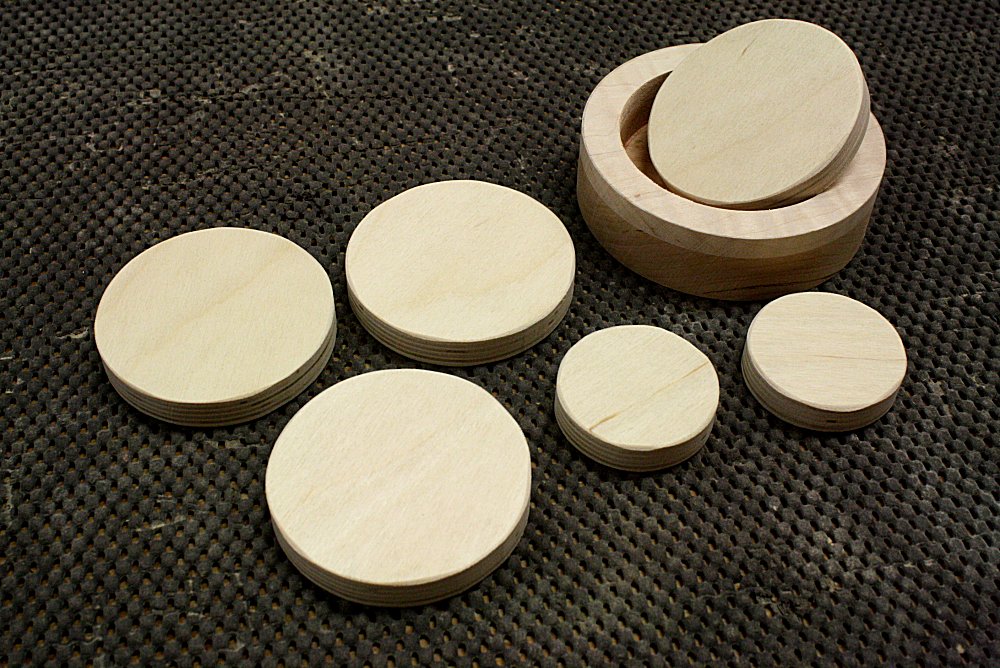
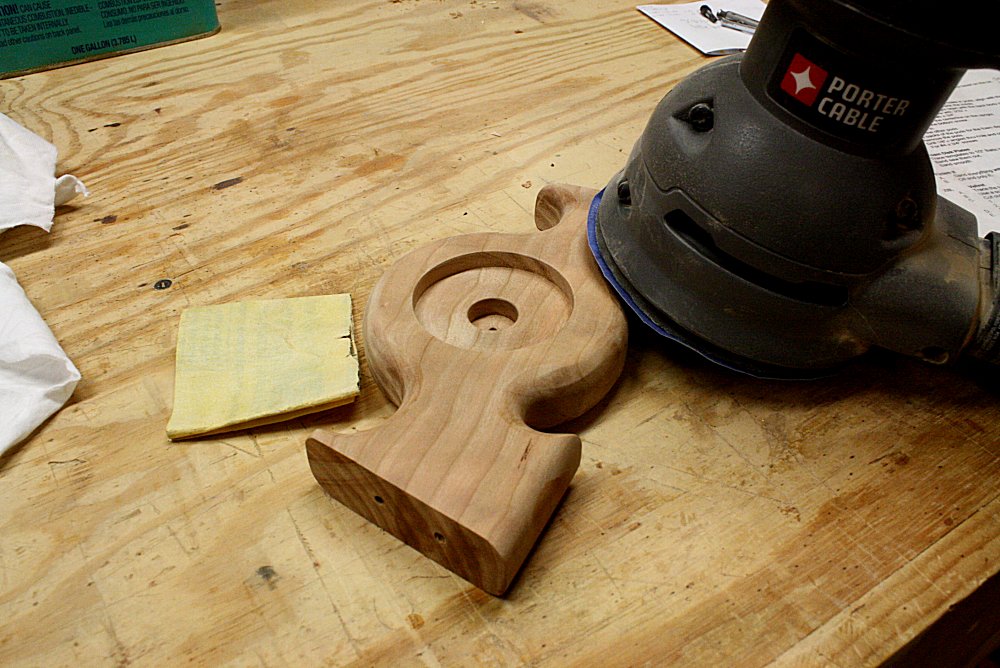
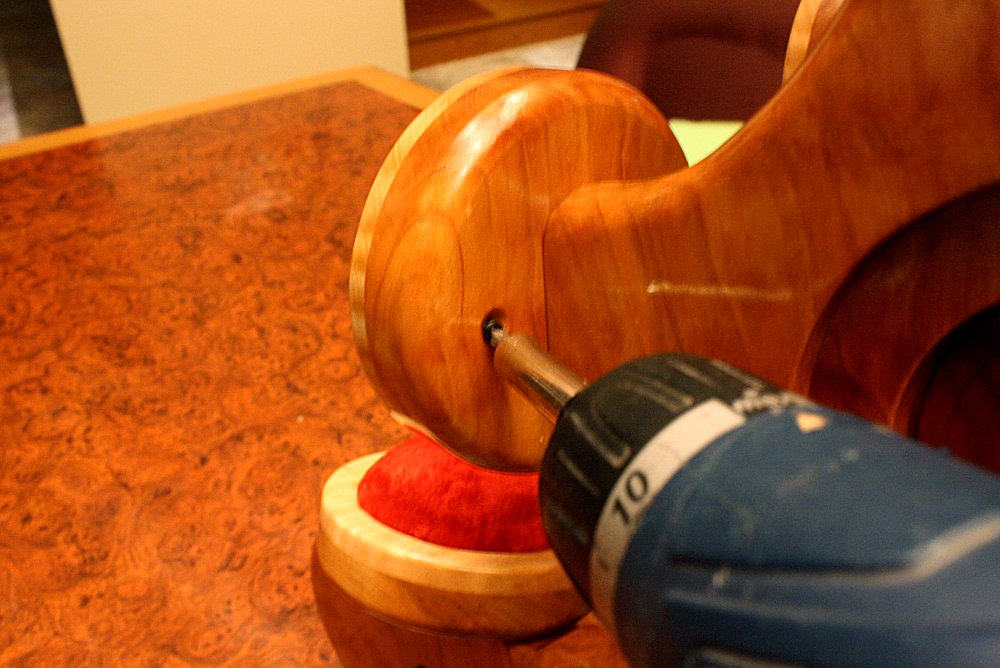
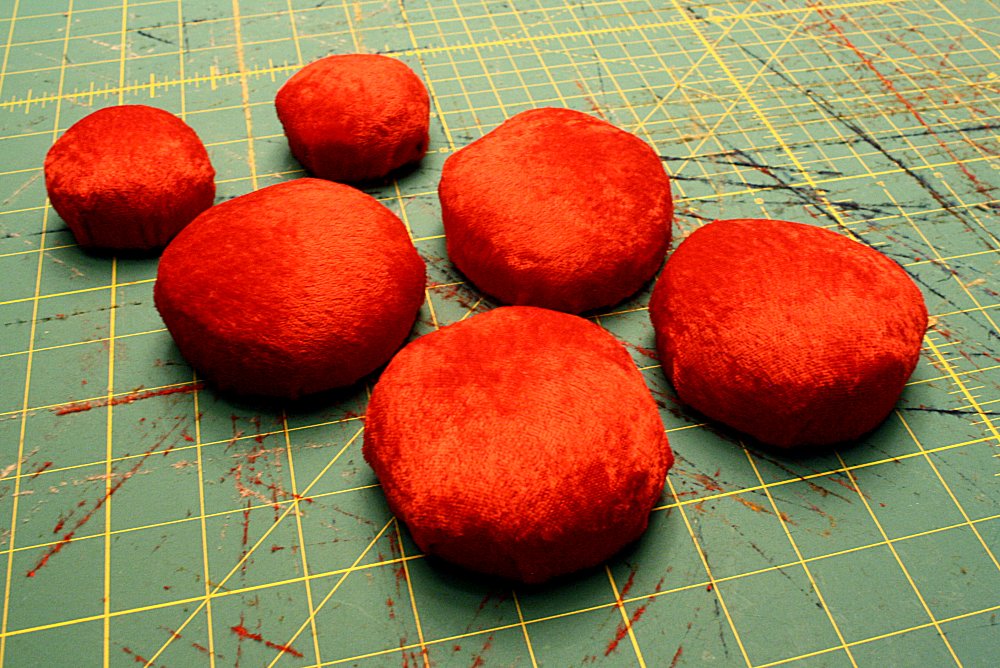
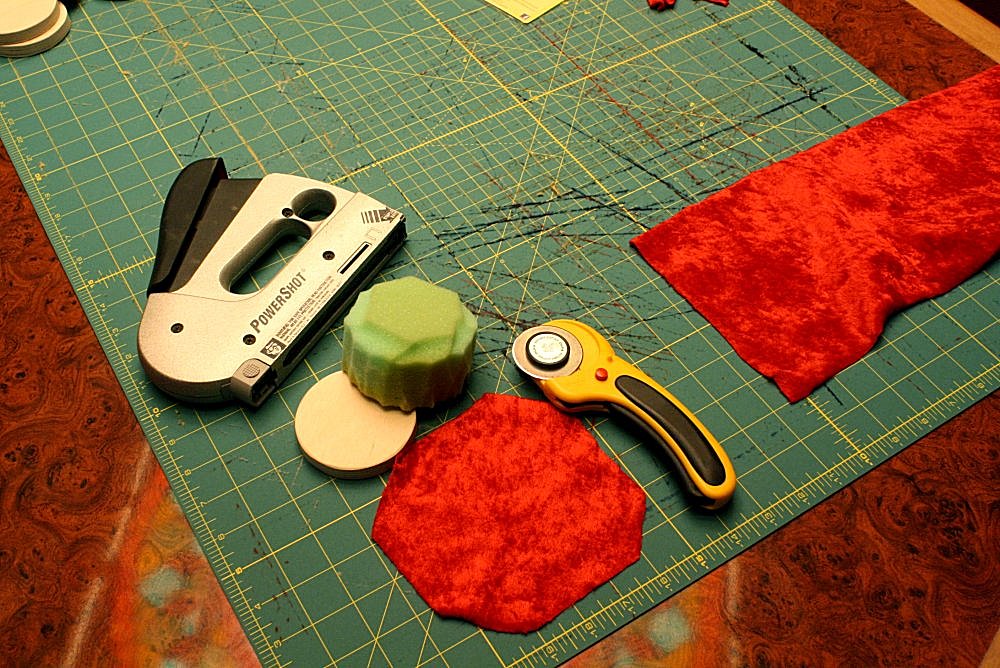
the stand has to sit flat. Then take it all apart again.I had a little extra time before beer-thirty so I made a bunch of little discs. The padded supports (pods) are velvet wrapped pieces of foam. We need something substantial to staple that velvet to before we shove it in that cup. It also gives us something to screw into to secure it. It's kinda upholstered like that chair you're sitting in right now. It might not make complete sense now. Trust me; we need the discs. We also need a beer. If you're interested, Founder's Barrel Runner tonight, 11.1%. |
||||
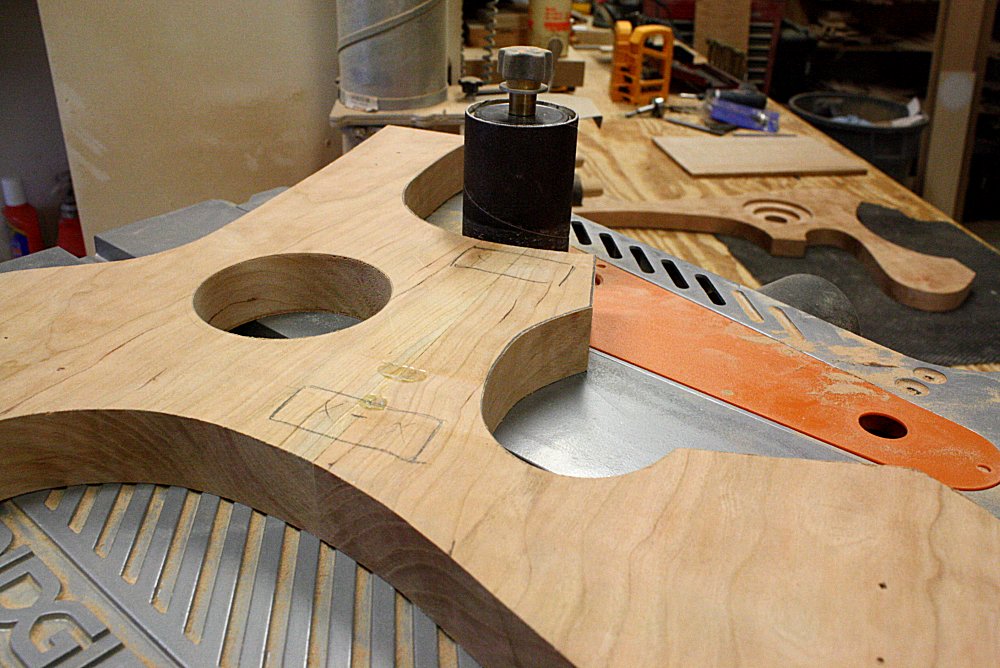
| November 11, 2018 | ||||
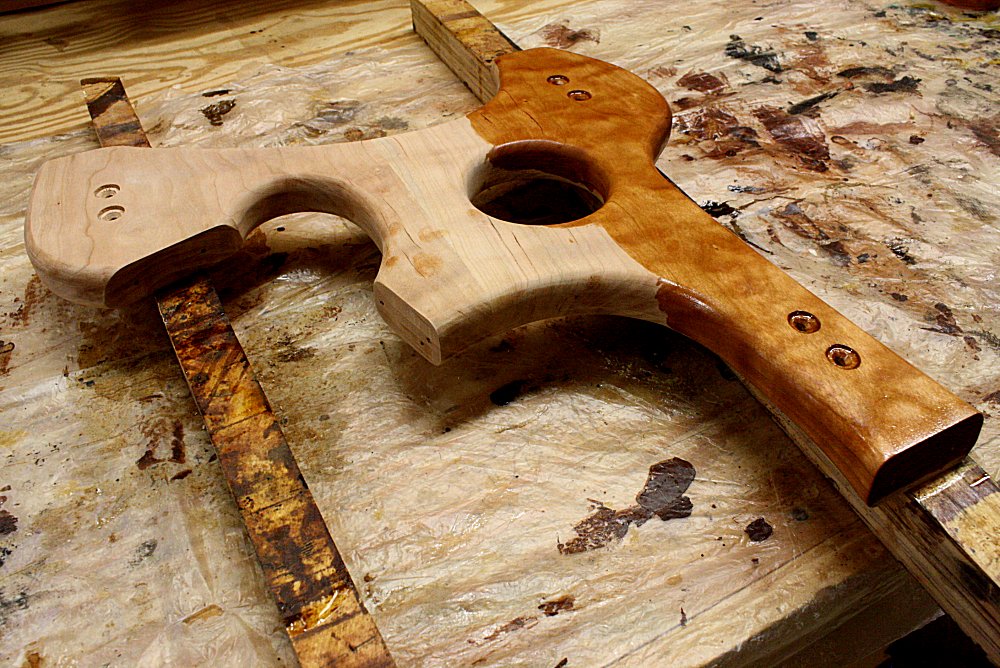
 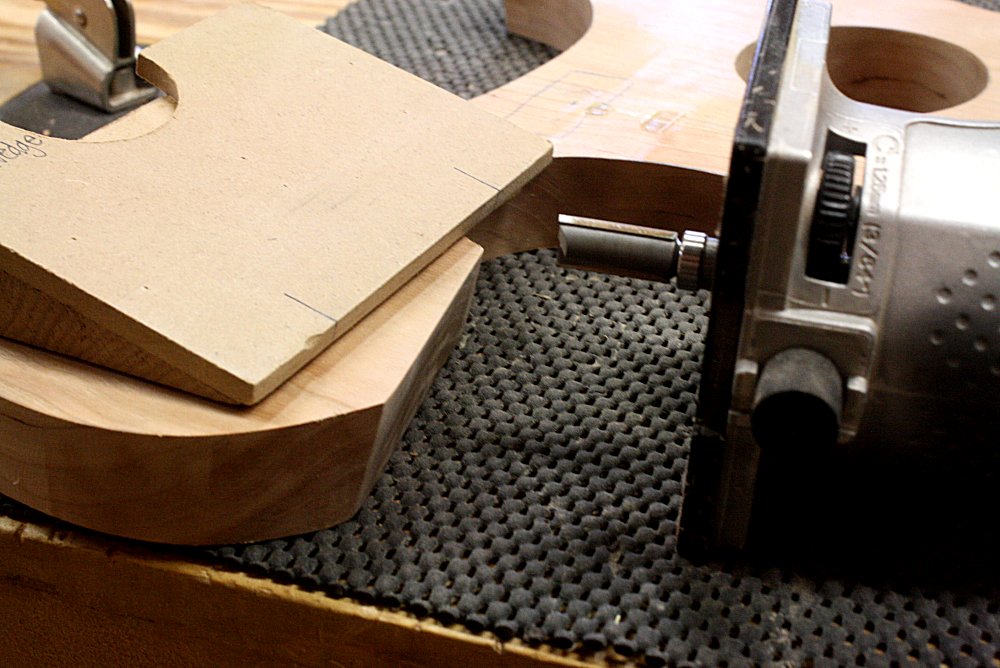 The
side panels angle in for stability, but I still have to taper the
area where the guitar will sit so the padding is perpendicular to
the curving bottom of the guitar. A small sloped platform and
a router will give it just the right cant. The
side panels angle in for stability, but I still have to taper the
area where the guitar will sit so the padding is perpendicular to
the curving bottom of the guitar. A small sloped platform and
a router will give it just the right cant.All the pieces are a little chunky looking with their square edges. To give them a softer, more organic appearance, I round over all the corners with a router. There's a lot of little details going on here, all of which will make this a special piece of art. 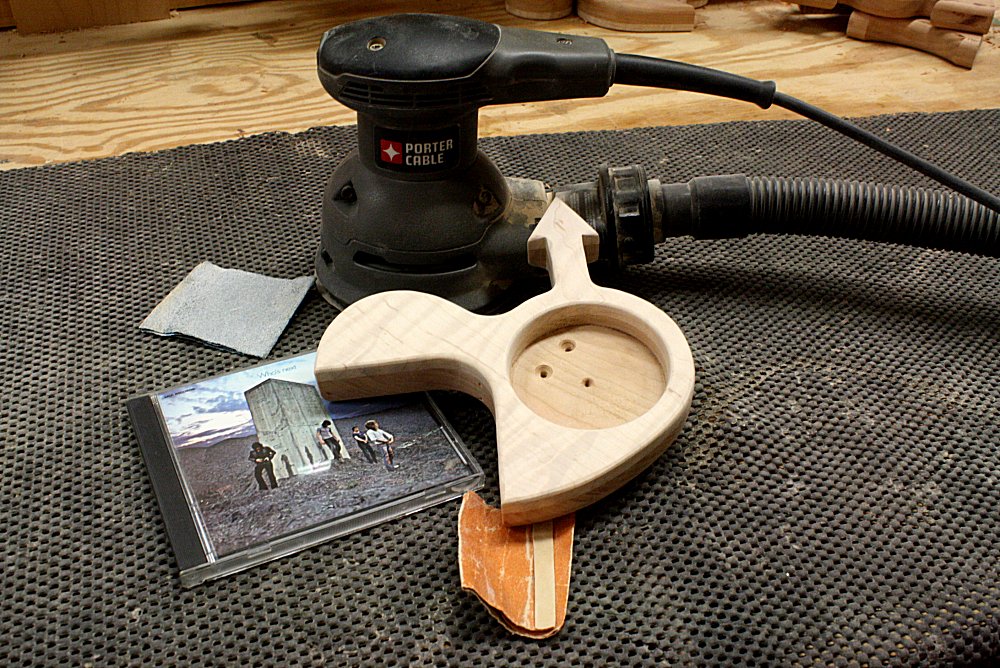 My
favorite time is sanding ... said no woodworker ever. It's a
necessary evil. If you want the finish to go on right, you
have to put in the prep work. To make those couple hours go by
little easier, I plugged in some old school jams in hopes that the
rock gods will invoke some blessings upon this project. This
is only the first round of sanding; there will be another.
Fortunately I have more CDs. My
favorite time is sanding ... said no woodworker ever. It's a
necessary evil. If you want the finish to go on right, you
have to put in the prep work. To make those couple hours go by
little easier, I plugged in some old school jams in hopes that the
rock gods will invoke some blessings upon this project. This
is only the first round of sanding; there will be another.
Fortunately I have more CDs. |
||||
| November 14, 2018 | ||||
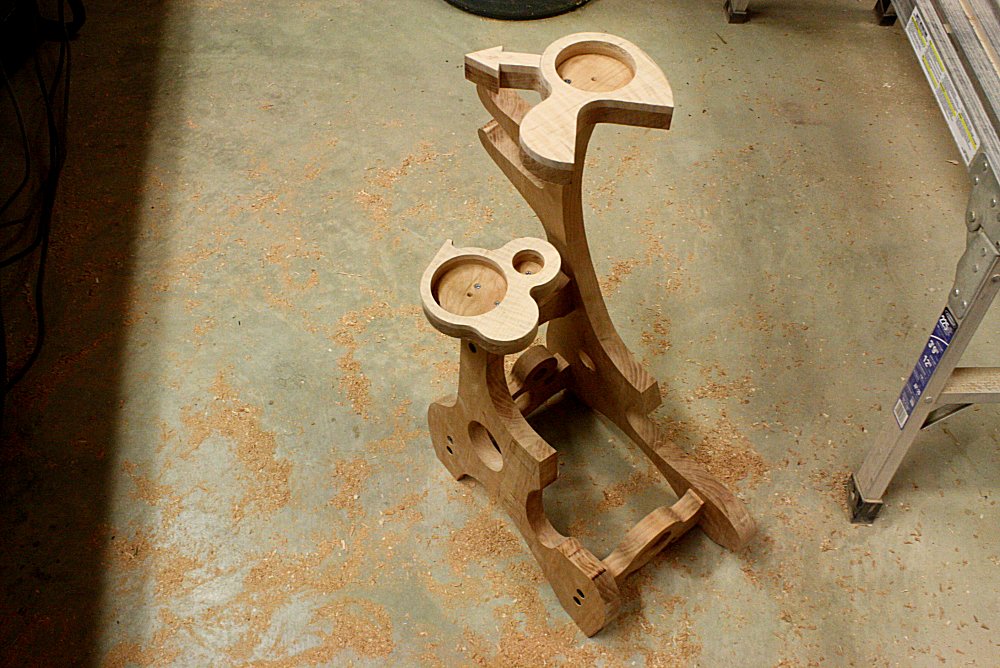
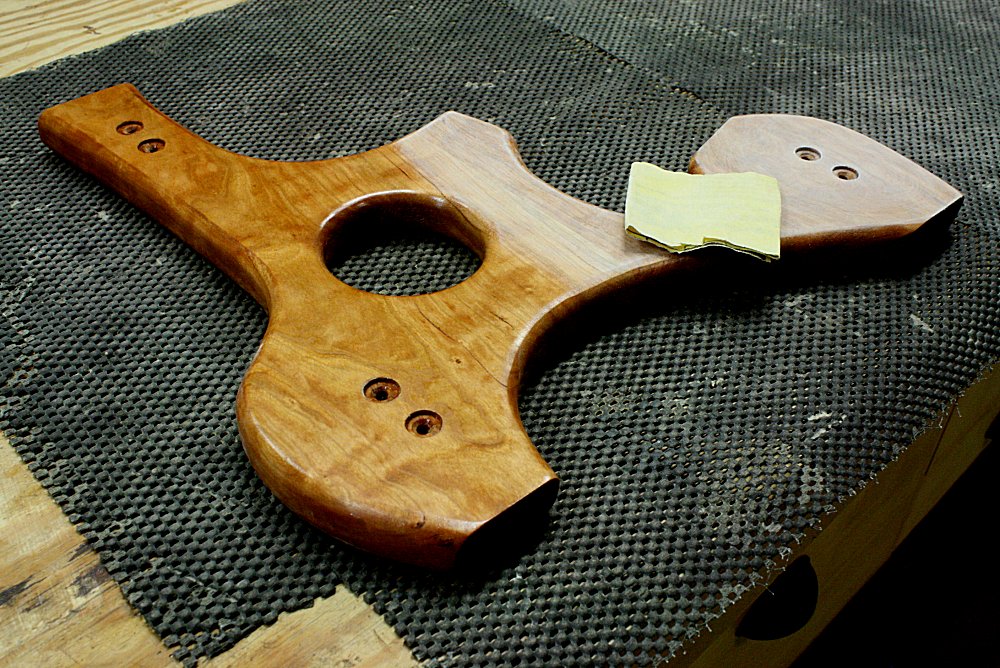
 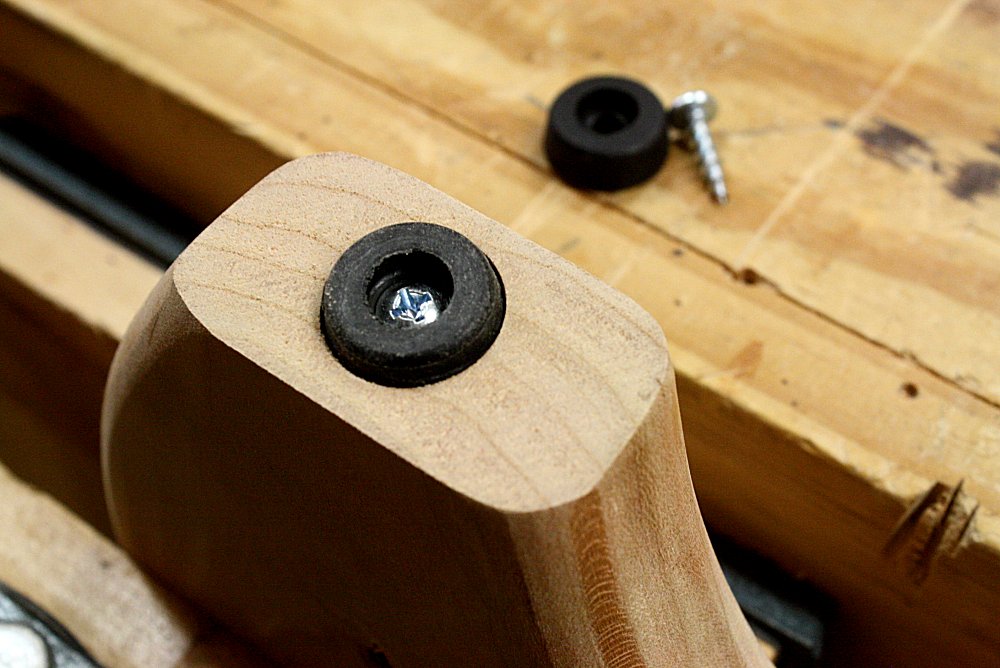 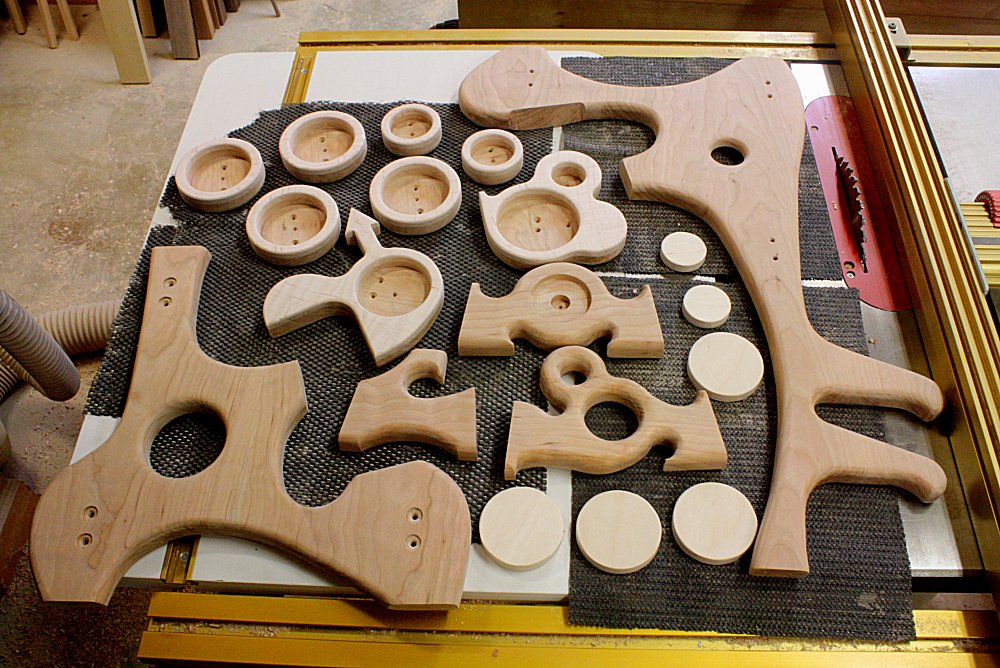 Here's
a quick shot of the 19 pieces that make up the stand. You
wouldn't think there'd be that many, but here they are. Here's
a quick shot of the 19 pieces that make up the stand. You
wouldn't think there'd be that many, but here they are.How about some rubber feet? I don't care so much about the floors getting scratched; I just don't want the stand to get scratched. I recess the rubber feet. They're low profile to start with, but you still don't want the stand to look like it's floating above the floor. I take extra care here so that the stand will sit flat and not rock around. The recesses all have to be the perfect depth. I reassemble the whole stand again to properly align and install the "pods", the cups that will hold the foam padding the guitar will rest on. Everything has to plane out correctly. Now I'll communicate with Timothy a little via email to tie down the finish approach and the color of the crushed velvet. Stay tuned to see what he decides! |
||||
| November 17, 2018 | ||||
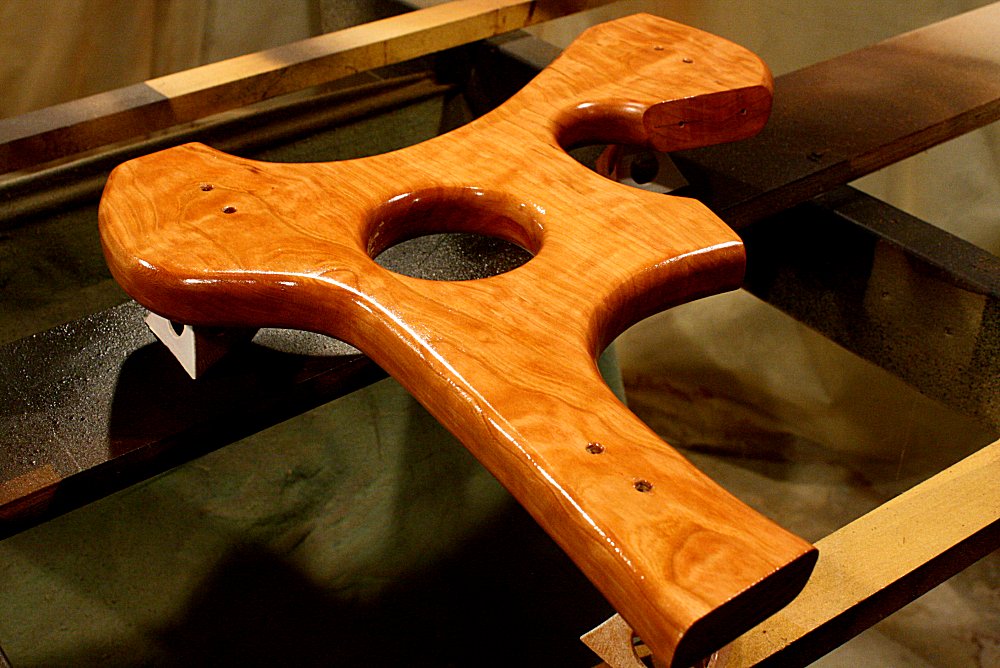
  We're
in the home stretch now! I did the final sanding of everything
up to 220 grit. Super smooth. Timothy chose to go with a
simple oiled finish. Linseed oil lends a warm amber color
which works great on cherry wood. It really soaks into and
pops the grain, richens up the color quite a bit. The figured
cherry ripples almost in 3D when you walk by it. It's called
chatoyance, and it's a pretty cool effect. That cherry wood
was a rare and fortunate find. We're
in the home stretch now! I did the final sanding of everything
up to 220 grit. Super smooth. Timothy chose to go with a
simple oiled finish. Linseed oil lends a warm amber color
which works great on cherry wood. It really soaks into and
pops the grain, richens up the color quite a bit. The figured
cherry ripples almost in 3D when you walk by it. It's called
chatoyance, and it's a pretty cool effect. That cherry wood
was a rare and fortunate find. |
||||
| November 19, 2018 | ||||
  Now
it's time to spray on some lacquer! After a couple coats
yesterday, it started looking pretty nice and shiny. So today
it's time to sand that shine off. This knocks down all the
little bumps so the next lacquer layers go down nice and smooth.
Lacquer dries quickly, so I should be able to get 4 coats down
tonight. However, Monday night football is proving to be
particularly distracting. Now
it's time to spray on some lacquer! After a couple coats
yesterday, it started looking pretty nice and shiny. So today
it's time to sand that shine off. This knocks down all the
little bumps so the next lacquer layers go down nice and smooth.
Lacquer dries quickly, so I should be able to get 4 coats down
tonight. However, Monday night football is proving to be
particularly distracting. |
||||
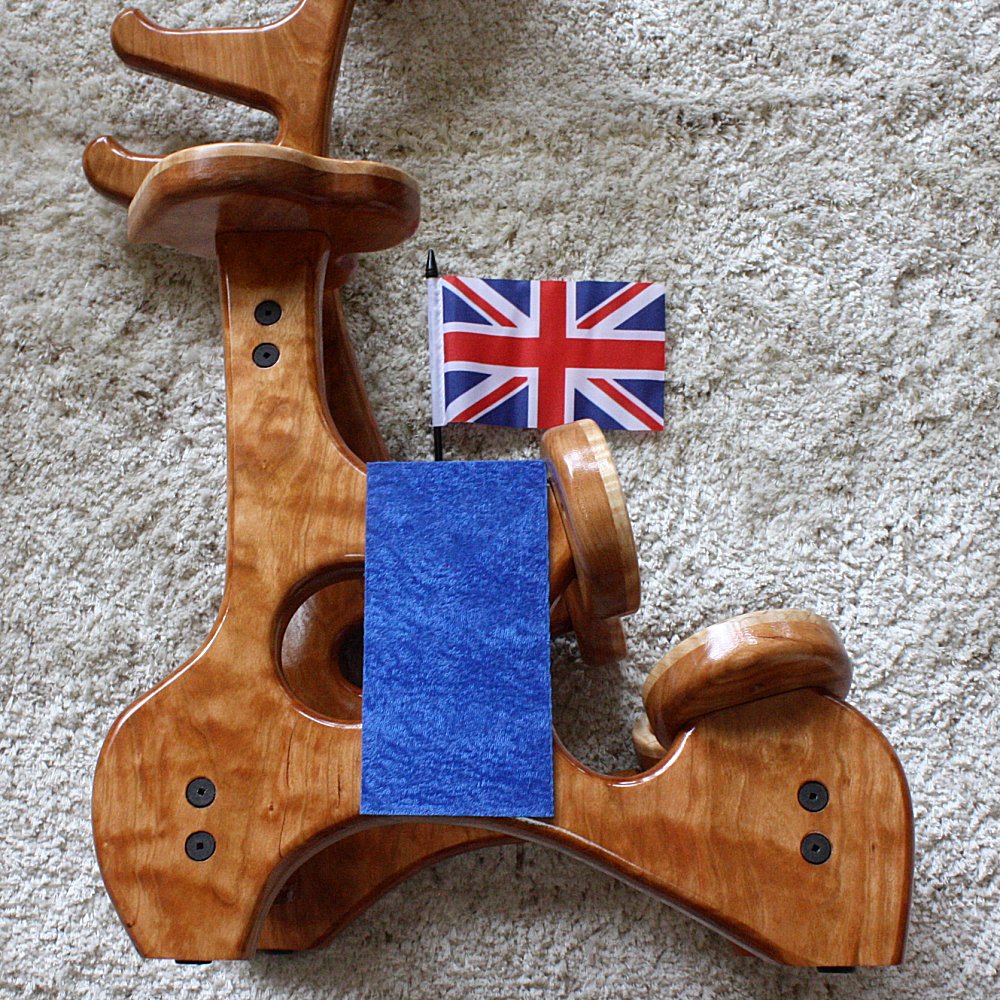
| November 23, 2018 | ||||
|
After a few days of watching lacquer dry, it's time for assembly and
some color picking. If you haven't yet guessed, Timothy likes
The Who. We're going to use the British Union Jack flag to
line the storage trays, but Tim still needs to pick a color for the
velvet which will wrap the foam cushions the guitar will rest on.
He narrowed it down to red, white, and/or blue to coordinate with
the flag. The pads can all be the same color or mixed up.
Difficult decisions. Remember, you can click on the thumbnails
for the hi-res photos. Admire that curly cherry grain while
you're there. |
||||
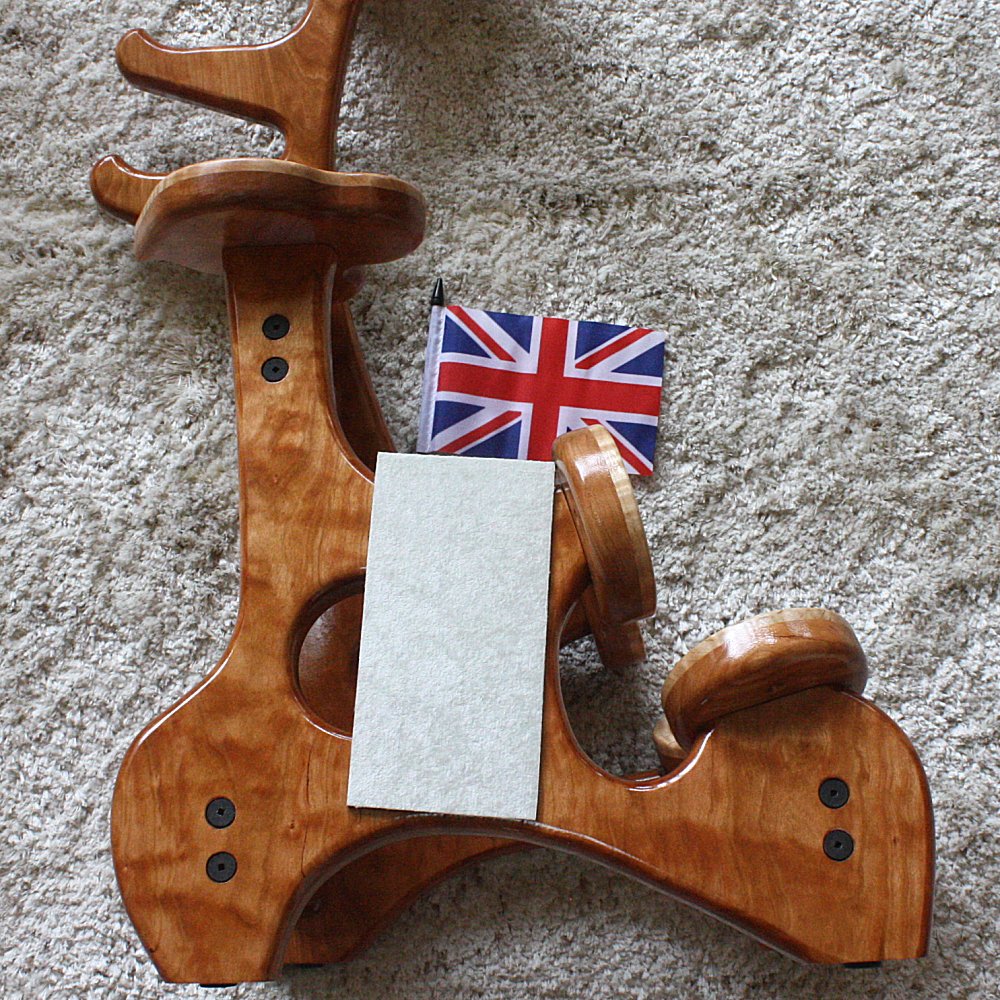 ▲White |
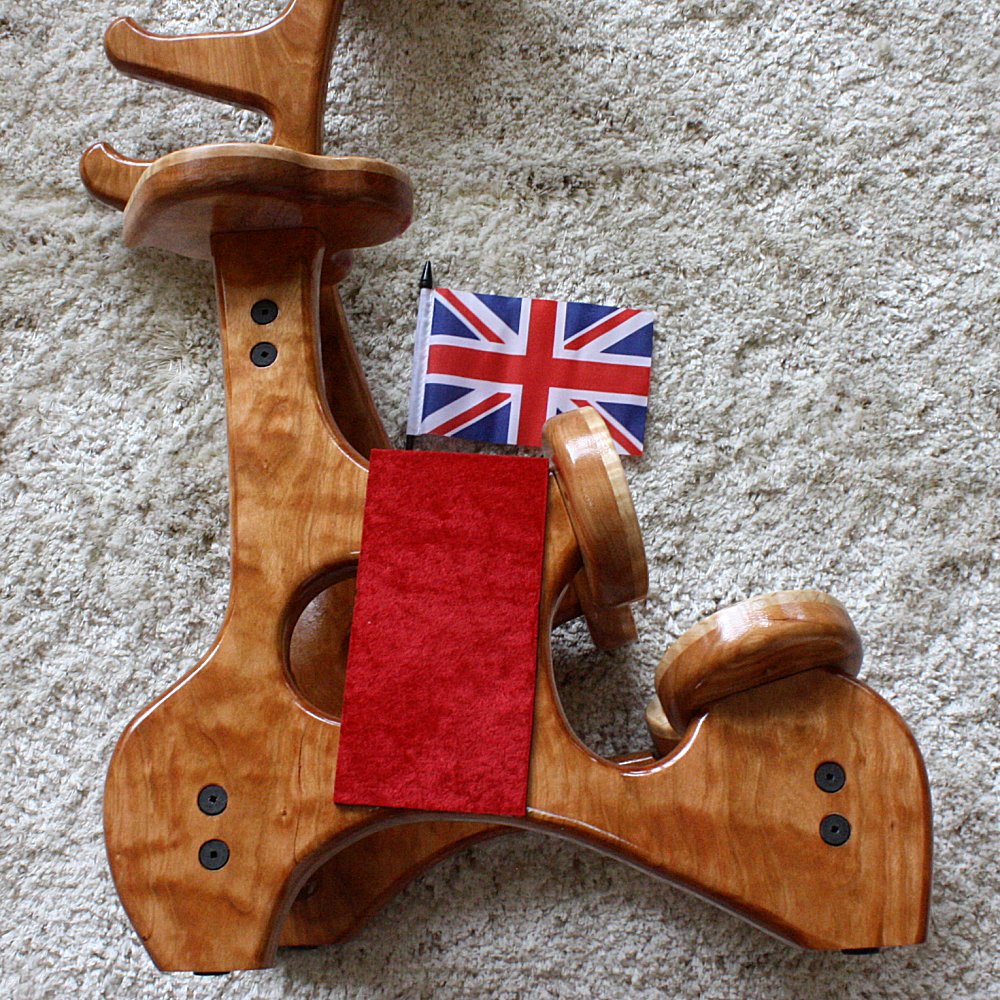 ▲Light Red, matches the flag more closely than the dark red |
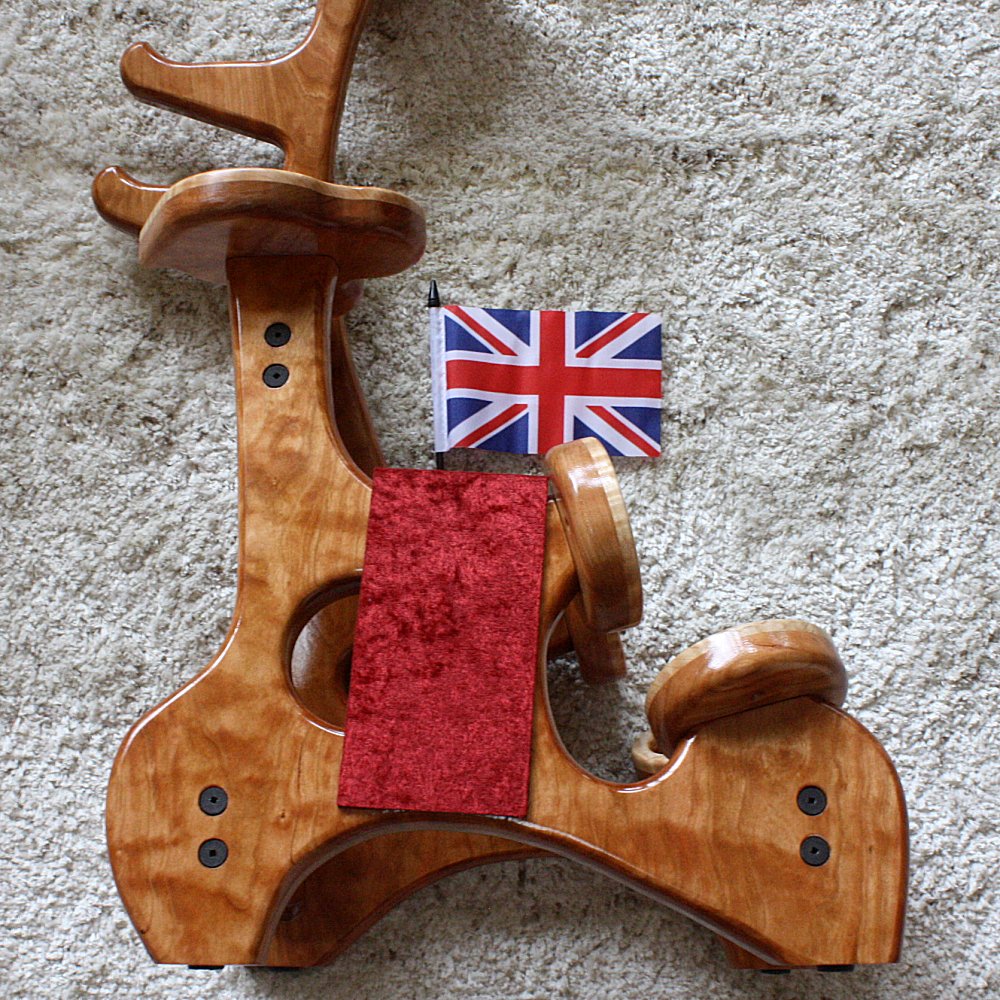 ▲Dark Red |
 ▲Light Blue |
 ▲Dark Blue, matches the flag more closely than the light blue |
|
Browse back
at the
Stands page to see examples of a
few of these colors installed, or at least see how the contrast
works in situ. Tim, go with your gut, your vision.
You'll only have to look at this for the rest of your life.
Let me know what you think. |
||||
| November 24, 2018 | ||||
   If
you do woodwork, you usually have to do a little something else,
too. The guitar can't rest on just wood. You have to
have a little padding in there. I cut some foam into a small
puck, put it on a plywood disc, and wrapped it in red velvet.
Repeat. Then I screw the little upholstered pucks in from
behind. Very nice, a little color, a little cushion. If
you do woodwork, you usually have to do a little something else,
too. The guitar can't rest on just wood. You have to
have a little padding in there. I cut some foam into a small
puck, put it on a plywood disc, and wrapped it in red velvet.
Repeat. Then I screw the little upholstered pucks in from
behind. Very nice, a little color, a little cushion. |
||||
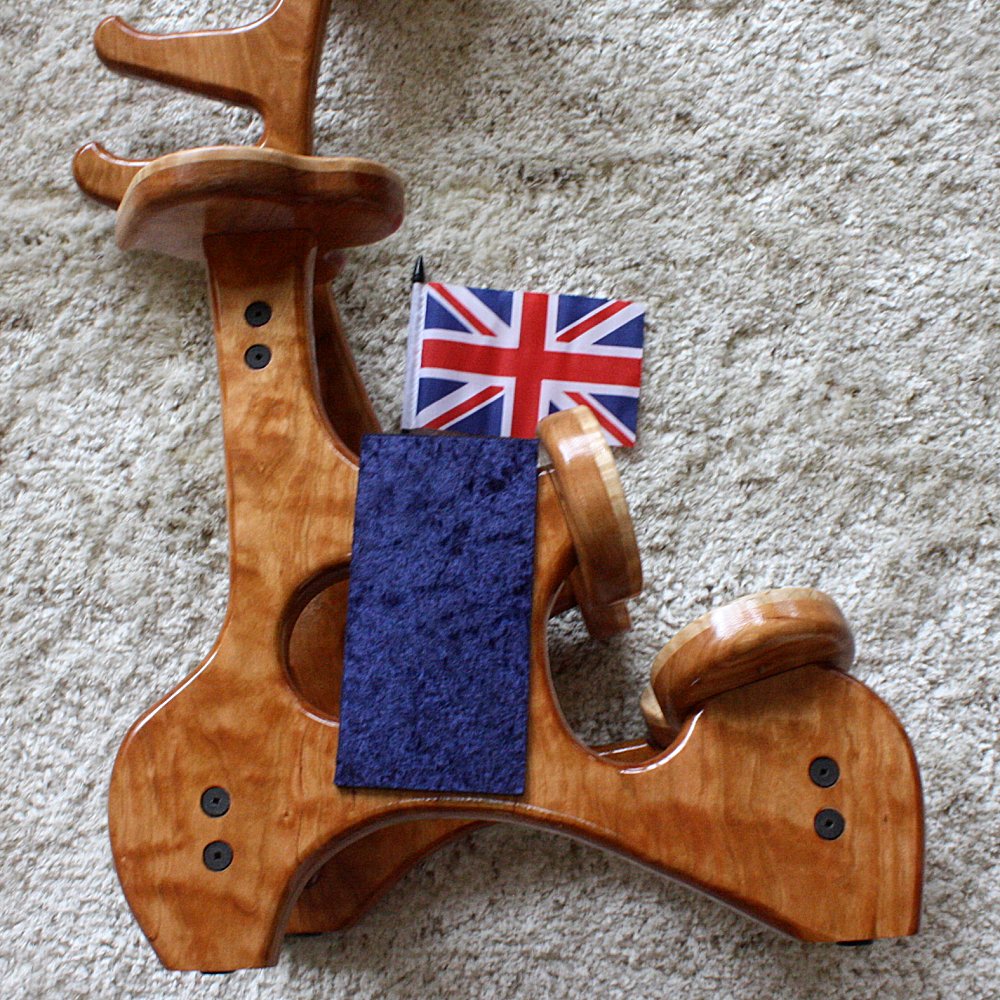
| November 26, 2018 | ||||
  Another
one for the record books! Another
one for the record books!Timothy helped design his own dream guitar stand: ● Timothy picked the wood. I found a great piece of figured cherry that fit the bill perfectly. He went with some premium curly maple accents for a little extra punch. ● Timothy got to pick the velvet color. He chose red to coordinate with his guitar. ● Timothy even got to select the color of the screws. I can get this decorative hardware in a few finishes. He liked what the black did for the ensemble. ● Timothy likes The Who, and who shouldn't? I worked the band's logo into several spots on the stand, even with lining the storage trays with little Union Jacks. It conveys the concept without it going cheesy over the top. Keep it classy. Even though Timothy doesn't live close to me, he could participate in the build right here on this blog. He got to make choices along the way so he could be assured that he got exactly what he envisioned. My other guarantee: a LIFETIME guarantee - with no fine print. I build things to last, and the quality is immediately noticeable and undeniable. Sure a Guitar Center special stand might have worked, but this guitar stand will occupy a prominent space in Timothy's studio and will hold his most precious possessions. It deserves a throne of honor and one that inspires. I'm glad I could be a part of making it. |
||||